How to Sign a PDF Document
6 min read
It’s easy to sign a PDF document, whether you have simple agreements like permission slips, or more important documents like NDAs and employment contracts to sign. In this guide, we’ll show you step-by-step how to add a signature to a PDF file on any device.
How to Electronically Sign a PDF Document?
To sign a PDF electronically or insert your electronic signature into it (as a scan), you have two options:
- If you want to sign an informal or basic PDF, use a PDF reader like Mac Preview or Adobe Reader.
- If you want to sign an official and important PDF, use an eSignature platform that offers secure signatures.
🧠 Did you know? You can use Advanced Electronic Signatures (AES) and Qualified Electronic Signatures (QES) to sign official and important documents to make them legally binding? They offer heightened security and legal validity with features like identity verification and audit trails, that guarantees compliance across jurisdictions.
Sign
any
Document in Less than
a Minute.
1. Add eSignature Using a PDF Reader
Most PDF readers like Preview (for Macbook users) or Adobe Acrobat have a “Fill & Sign” feature. This feature allows you to create and place your signature on the document.
Assessment
Pros
- ✅ Quick and easy for basic signing needs.
- ✅ No need for an internet connection.
- ✅ Free options available.
Cons
- ❌ Limited security features.
- ❌ May not be legally binding for all types of documents.
- ❌ Lacks advanced features like tracking and multiple signer support.
Here’s how it works on each.
Guide: eSign PDF in Mac Preview
1. Open Your PDF in Preview
Double-click the file to open it in Preview. If Preview is not your default PDF viewer, right-click the file, select “Open With,” and choose “Preview.”
2. Access Markup Tool
Once your PDF is open in Preview, click on the “Show Markup Toolbar” button. This button looks like a little toolbox and is located at the top of the window. If the Markup Toolbar is already visible, you can skip this step.

3. Setting Up Your Signature
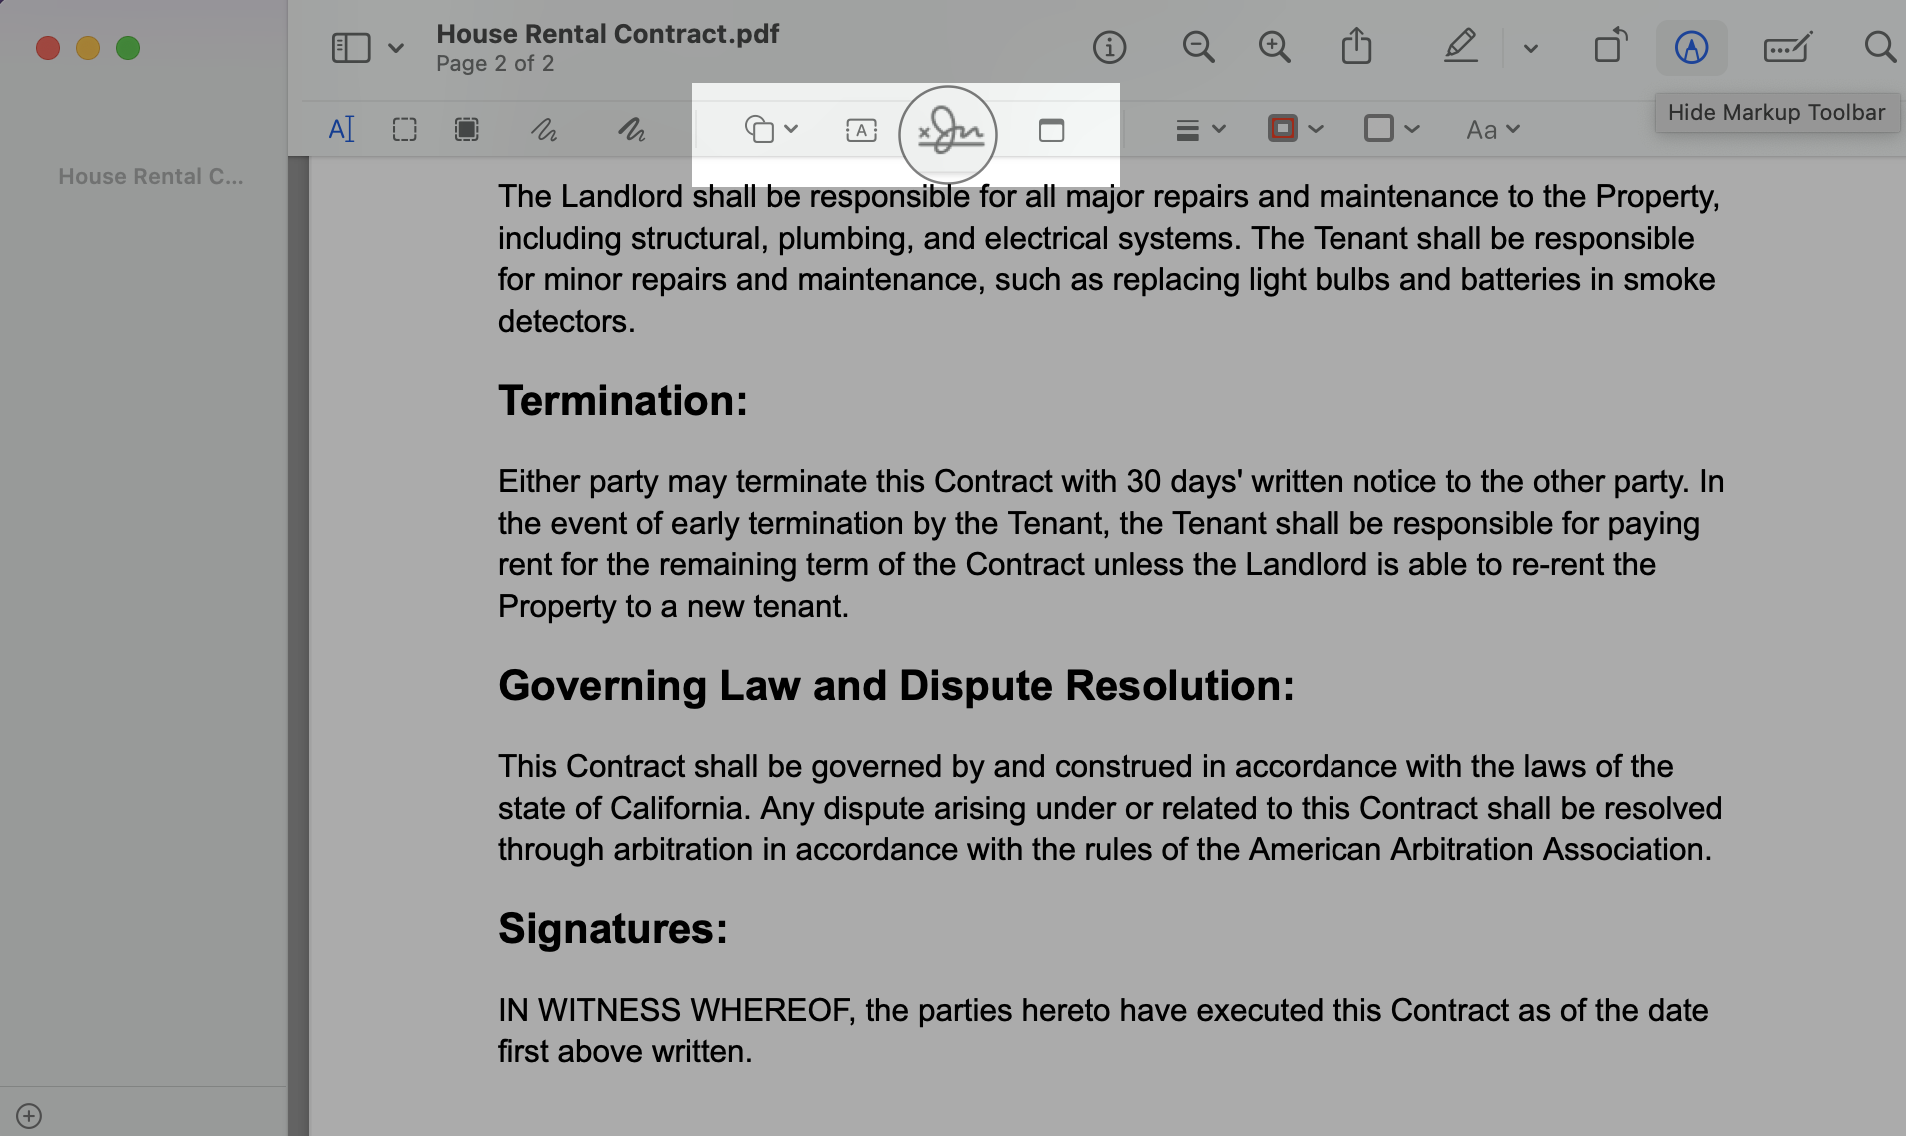
In the Markup Toolbar, click on the “Sign” button. This button looks like a signature and is usually located near the text and shape tools. A drop down menu will appear.
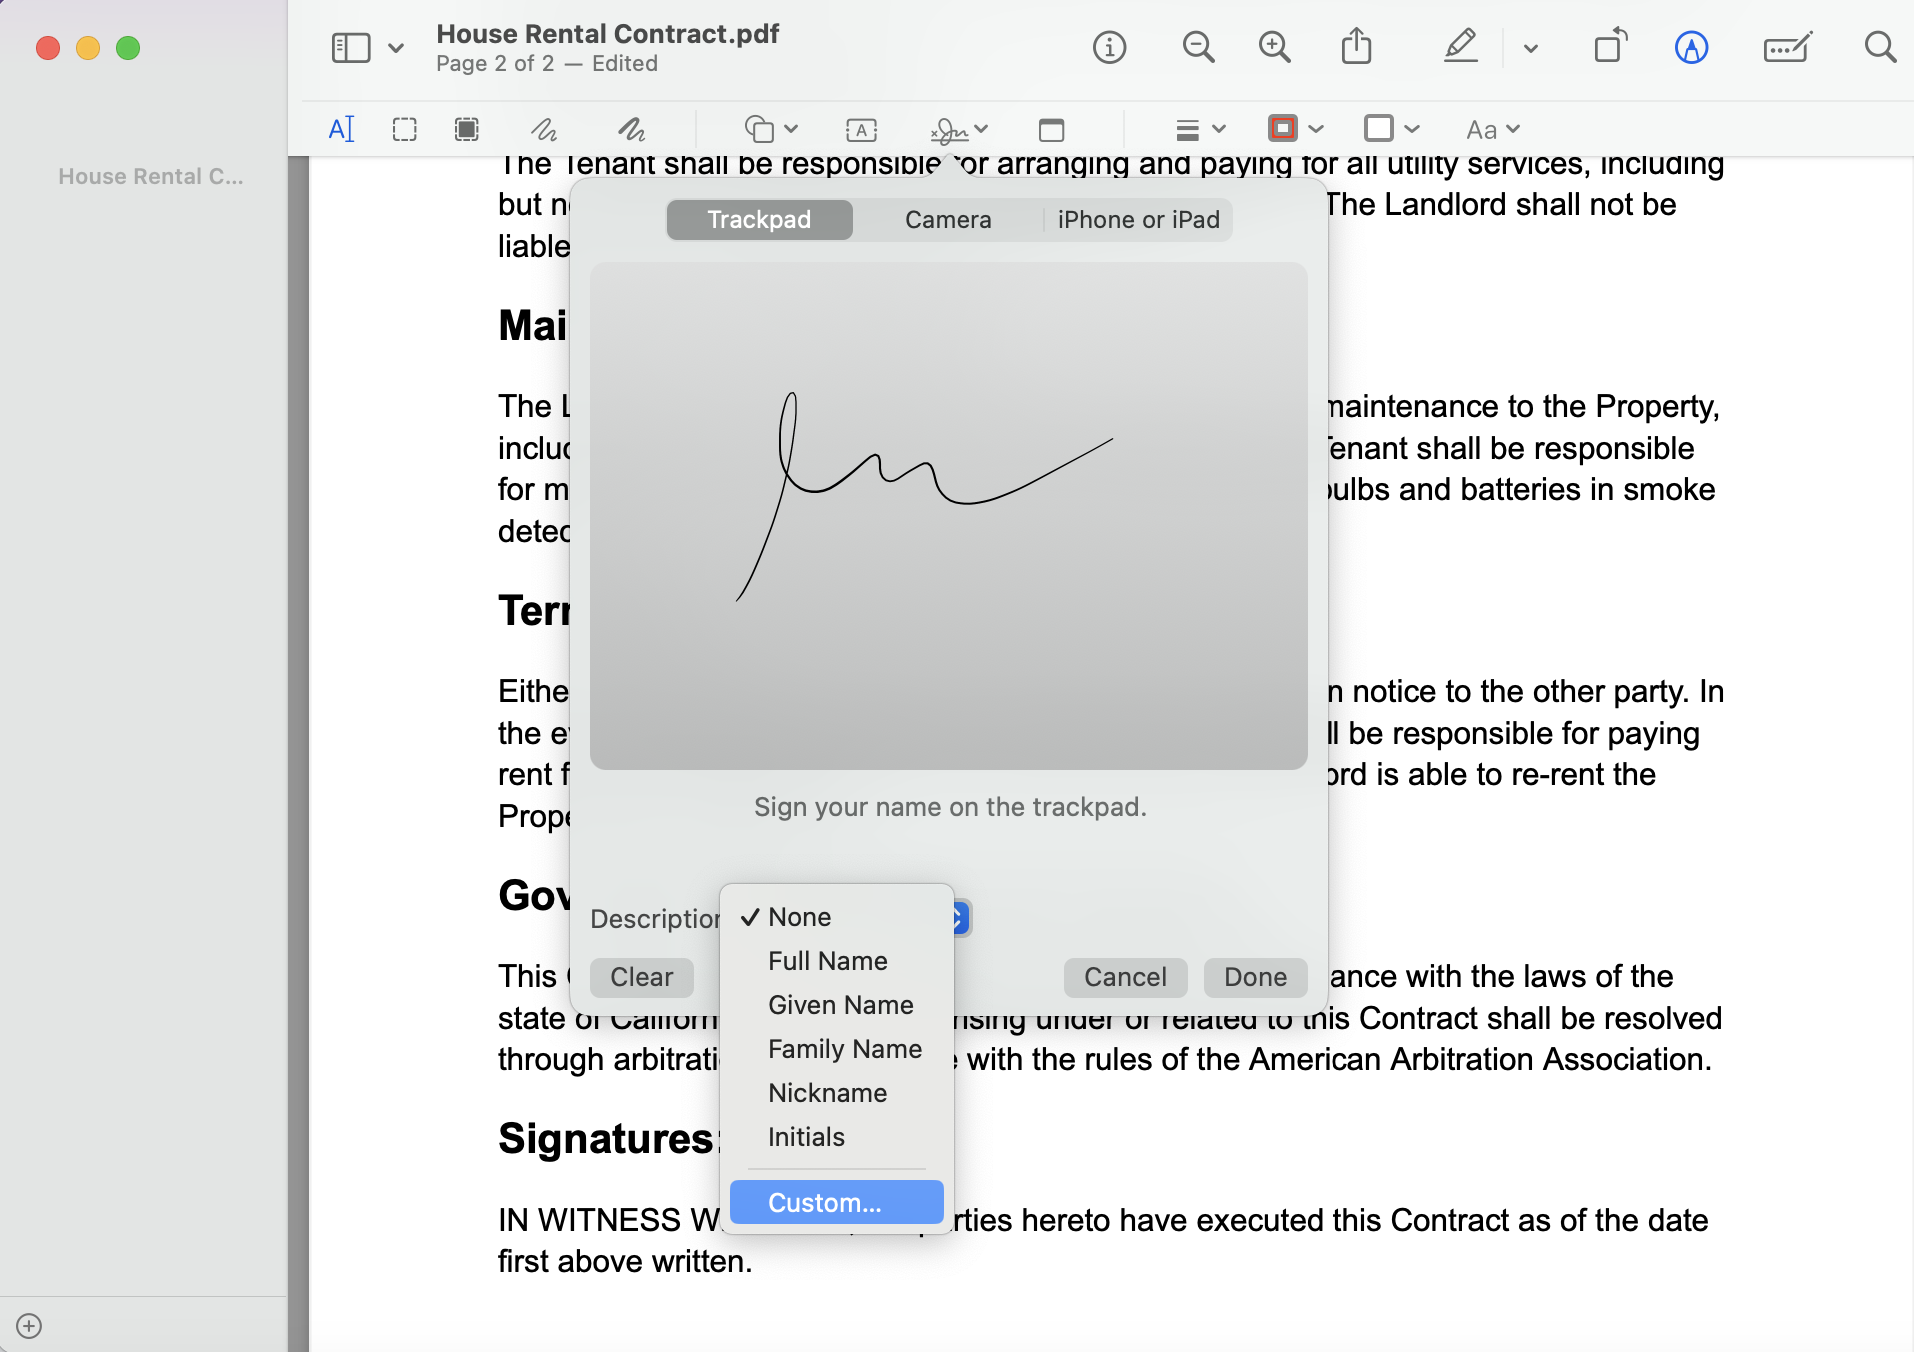
If you have not created a signature before, you will be prompted to create one. You can also select a description for your signature for example, it can be a Full Name, Given Name, Family Name, Nickname, Initials, or a custom field.

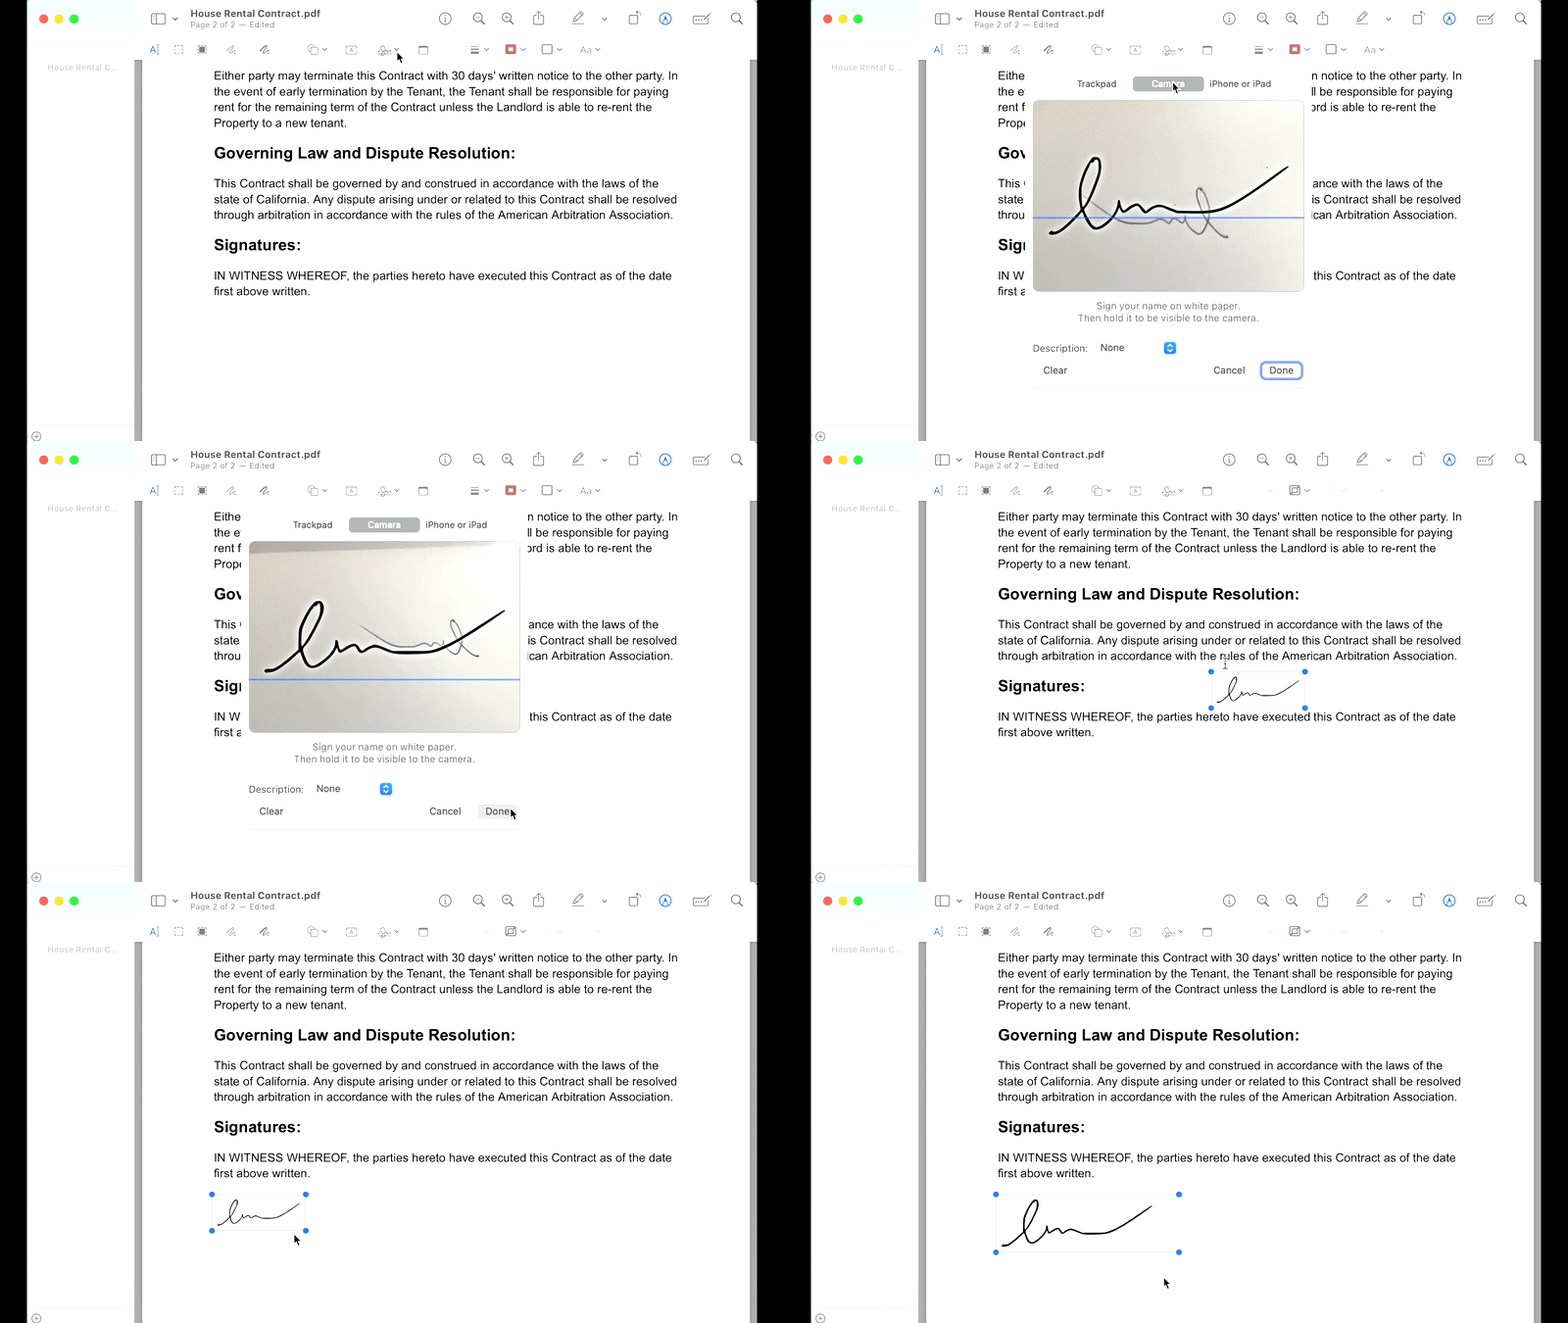
4. Create Your Signature
- Trackpad: If you choose the Trackpad option, use your finger to draw your signature on the trackpad. Click “Done” when you are satisfied with the signature.
- Camera: If you prefer to use your handwritten signature, select the Camera option. Write your signature on a piece of white paper, hold it up to the camera, and align it with the on-screen guidelines. The camera will capture your signature, and you can adjust it if necessary.
- iPhone or iPad: If it’s difficult for you to sign using the trackpad or you want to use a Apple Pencil, select “iPhone or iPad” to use your other devices to create the signature.

5. Insert Your Signature
Once you have created and saved your signature, it will be stored in Preview.
Open the “Sign” dropdown menu again from the Markup Toolbar.
Click on your saved signature. It will appear in your document.
6. Place and Resize Your Signature
Click where you want to place your signature in the document. A movable and resizable signature field will appear.
Drag your signature to the desired location on the PDF.
Resize the signature by dragging the corners of the signature box until it fits appropriately.
7. Save the Signed Document
Once your signature is correctly placed and resized, save the document.
Go to “File” in the menu bar and select “Save” to save the changes to the original file.
If you prefer to keep the original document unsigned, choose “File” —> “Duplicate” to create a copy of the document. Then, save the signed copy under a new name.
Guide: eSign PDF in Adobe
1. Access the Fill & Sign Tool
Click on “Fill & Sign” in the right-hand pane or select it from the “Tools” tab.
2. Add Your Signature
Click the “Sign” icon in the toolbar, then select “Add Signature.”
Choose to type, draw, or upload your signature.
Click “Apply.”
3. Place Your Signature
Click on the spot in the PDF where you want to place your signature.
Drag and resize as necessary.
4. Save the Document
Go to “File” —> “Save” to save your signed PDF.
2. Add eSignature Using eSignature Platform (Best Method)
You can use eSignature platforms like fynk to sign and endorse any PDF document, whether you’re signing everyday agreements with a simple signature or need to use an advanced or qualified eSignatures for signing important PDFs.
Assessment
Pros
- ✅ Highest level of security and legal compliance.
- ✅ Suitable for documents requiring multiple signatures.
- ✅ Advanced features like tracking, reminders, and document management.
Cons
- ❌ Requires an internet connection.
Sign
any
Document in Less than
a Minute.
Guide
Follow these steps to electronically sign a PDF using eSignature platforms.
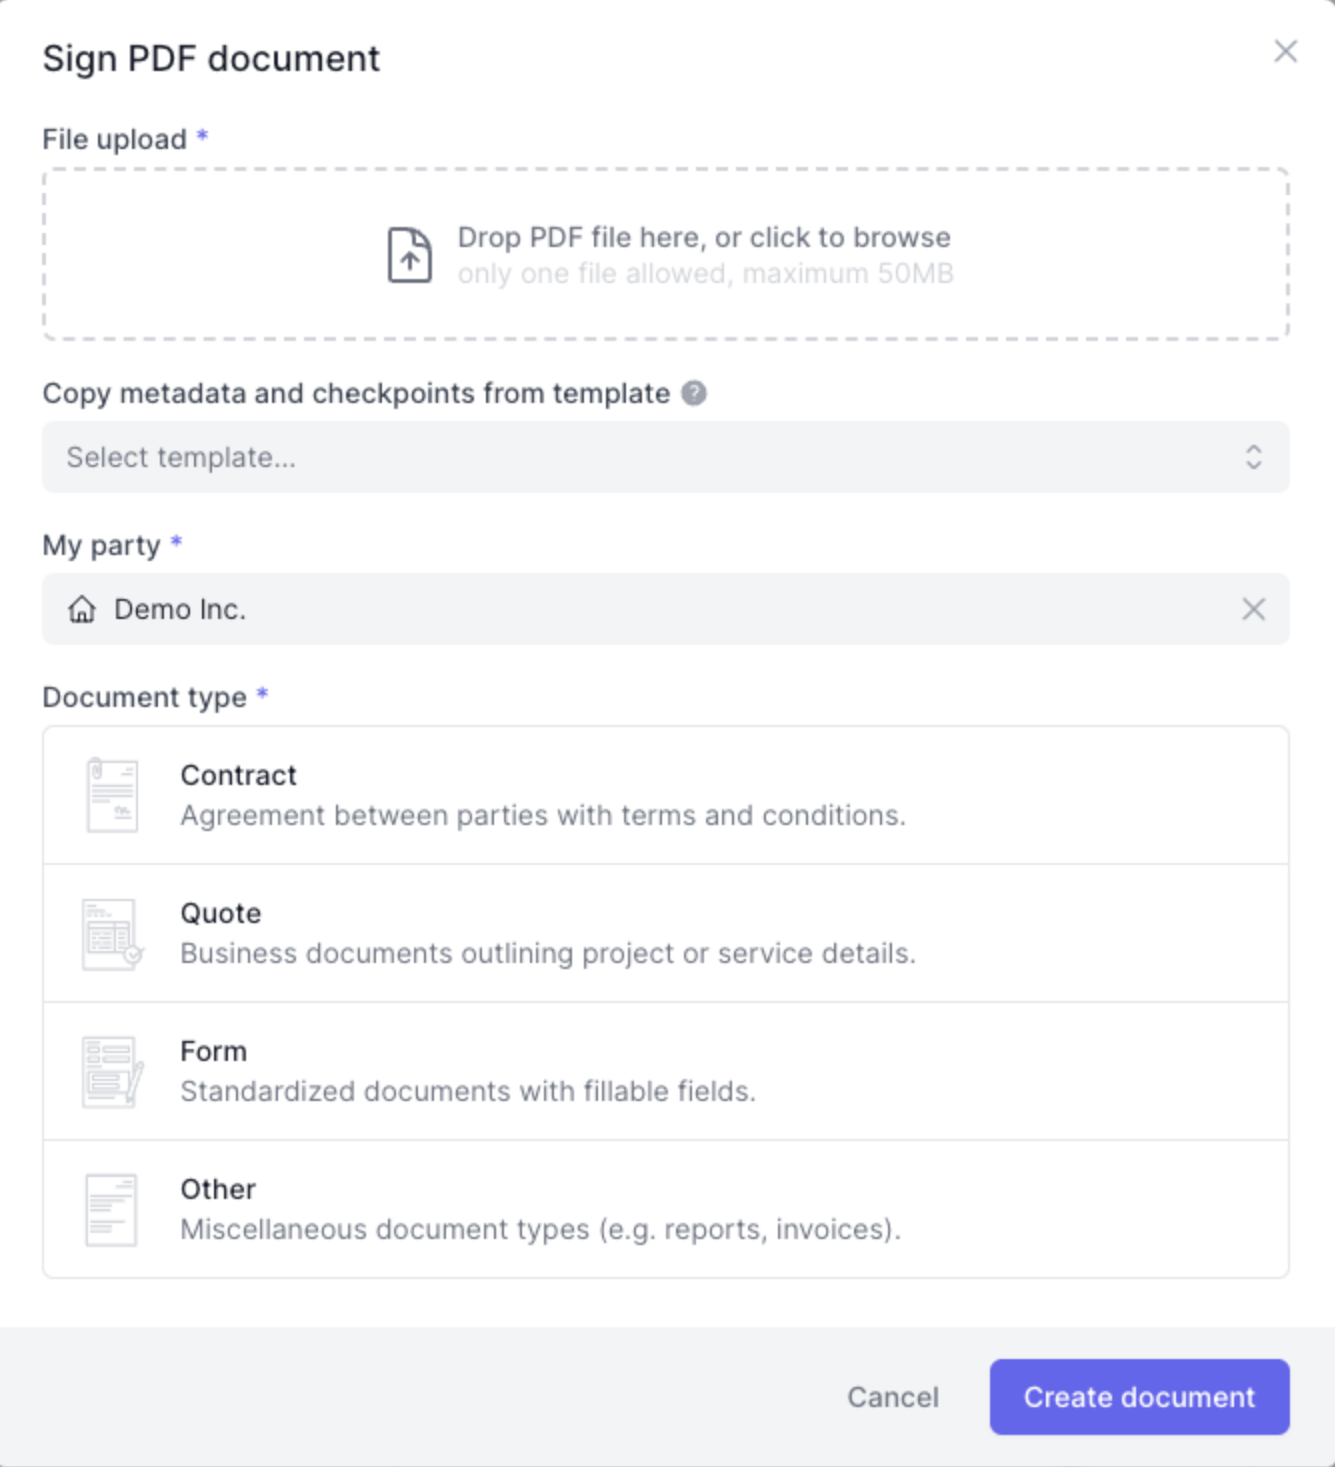
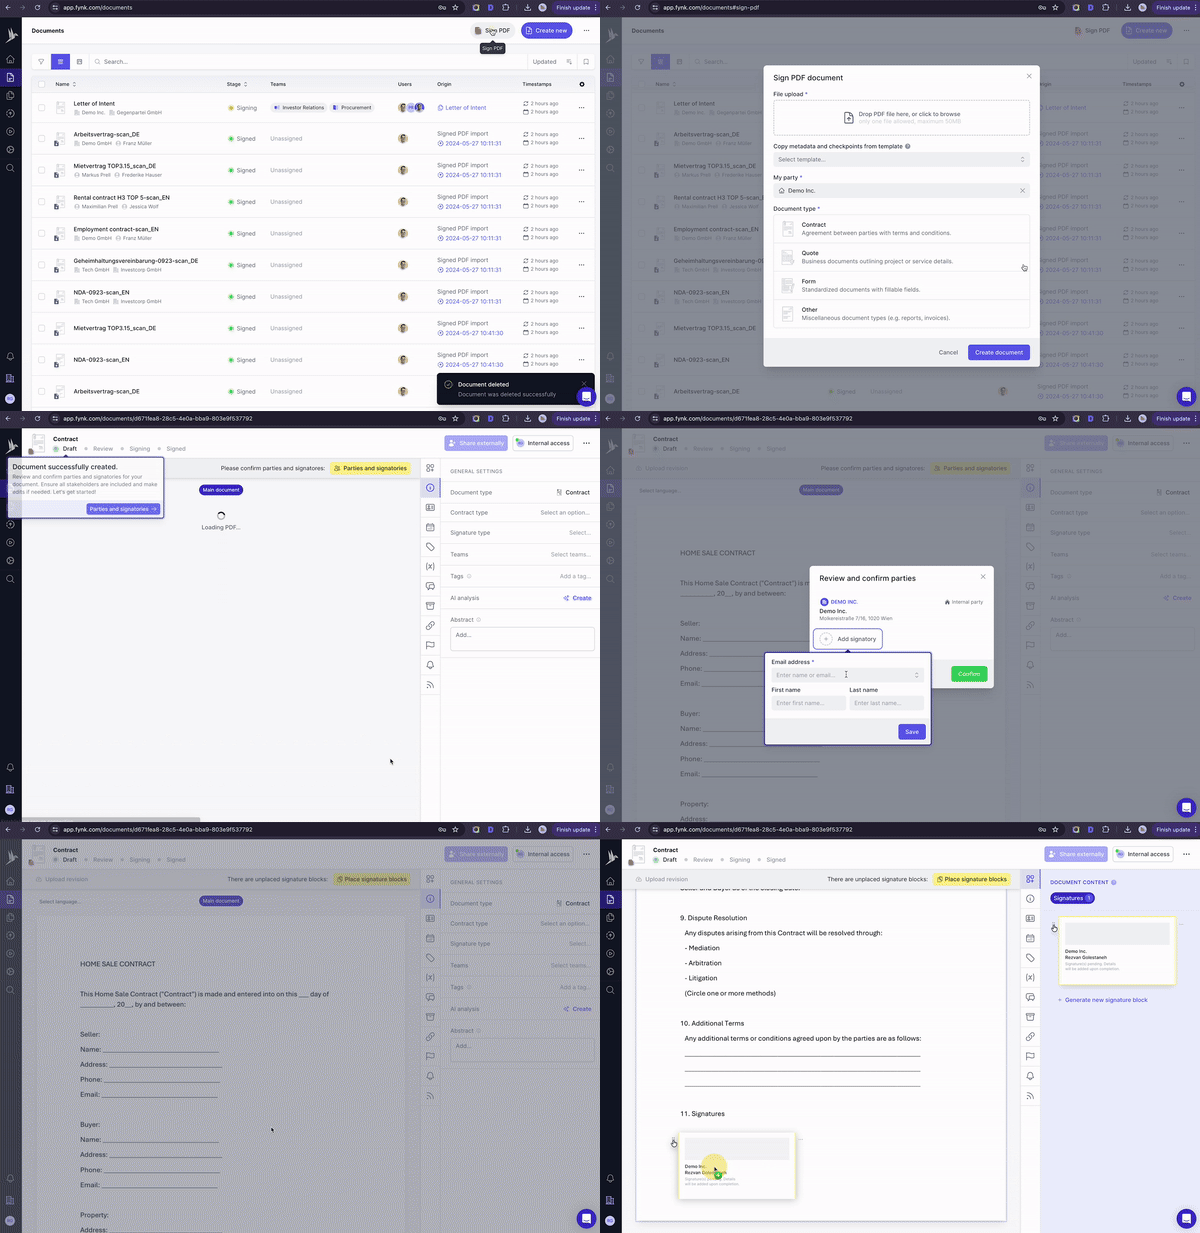
1. Upload Your PDF Document
Once logged in, click the “Sign a PDF” and click or drag and drop your PDF file into the upload area.

2. Add the Email Addresses of the Signers
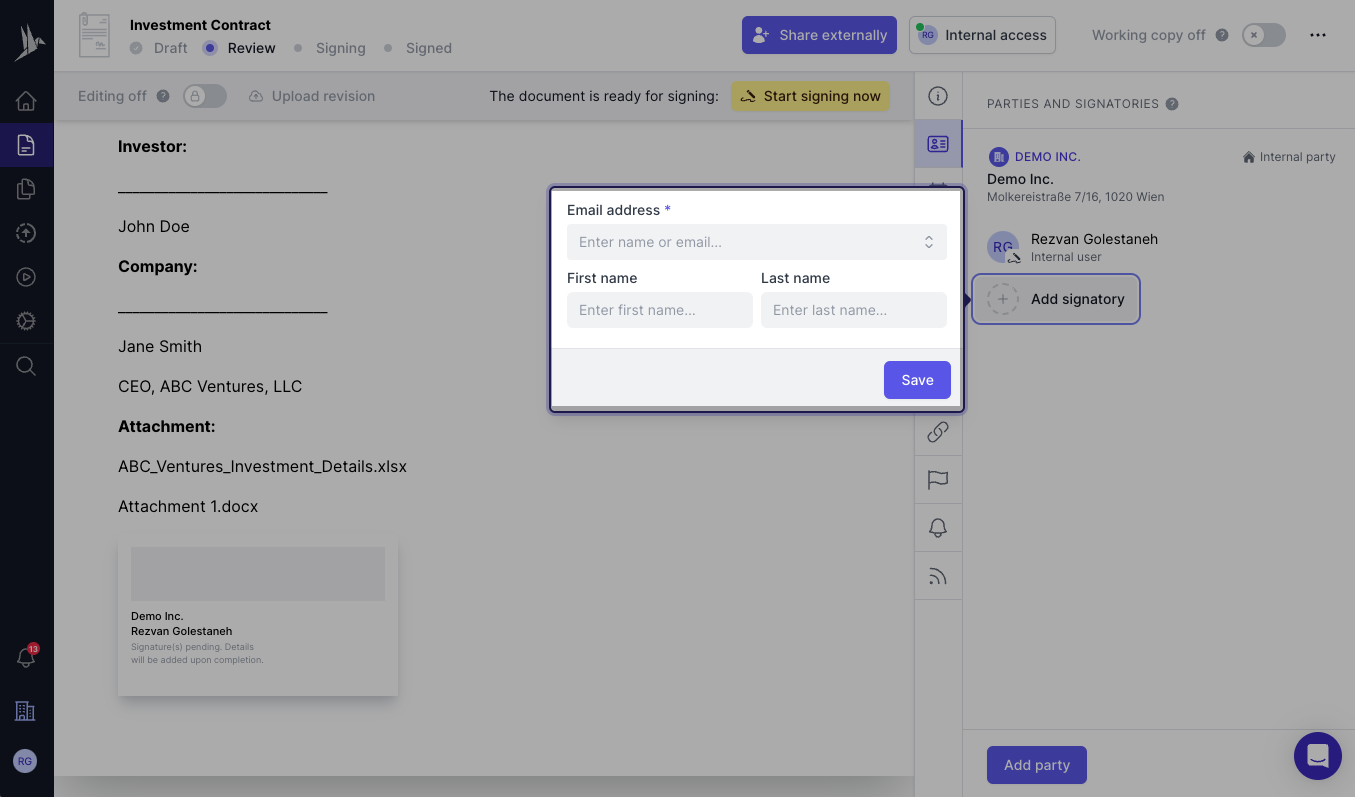
After the document is uploaded, you will be prompted to add the email addresses of all parties and required signers.
Enter the email addresses accurately to ensure proper delivery of signing requests.
If you are the only one who needs to sign the document, enter your email and skip to “Start Signing Now.”

3. Select the Type of Signature (Optional)
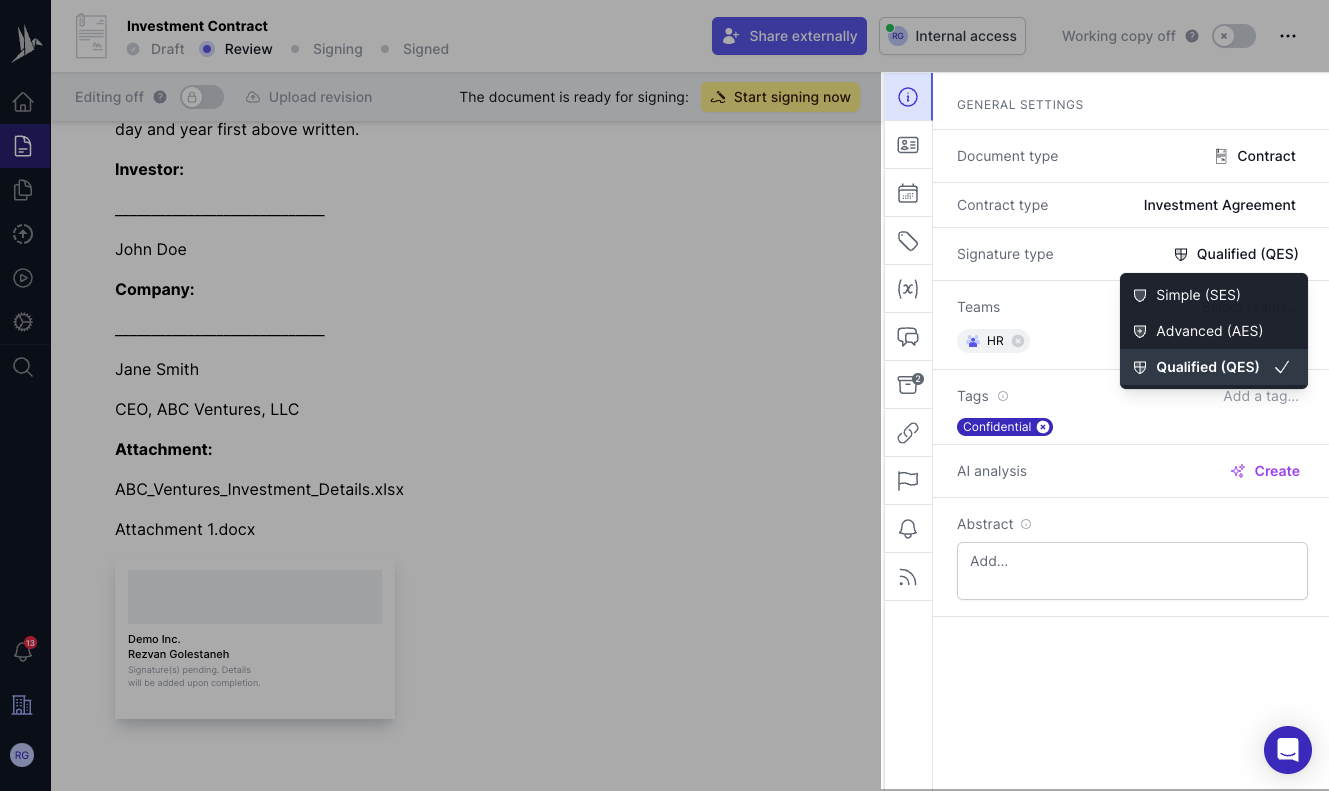
If you or any other parties are required to use an Advanced or Qualified electronic signatures, go to the “General” tab and choose the “Signature type” you wish.
💡 Good to Know: Advanced Electronic Signatures (AES) and Qualified Electronic Signatures (QES) are types of electronic signatures defined by EU regulation eIDAS which require a ID verification step.

4. Place Signature Fields in the Document
Drag and drop signature fields to the appropriate locations where each signer needs to sign.

5. Sign Your Signature
Choose to type, draw, or upload your signature.
Type Your Signature ⌨️
Once you have accessed the “Fill & Sign” feature, choose the option to “Type” your signature. This will enable you to enter your name, and the software will convert it into a signature-like font.
Draw Your Signature ✍️
If you prefer a more personalized touch, select the “Draw” option. Using your mouse, stylus, or touchpad, draw your signature directly onto the document.
Insert Your Signature as a Scan 📸
You can also scan your signature using a scanner or take a clear photo of it with your smartphone. Save the image as a file (preferably in PNG format). In the PDF reader, select the option to insert an image and place your scanned signature onto the document.
6. Send a Request for Signing
If you need other people to sign a PDF, add their emails as signatories, place a signature block in the PDF and then click on “Start Signing.”
fynk will automatically email the designated signers, providing them with instructions on how to review and sign the document electronically.
7. Monitor the Signing Process
Use fynk’s tracking features to monitor the progress of the document.
You will receive notifications as each party signs the document, ensuring that the process is transparent and efficient.
✨ Pro Tip: You can use checkpoint feature to collect approvals before eSigning the PDF. This way you make sure all necessary parties have reviewed and agreed to the document prior to finalizing the signature.
By using fynk, you can efficiently and securely sign PDF documents electronically, ensuring compliance with necessary legal standards while enjoying a seamless and user-friendly experience.
Conclusion
To wrap up, signing PDF documents electronically is easy! You can use basic tools like your PDF reader or opt for eSignature platforms like fynk. If you just need a simple signature, your PDF reader will do the trick. But if you need extra security, legal proof, or more features, fynk has got you covered. Just follow the steps we’ve shared, and you’ll be signing your PDFs safely and smoothly in no time.

