
How to insert a signature in Excel

Rezvan Golestaneh
Updated · Published · 11 min read
How do you insert a signature in Excel?
To insert a sign or signature in Excel, go to Insert > Pictures and place an image of your signature over the cell. In Excel for Windows, you can also add a signature line under Insert > Text > Signature Line. Both are free.
There are 6 ways to put a signature into a Microsoft Excel workbook:
- Insert an image of your signature (the most common method, works everywhere)
- Draw your signature on the Draw tab
- Add a signature line with a digital certificate (Excel for Windows only)
- Add an invisible digital signature (Excel for Windows only)
- Type your name in a text box
- Send the Excel file for signature with an eSignature platform (when other people have to sign)
On your phone: open the sheet in the Excel app, tap Draw and sign with your finger, or insert a photo of your signature with Insert > Pictures. The steps for phone, Mac and the web are below.
Does Excel have a built-in signature feature? Only partly. Excel for Windows has a signature line and an invisible digital signature, and both need a digital certificate. As of October 2026, Excel for Mac and Excel for the web have neither (Microsoft Q&A). Nor can Excel send a workbook to someone else and collect their signature. For that, you need an electronic signature tool.
Sign an Excel file for free.
1. Insert an image of your signature in Excel
Inserting a picture of your handwritten signature is the quickest way to sign an Excel sheet, and it works in Excel for Windows, Mac and the web. Legally, it is a simple electronic signature (SES).
No signature image yet? Our signature generator makes one in your browser. Draw it, type it, or clean up a photo of the one on paper, then download a transparent PNG that sits over the cell without a white box behind it. The same file works when you add a signature in Google Docs or Word.
Pros
- ✅ Uses your real handwritten signature
- ✅ Works in every version of Excel, including Mac and the web
- ✅ You can reuse the same image in every workbook
Cons
- ❌ Anyone who gets the image can copy it into another file
- ❌ It does not prove who placed it or whether the sheet changed afterwards
- ❌ Low-resolution images look blurry when you zoom in or print
How to insert a signature image
- Sign on a sheet of plain white paper with a dark pen.
- Photograph or scan it and save the result as an image file (PNG or JPEG). Crop it close to the signature.
- Open your workbook and click the cell where the signature should go.
- Go to Insert > Pictures. In Microsoft 365, choose Place over Cells > This Device (older versions go straight to This Device).
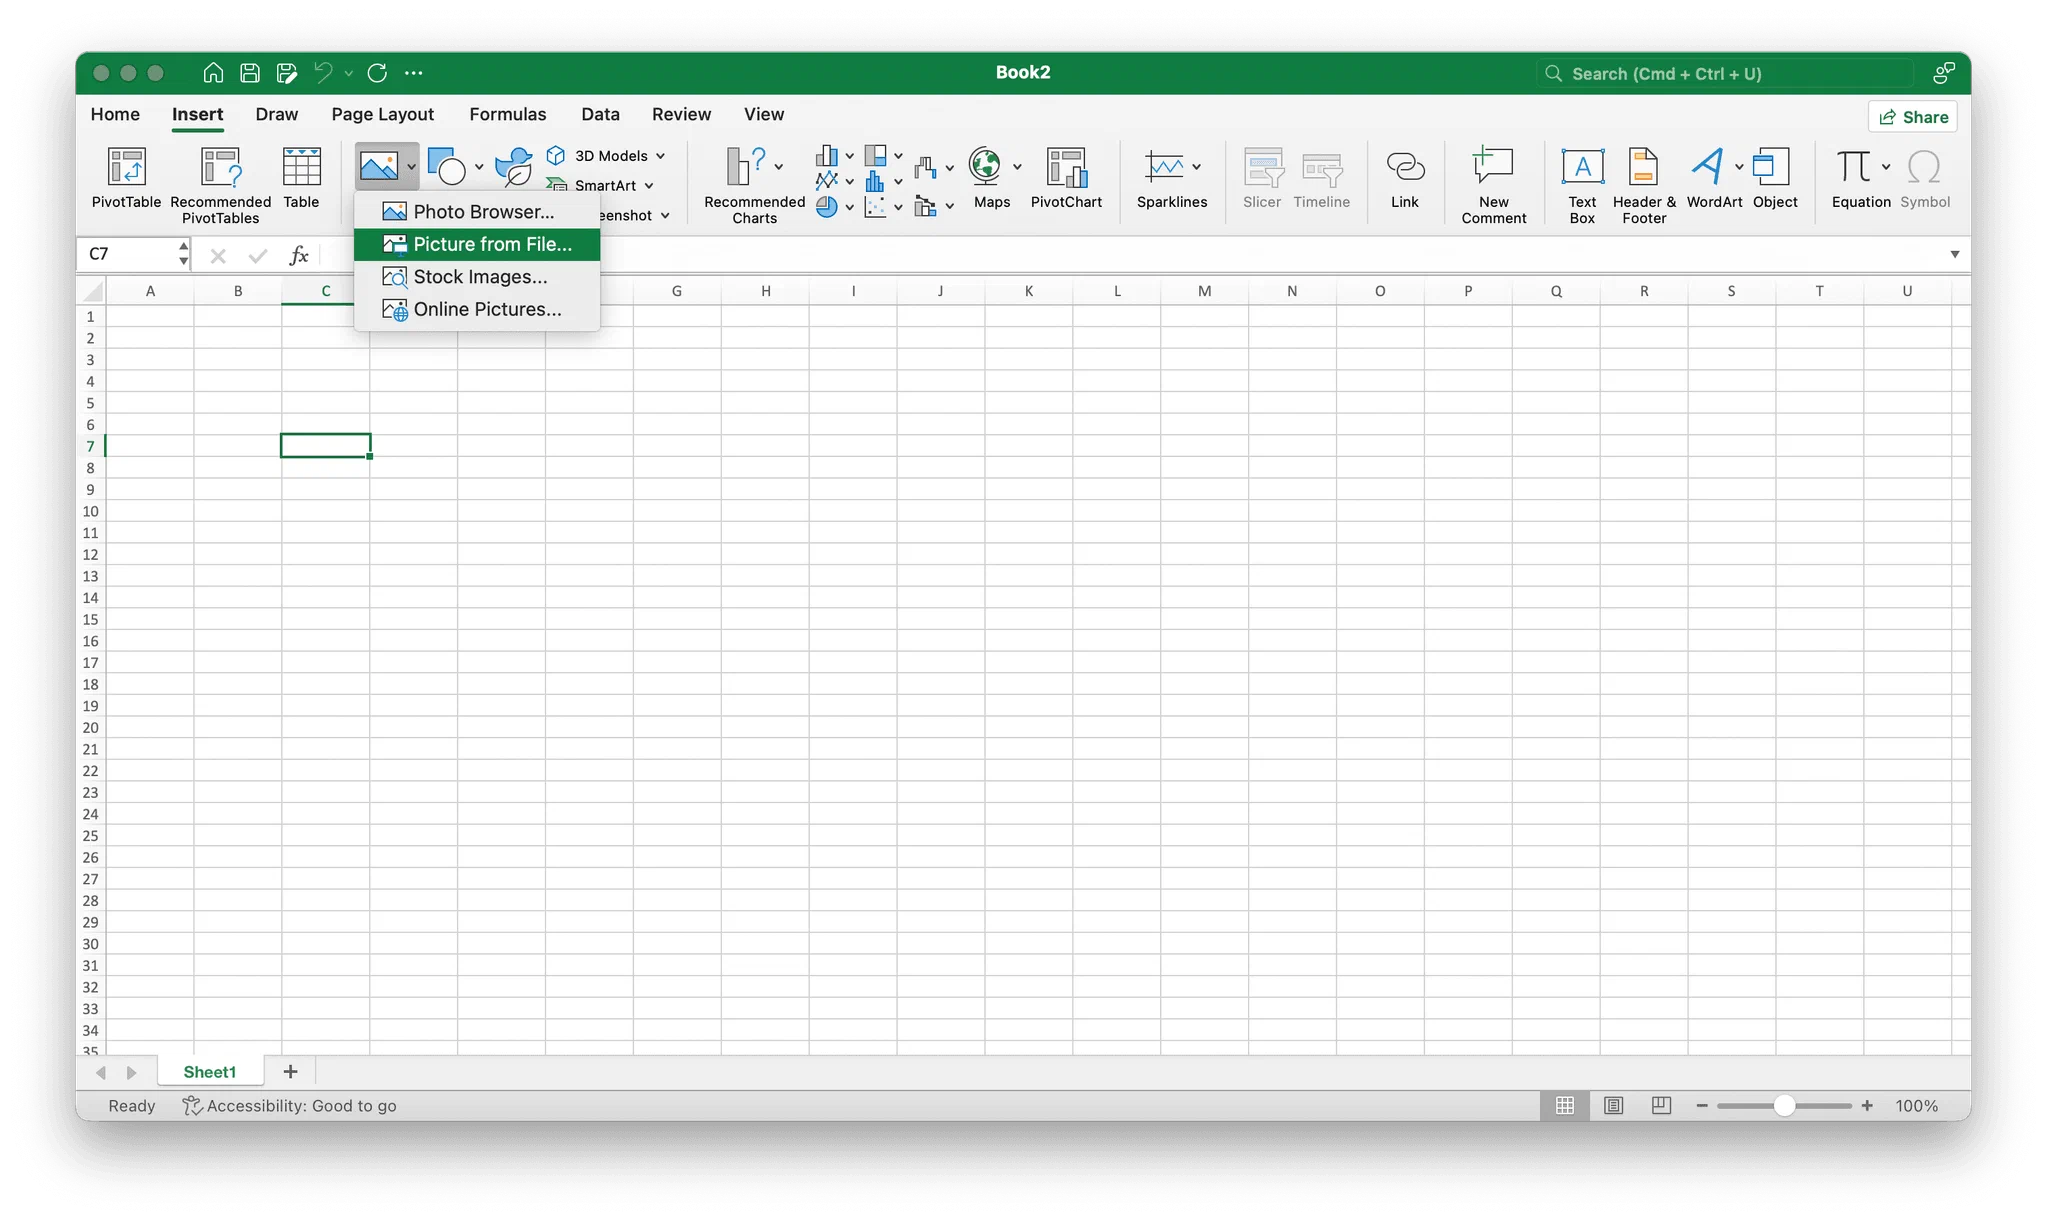

- Select your signature image and click Insert.
- Drag a corner handle to resize it (corners keep the proportions) and move it onto the signature cell.
Choose Place over Cells rather than Place in Cell: a picture that floats over the cells can be moved, resized and formatted freely, which you need for the next two steps.
How to insert a signature in Excel without a background
A photo of a signature usually has a white box around it that covers cell borders. Three ways to remove it:
- Use a transparent PNG. It needs no editing. The signature generator above exports one.
- Remove Background. Select the picture, go to Picture Format > Remove Background, adjust the area with Mark Areas to Keep or Mark Areas to Remove and click Keep Changes. Works in Excel for Windows and Mac (Microsoft Support).
- Set Transparent Color. Go to Picture Format > Color > Set Transparent Color and click the white area. Best on a clean scan with an even background (Microsoft Support).
How to lock the signature so it doesn’t move
By default, a picture moves and stretches when rows or columns near it change. To keep it in place:
- Right-click the image and choose Format Picture.
- Open Size & Properties > Properties and select Don’t move or size with cells.
- To stop others moving or deleting it, turn on Review > Protect Sheet and leave Edit objects unchecked (Microsoft Support).
Sheet protection only stops accidental edits. It does not prove who signed.
2. Draw your signature in Excel
On the Draw tab you can add a handwritten signature with a mouse, trackpad, pen or finger. The Draw tab is available in Microsoft 365 versions of Excel for Windows and Mac, and in Excel for the web (Microsoft Support).
Pros
- ✅ Quick, no scanning or image file needed
- ✅ Works well on a touchscreen or with a stylus
Cons
- ❌ Hard to draw a neat signature with a mouse or trackpad
- ❌ The result can look messy compared to a scanned signature
- ❌ Like an image, it proves nothing about who drew it
How to draw a signature in Excel
- Open your workbook and go to the Draw tab. If you don’t see it, add it under File > Options > Customize Ribbon (Windows) or Excel > Preferences > Ribbon & Toolbar (Mac).
- Pick a pen, colour and thickness.
- Write your signature over the signature cell. On a Mac, Draw with Trackpad lets you use the trackpad like a pen.
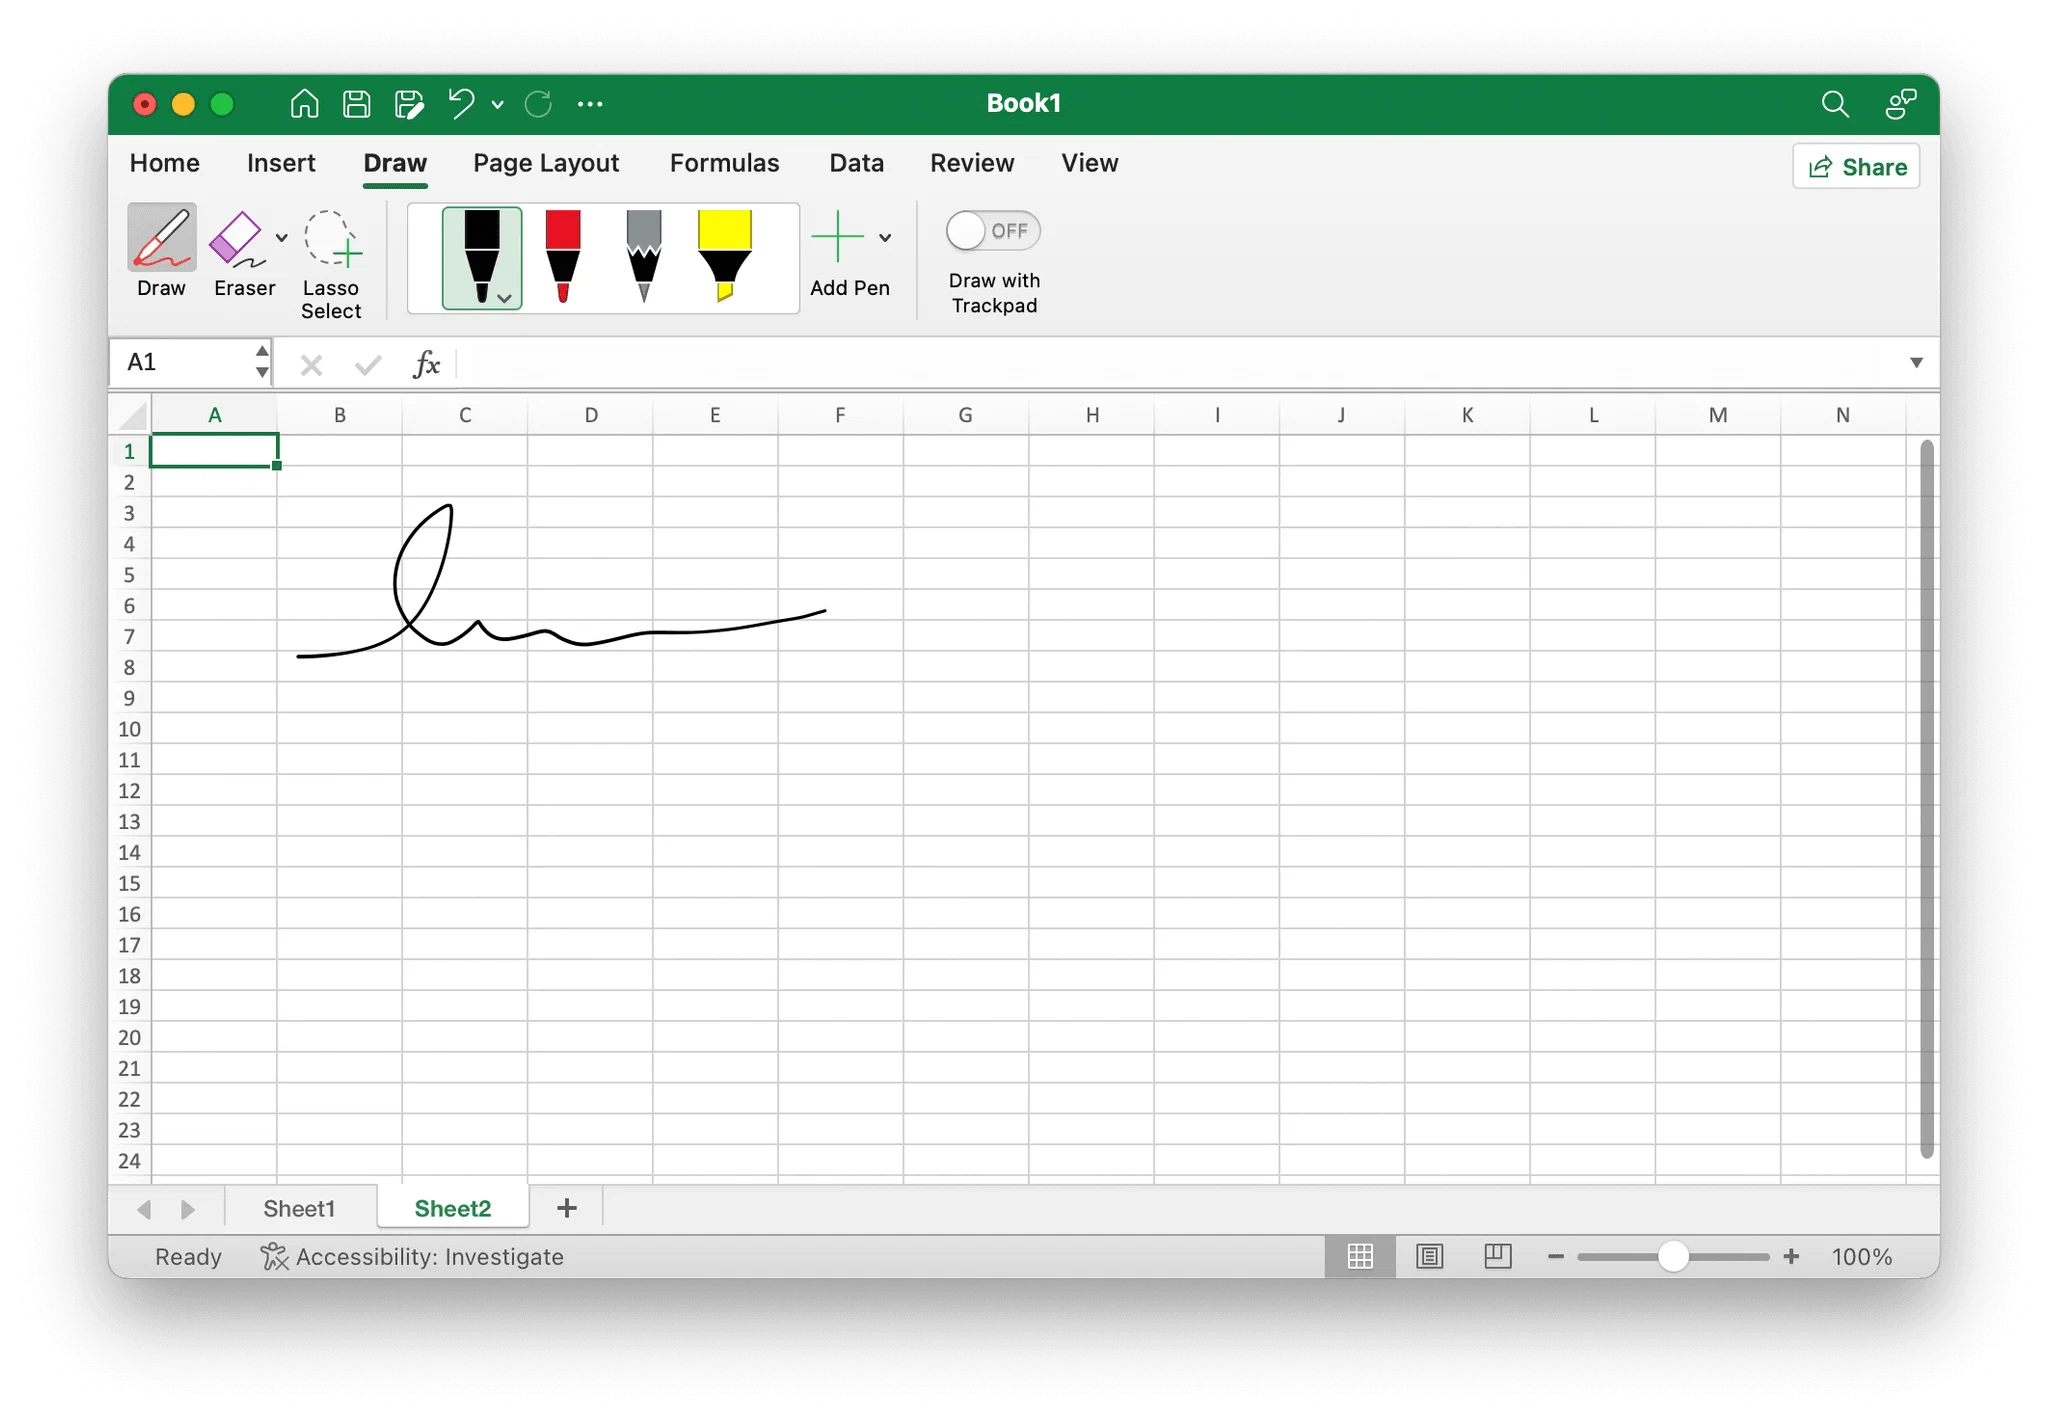
- Switch back to Select (or press Esc), then move or resize the ink like any other object.
- To reuse it, copy the ink drawing and paste it into other workbooks.
The older route via Insert > Shapes > Scribble still exists in Excel for Windows, but the Draw tab gives smoother lines and pressure support.
Remember: A drawn or inserted signature is a simple electronic signature. It is fine for internal sign-offs and everyday agreements, but it is the weakest form of evidence.
3. How to add a signature in Excel with a signature line (Windows only)
The signature line is Excel’s built-in signature feature. It adds a visible signature box, and signing it attaches a certificate-based digital signature to the workbook. It works like signing a Word document, in Excel for Windows only.
Pros
- ✅ Built in, no extra tool
- ✅ Shows whether the workbook was changed after signing
- ✅ With a qualified certificate, it can be an advanced electronic signature (AES) or a qualified electronic signature (QES)
Cons
- ❌ Not available in Excel for Mac or Excel for the web
- ❌ Each signer needs Excel for Windows and their own digital certificate, which usually costs money
- ❌ The signed workbook becomes read-only, so finish all edits first
How to add a signature line in Excel
- Click the cell where the signature line should go.
- Go to Insert > Text > Signature Line (in some versions: Microsoft Office Signature Line).
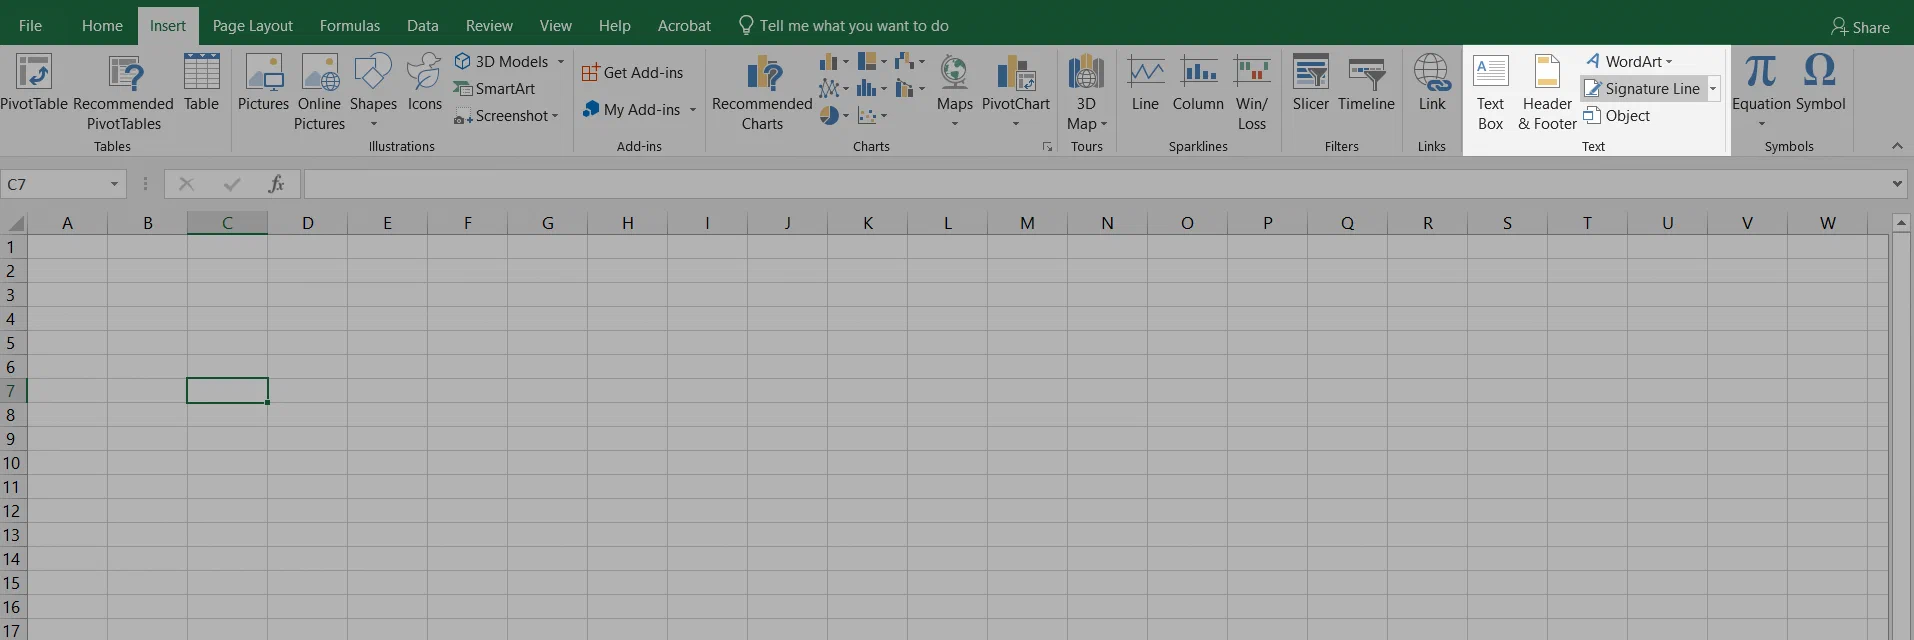
- In the Signature Setup dialog, enter the suggested signer’s name, title and email address, plus any instructions to the signer.
- Tick Allow the signer to add comments in the Sign dialog box and Show sign date in signature line if needed, then click OK.
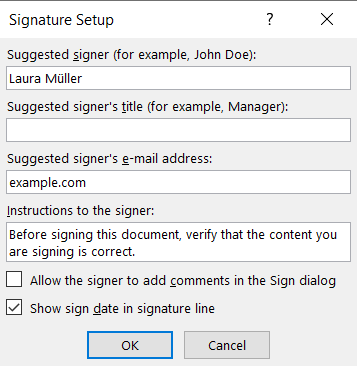
The signature line now appears on the sheet:

How to sign the signature line
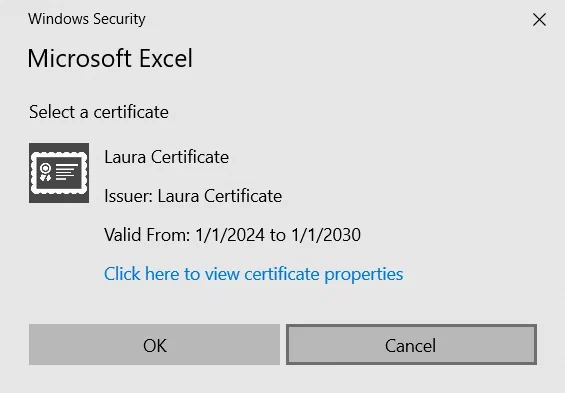
To sign, you need a digital certificate (digital ID) from a certification authority, usually valid for a year (Microsoft Support). For testing, you can create your own certificate, but nobody has verified your identity, so it proves little to others.
Important: In the EU, it only counts as a QES with a qualified certificate from a qualified trust service provider under eIDAS, on a qualified signature creation device. Check with your provider first.
- Double-click the signature line (or right-click it and choose Sign).
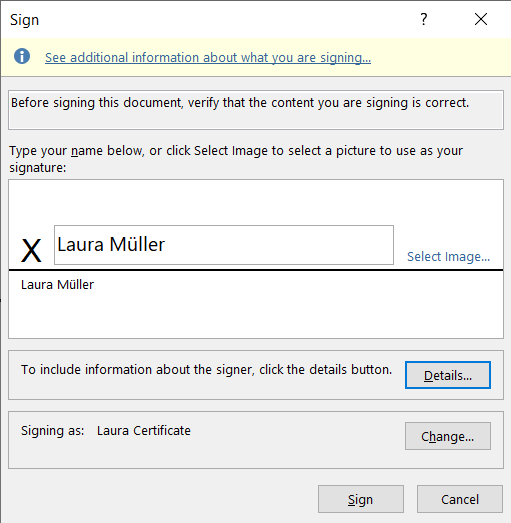
- Type your name next to the X, write it with ink, or click Select Image to use a picture of your signature.
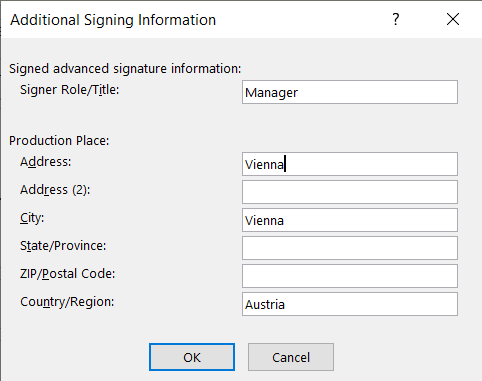
- Click Details… to add your address or title.
- If the certificate shown is not the right one, click Change and pick another.
- Click Sign.
The signed line looks like this:
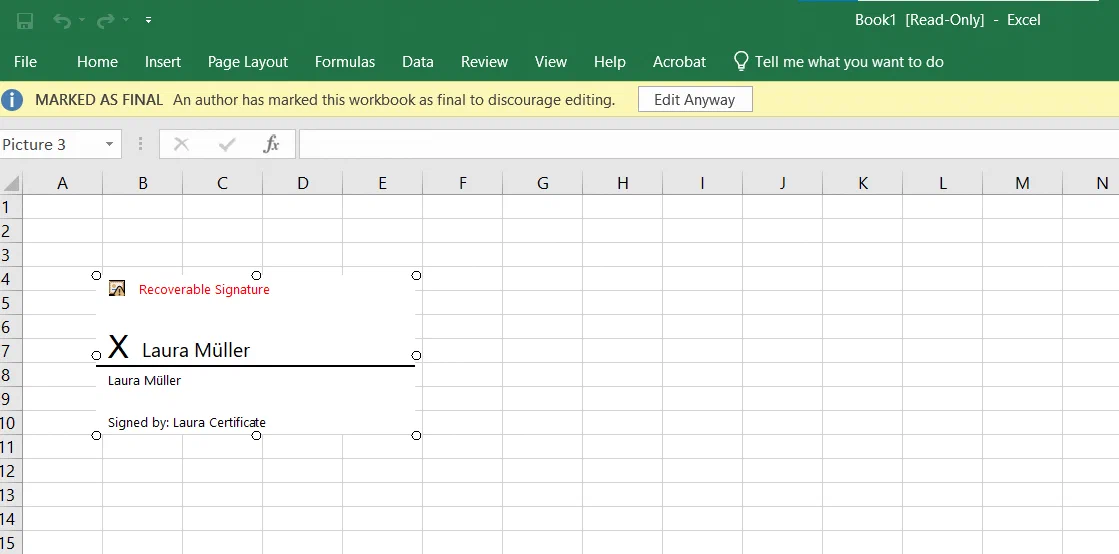
The workbook is now read-only, with a Signatures button at the bottom. Any later edit invalidates the signature.
4. How to add a digital signature in Excel (Windows only)
To add a digital signature in Excel without a visible line, go to File > Info > Protect Workbook > Add a Digital Signature. This invisible digital signature does not show on the sheet. It protects the whole workbook: anyone opening it can see that it was signed, by whom, and whether it changed since. Like the signature line, it needs a digital certificate and Excel for Windows.
- Open your workbook and go to File > Info.
- Choose Protect Workbook > Add a Digital Signature.
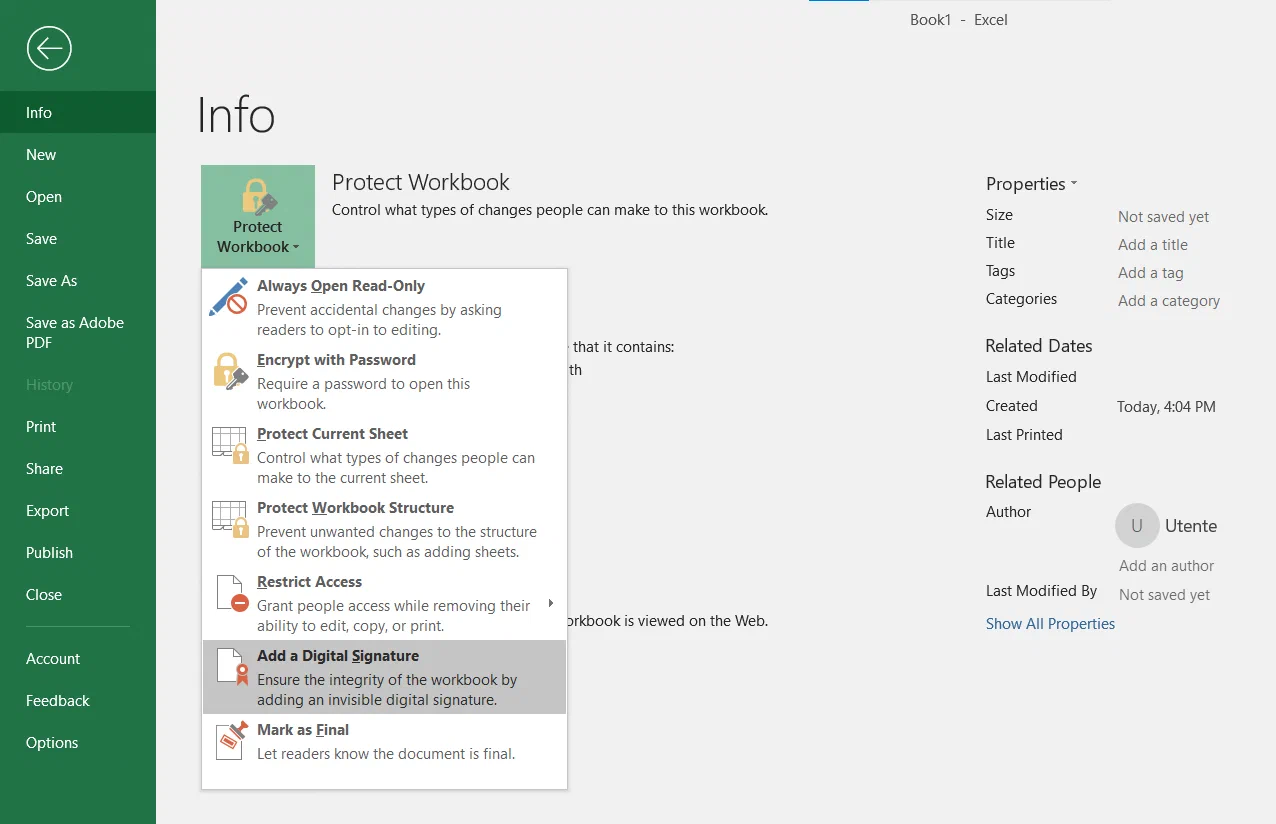
- Choose a commitment type, enter the purpose for signing if you like, check the certificate (click Change to pick another), and click Sign.
The workbook becomes read-only and shows the Signatures button. To remove the signature, open File > Info > View Signatures, click the arrow next to the signature and choose Remove Signature.
When to use it: for workbooks that must not change after approval, such as a final budget or a calculation that goes to an auditor. It is not useful for collecting signatures from people outside your organisation, because each of them would need Excel for Windows and their own certificate.
5. Type your name as a signature
You can type your name in a text box, in a script-style font if you like. A typed name is a valid simple electronic signature when you type it with the intent to sign. In the EU, eIDAS Article 25(1) says an electronic signature cannot be denied legal effect just because it is electronic. Its weakness is evidence, not validity: anyone can type anyone’s name.
Pros
- ✅ The fastest method, works in every version of Excel
- ✅ Always legible
Cons
- ❌ Easy to fake, it proves nothing about who typed it
- ❌ Script fonts that are not installed on the reader’s device are replaced with a default font
How to type a signature in Excel
- Go to Insert > Text > Text Box (or Insert > Shapes > Text Box).
- Draw the text box where the signature should go.
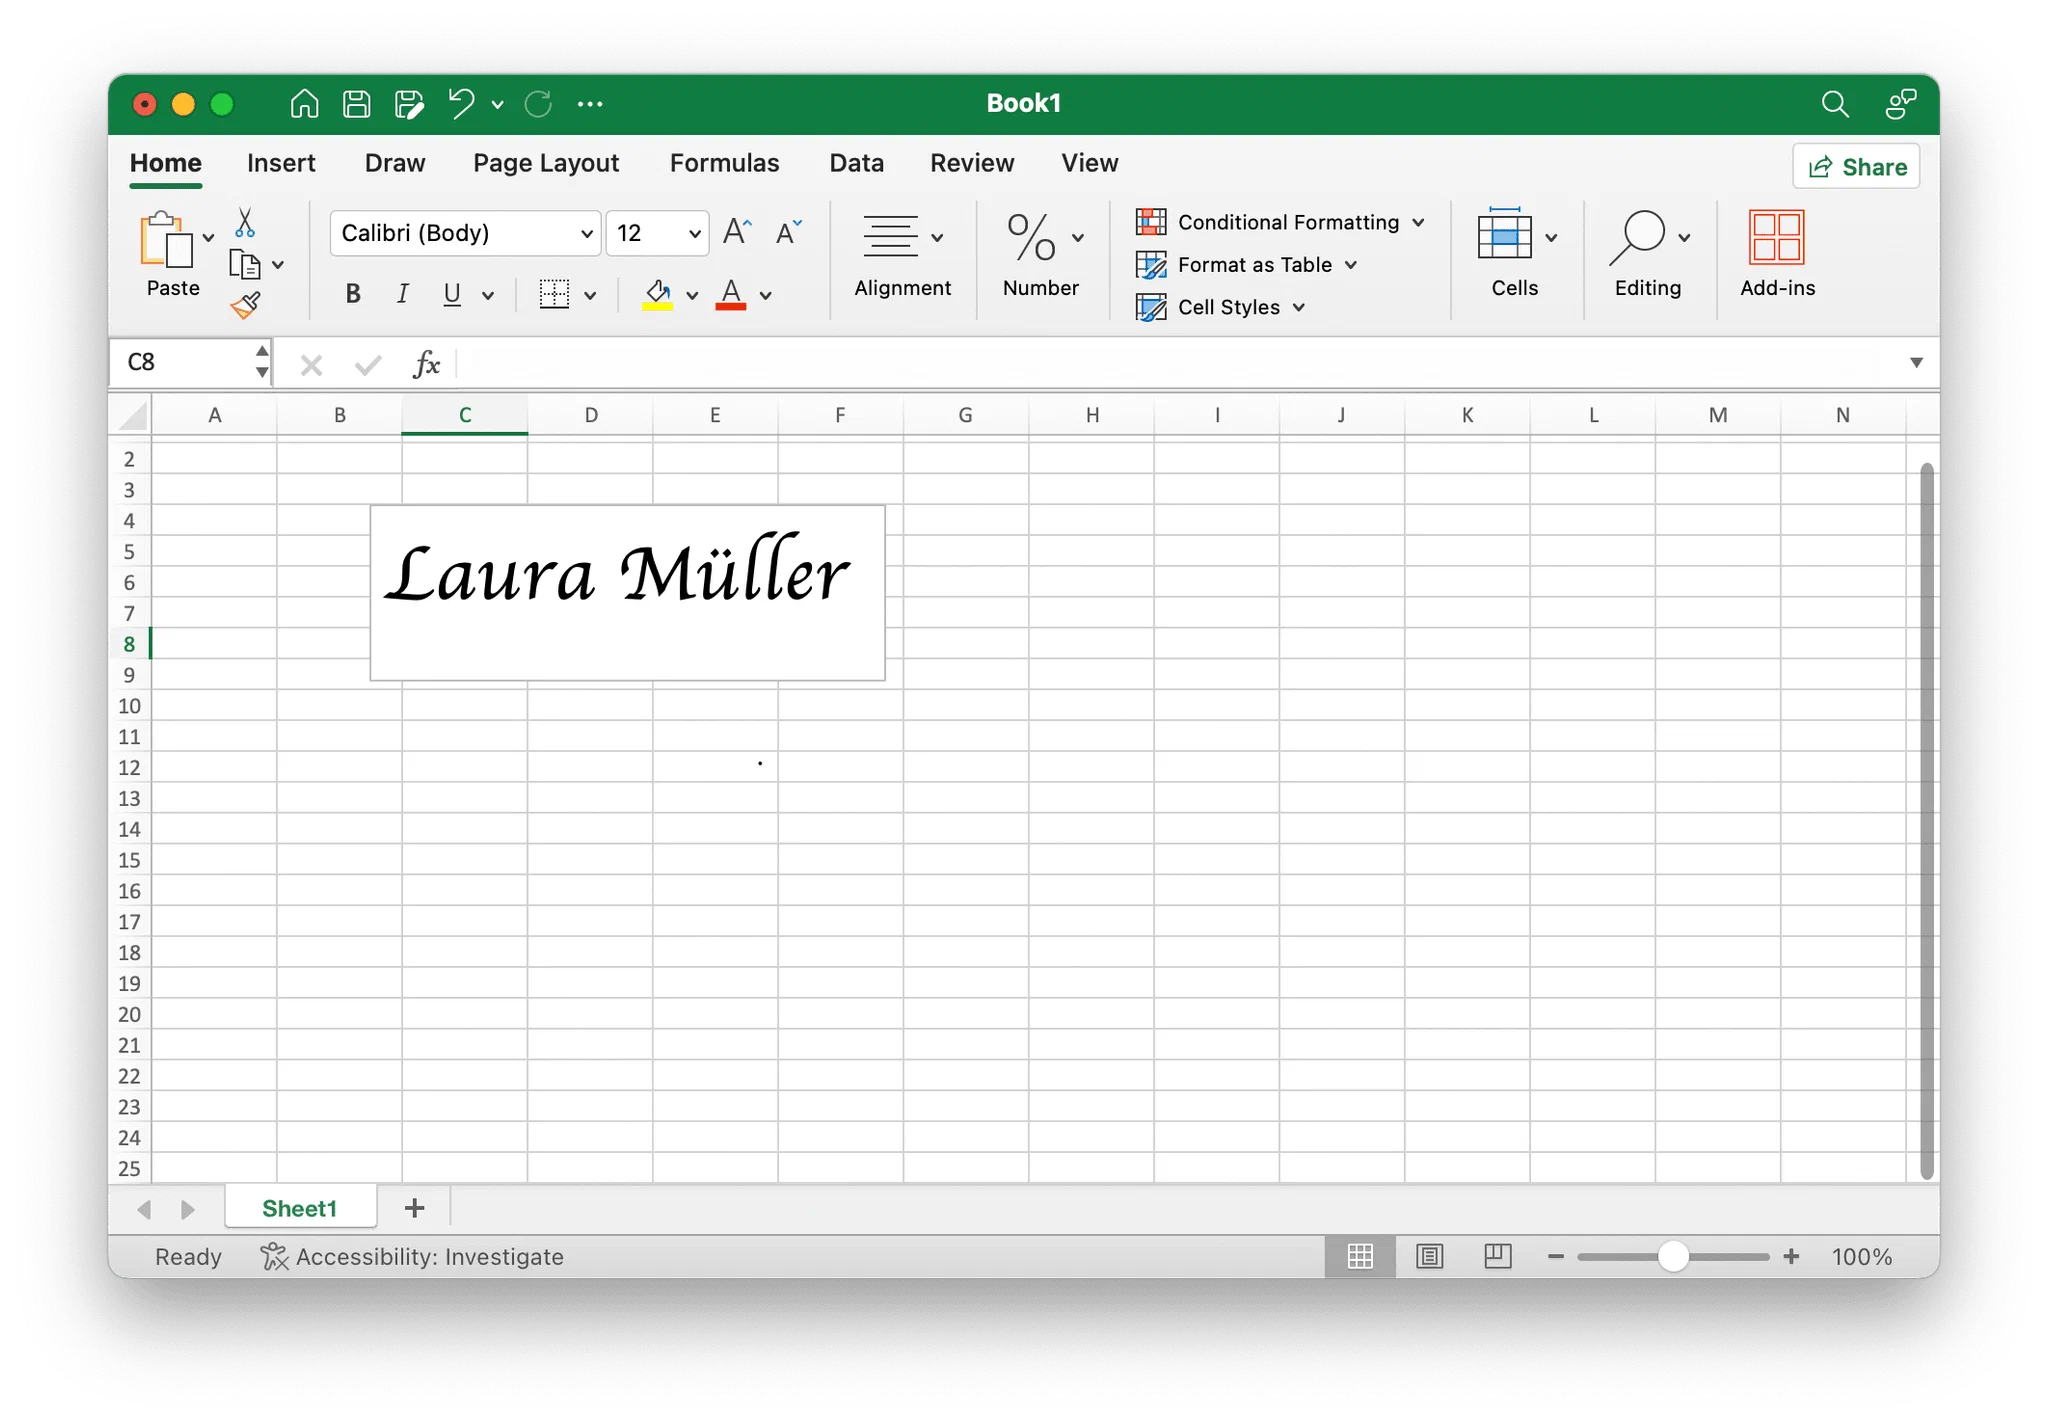
- Type your full name and choose a font and size.
- Drag the text box into position. You can also simply type your name into the signature cell.
6. Send the Excel file for signature with an eSignature platform
When someone else has to sign, or you need proof of who signed and when, send the sheet through an eSignature platform. Save it as a PDF first: File > Save As (or Export) > PDF. Wide sheets often need Page Layout > Orientation > Landscape or Scale to Fit before you export.
Sending a spreadsheet for e-signature in fynk takes three steps, and it is included in the Free plan:
- Sign in to fynk.
- Drag and drop your PDF. fynk takes PDF and Word files as they are.
- Sign it, or send it to the other signers. Choose SES, AES with a phone code or a national eID, or QES; fynk sends reminders and keeps an audit trail.
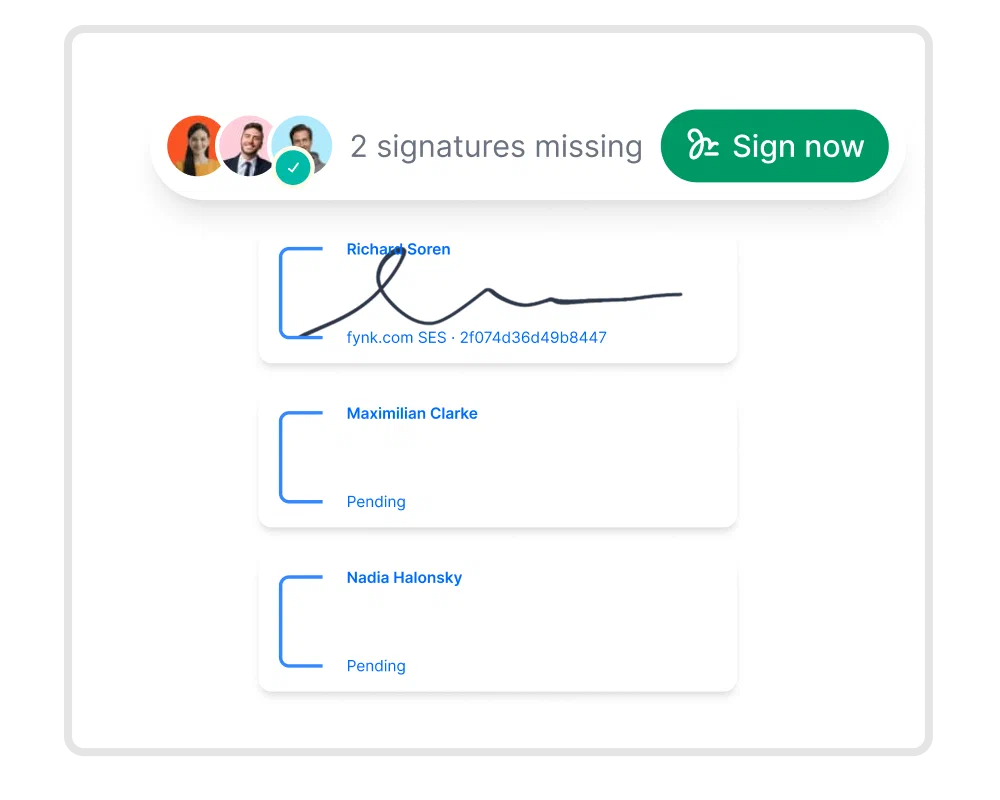
We are all looking at the same contract at the same version. You can clearly see who has signed, who is next, and what needs attention.

The same works when you sign a PDF from any other app. If your numbers live in Google, sign the Google Sheet instead.
How to put a signature in Excel on your phone, Mac or the web
To add a signature in Excel on your phone, open the sheet in the Excel app for iPhone, iPad or Android and either draw it on the Draw tab with your finger or insert a picture of your signature.
- Draw it: open the Draw tab, pick a pen and sign with your finger (or Apple Pencil on iPad).
- Insert a picture: sign on white paper, take a photo, then use Insert > Pictures and place it over the cell. A transparent PNG looks cleaner.
Excel for Mac and Excel for the web work the same way: use a signature image (method 1), the Draw tab (method 2) or a typed name (method 5). On a Mac, Draw with Trackpad turns the trackpad into a pen.
The mobile apps, Mac and the web have no signature line or digital signature (as of October 2026). To get a certificate-based signature or a sheet signed by others, save it as a PDF and send it with an eSignature platform (method 6): signers sign in the browser on any device.
Searching for a contract management solution?
Find out how fynk can help you close deals faster and simplify your eSigning process – request a demo to see it in action.
Frequently asked questions
Insert an image of your signature (Insert > Pictures), draw it on the Draw tab, or type your name. Each is a simple electronic signature. To prove who signed, or to get other people's signatures, send the file through an eSignature platform.
In Excel for Windows, go to File > Info > Protect Workbook > Add a Digital Signature, or add a visible line via Insert > Text > Signature Line and double-click it to sign. You need a digital certificate. After signing, the workbook is read-only and any later edit invalidates the signature.
Excel for the web has no digital signature. You can insert a signature image or draw one on the Draw tab. For a certificate-based signature online, save the sheet as a PDF and sign it with an eSignature platform that offers advanced or qualified signatures.
Draw it with a mouse, trackpad or finger, type your name, or photograph your signature on paper. Our free signature generator turns any of these into a transparent PNG you can insert in Excel, Word or a PDF.
Add a separate signature line for each signer (Insert > Text > Signature Line, Windows only); each person signs their own line with their certificate. With images, insert one per signer. To collect signatures from several people outside your team, save the sheet as a PDF and send it through an eSignature platform, which can set the signing order.
For most documents without a form requirement, yes. An image, drawing or typed name is a simple electronic signature, which the EU eIDAS regulation (Art. 25(1)) and the US ESIGN Act do not reject just because it is electronic. It is weak evidence, though, and where the law requires a handwritten signature, only a qualified electronic signature can replace it. Whether an e-signature is legally binding for a document depends on the country.
Please keep in mind that none of the content on our blog should be considered legal advice. We understand the complexities and nuances of legal matters, and as much as we strive to ensure our information is accurate and useful, it cannot replace the personalized advice of a qualified legal professional.




Get a regular dose of insightful contract management content


Take control of your agreements. Move your business forward.
Run agreements the way they should run: fast, clear, and on your terms.
No setup headaches
Go live in days, not quarters
No lock-in
Full export anytime
No hidden fees
Signatures included, no envelope fee