How to Redline a Word Document? Complete Guide
To redline a document in Microsoft Word, you use the Track Changes feature and also comments. This guide explains how to redline a Word document in Mac, Windows, and Microsoft 360, how to add comments, review and compare versions, and how to save and share redlined documents.
- TL;DR – Redlining in Word Made Simple
- How to redline a Microsoft Word document
- How to redline a Word document with comments
- How to accept or reject redline changes in Word
- How to save changes on a redline Word document properly?
- How to save a redlined Word document as a PDF
- How to compare two Word documents and create a redline?
- How to share and send a redline Word document
- Advanced redline setting in Microsoft Word
- Redlining a sensitive or legal document?

TL;DR – Redlining in Word Made Simple
Redlining in Word works through the Track Changes feature, it’s not called “redline.”
- Turn on Track Changes
- Windows: ^ Ctrl + ⇧ Shift + E
- Mac: ⌘ Command + ⇧ Shift + E
- Add Comments Quickly
- Highlight text → Review > New Comment
- Shortcut:
- Windows: ^ Ctrl + ⌥ Alt + M
- Mac: ⌘ Command + ⌥ Option + A
- Compare Two Documents
- Go to Review > Compare → select original + revised files.
- Save & Share
- To send with markup visible: File > Save As > PDF (make sure markup is displayed).
Redlining in Word works through the Track Changes feature, so it’s not called “redline.”
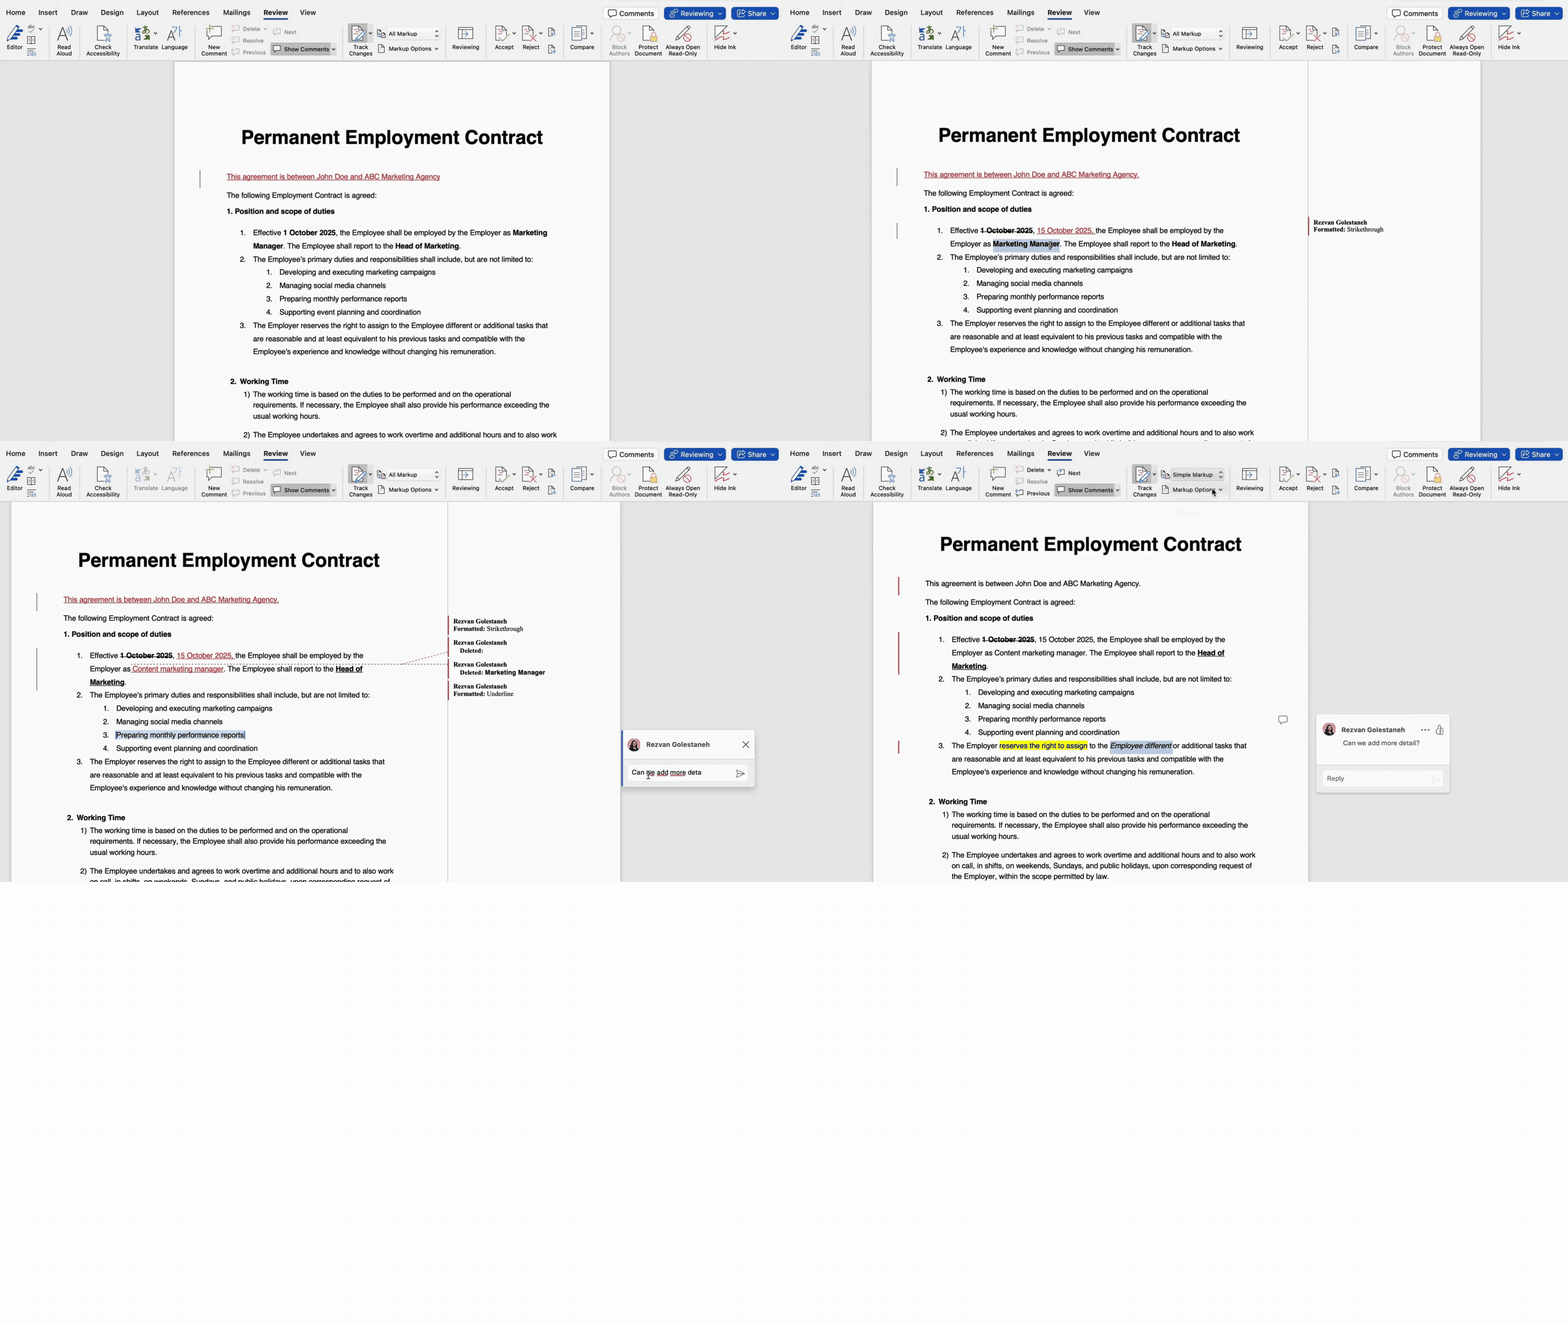
This is the redlining panel (Review) in Mac:


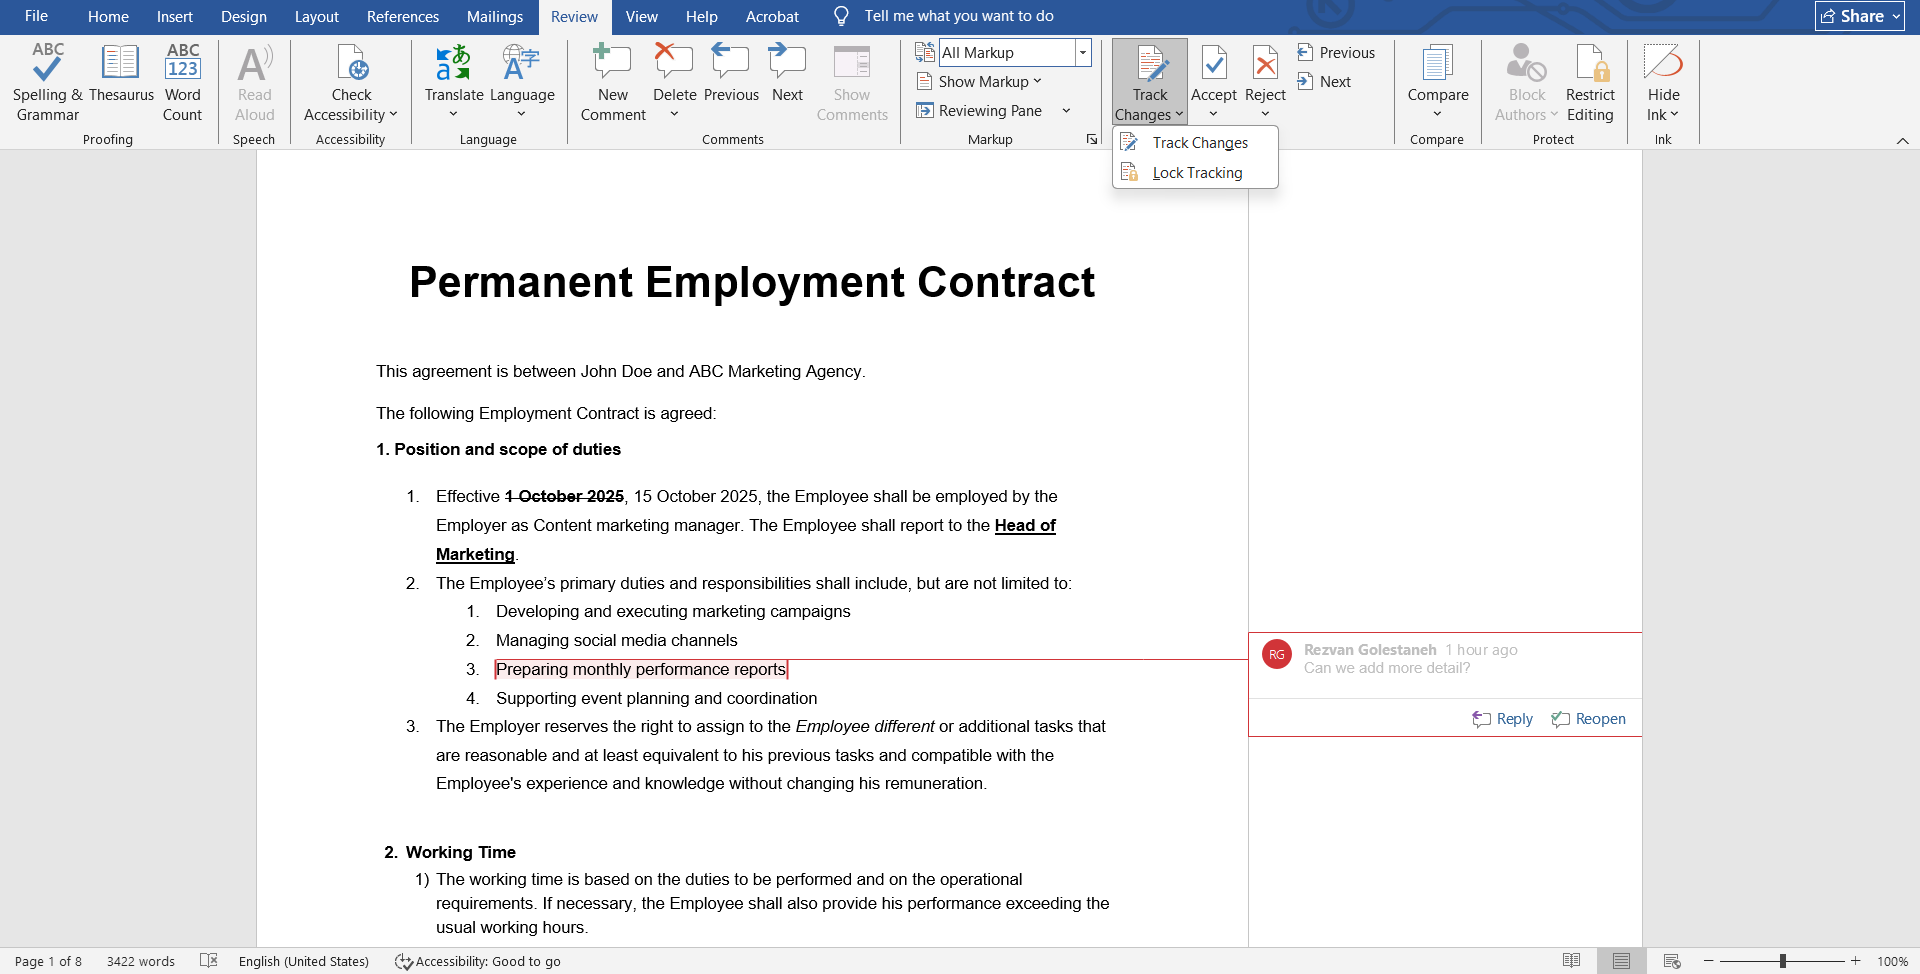
And this is Review panel in Microsoft Word Windows version:


And here’s the Microsoft 360 (online) version:


- Word desktop (Windows/Mac): Full Track Changes with all options (insertions, deletions, formatting, comments, balloons, reviewer filters, Compare/Combine, Lock Tracking).
- Word for the web (Microsoft 365 Online): Supports Track Changes, adding comments, and viewing edits, but lacks advanced controls (no Compare/Combine, limited markup preferences, fewer balloon/appearance settings).
- Word mobile (iOS/Android): Very basic redlining — you can toggle Track Changes, add comments, and accept/reject edits, but advanced settings and customization aren’t available.
How to redline a Microsoft Word document
On Mac
Step 1: Turn on track changes
- Open your document in Microsoft Word for Mac.
- On the top menu bar, click the Review tab.
- Select Track Changes. When it’s on, the button will stay highlighted.
- Shortcut: press ⌘ Command + ⇧ Shift + E to toggle Track Changes on or off.


Step 2: Customize how changes appear
- In the Review tab, open the drop-down next to Tracking.
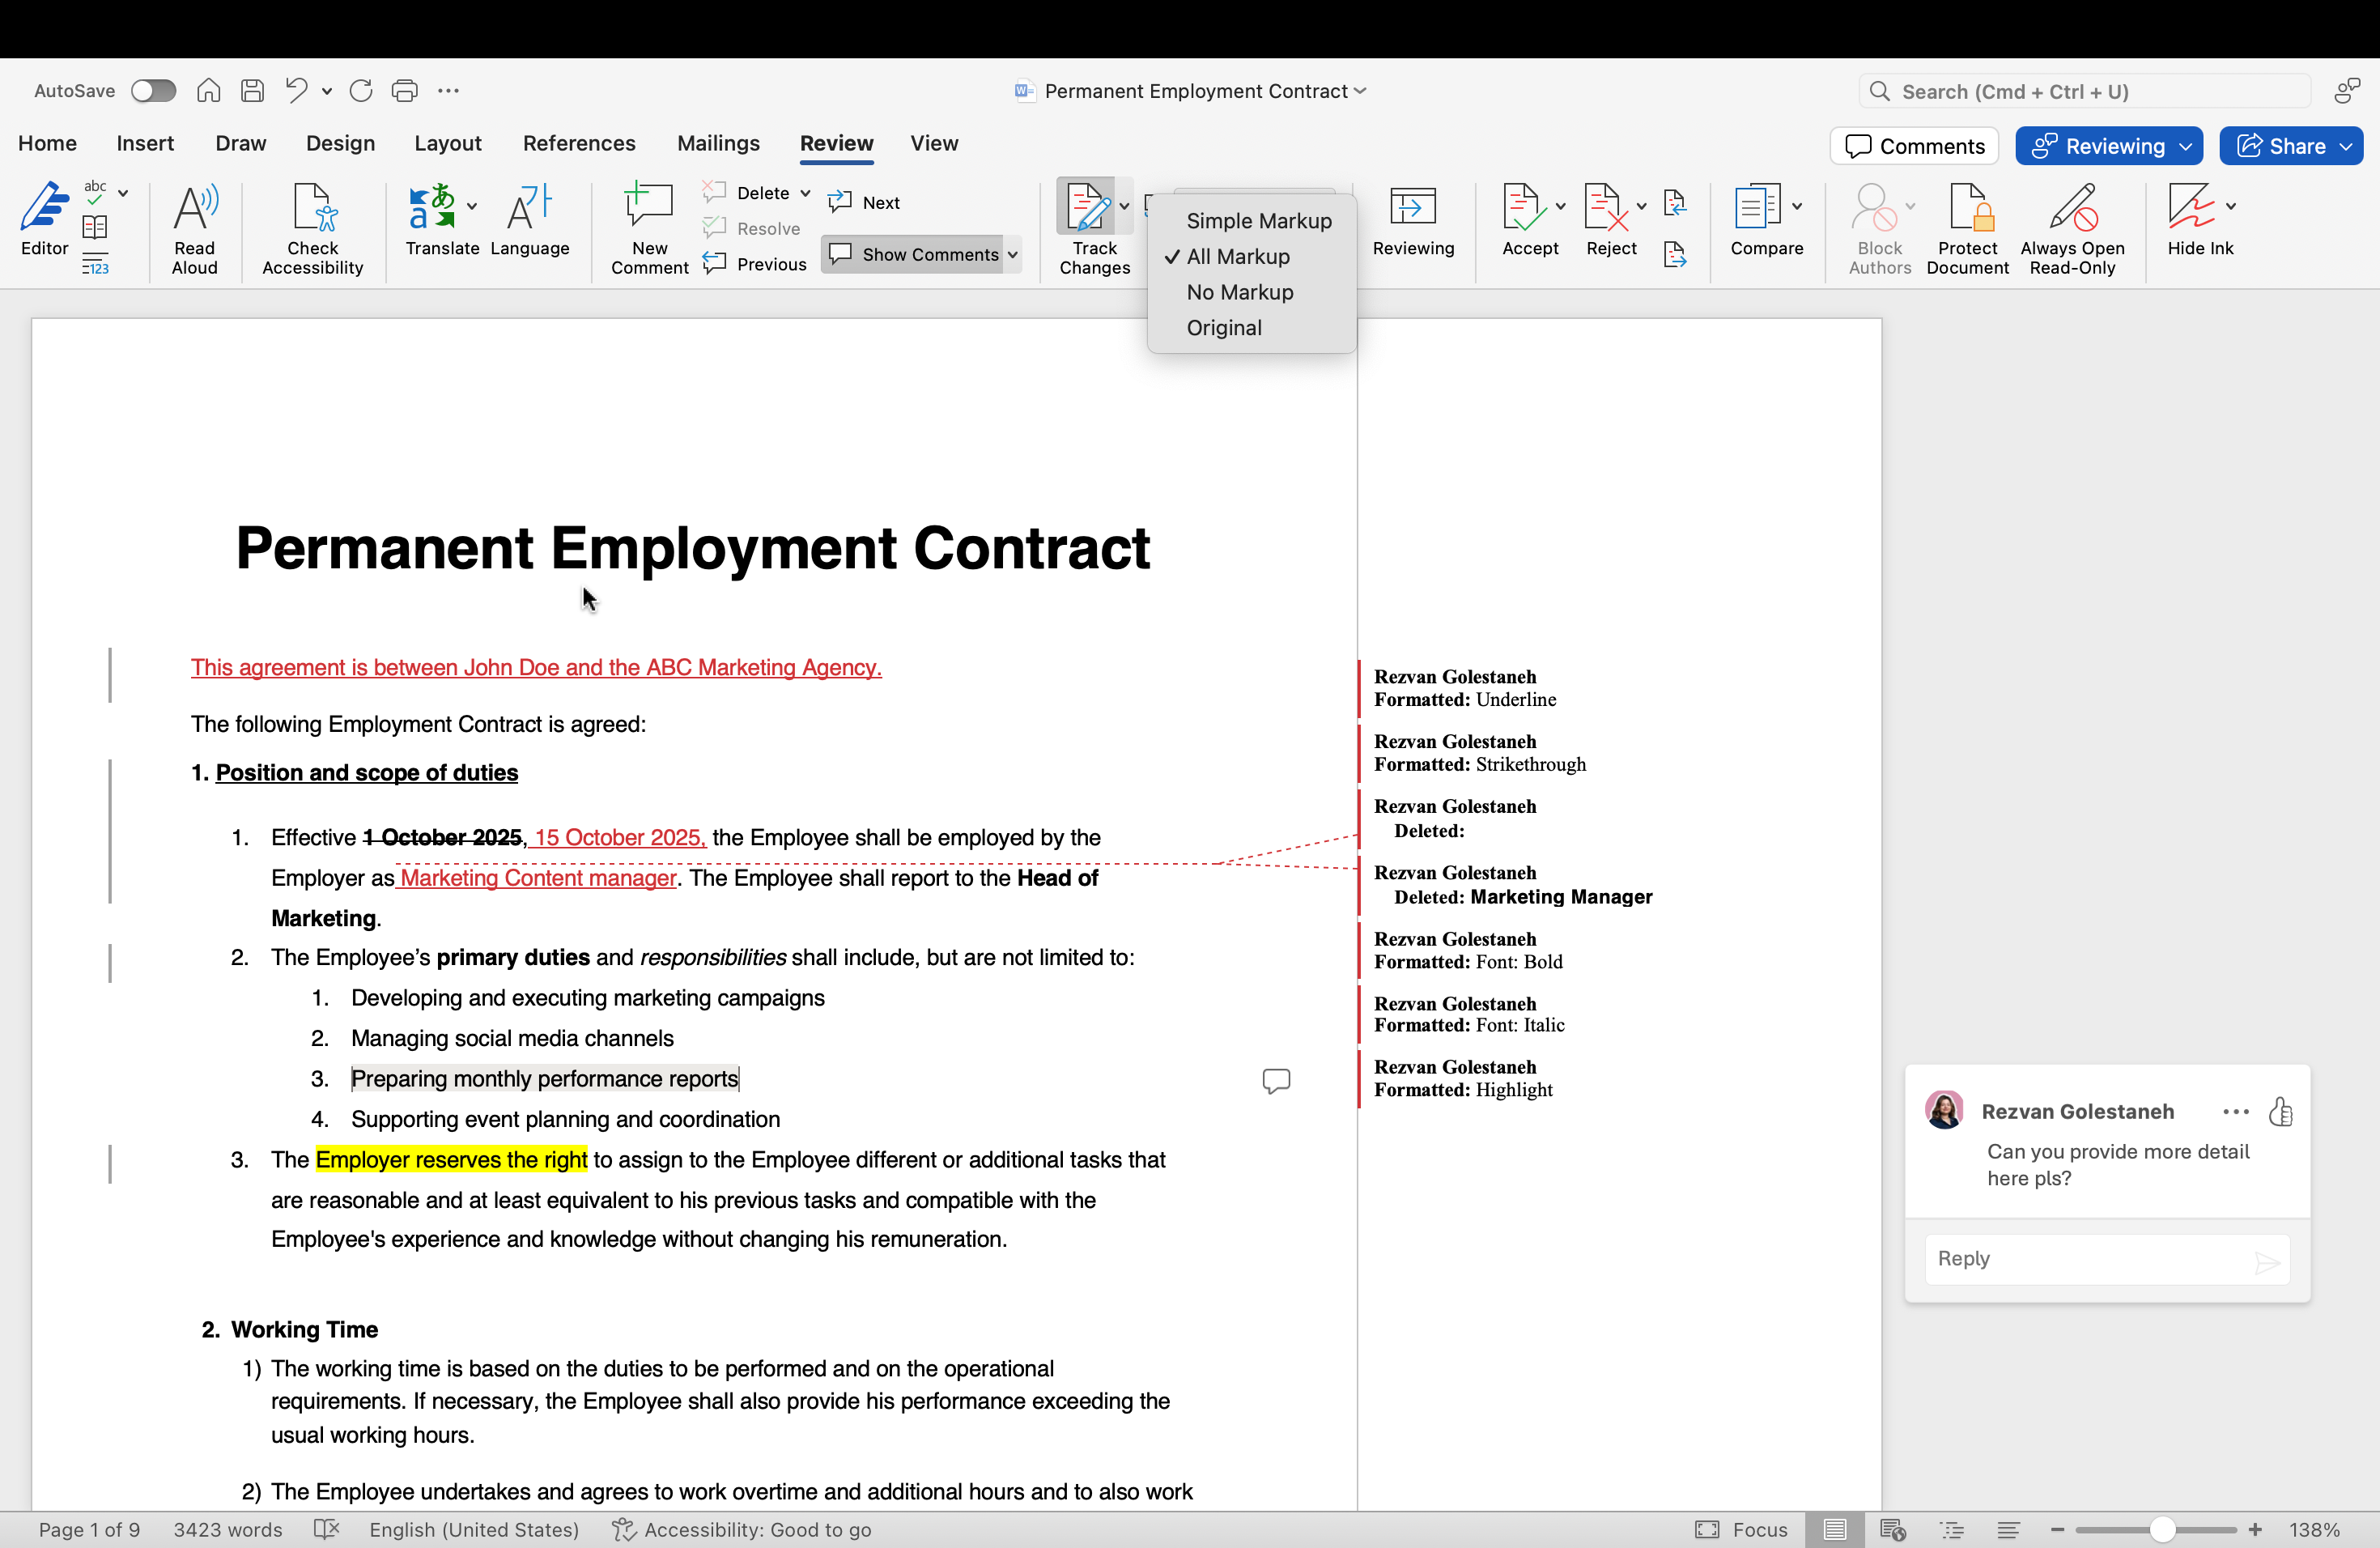
- Choose your display mode:
- All Markup → shows all changes and comments.
- Simple Markup → shows a clean text view with a red line in the margin for changes.
- No Markup → hides the edits so you see a final-style document.
- Original → displays the document before any tracked changes.


- Use Show Markup to turn on/off specific items like Comments, Insertions and Deletions, or Formatting.
Step 3: Start editing
- Insert text: just type; Word marks it as new.
- Delete text: press Delete or Backspace; Word strikes it out or moves it to a balloon, depending on settings.
- Format text: font, size, color, bold, italic — all are tracked if formatting is enabled.
- Add comments: highlight text → click New Comment in the Review tab (or use ⌘ Command + ⌥ Option + A) → type your note.


In windows
The process is very similar to Mac.
Step 1: turn on track changes
- Open your document in Microsoft Word.
- Go to the Review tab on the ribbon.
- Click the Track Changes button. Once it’s active, the button stays highlighted.
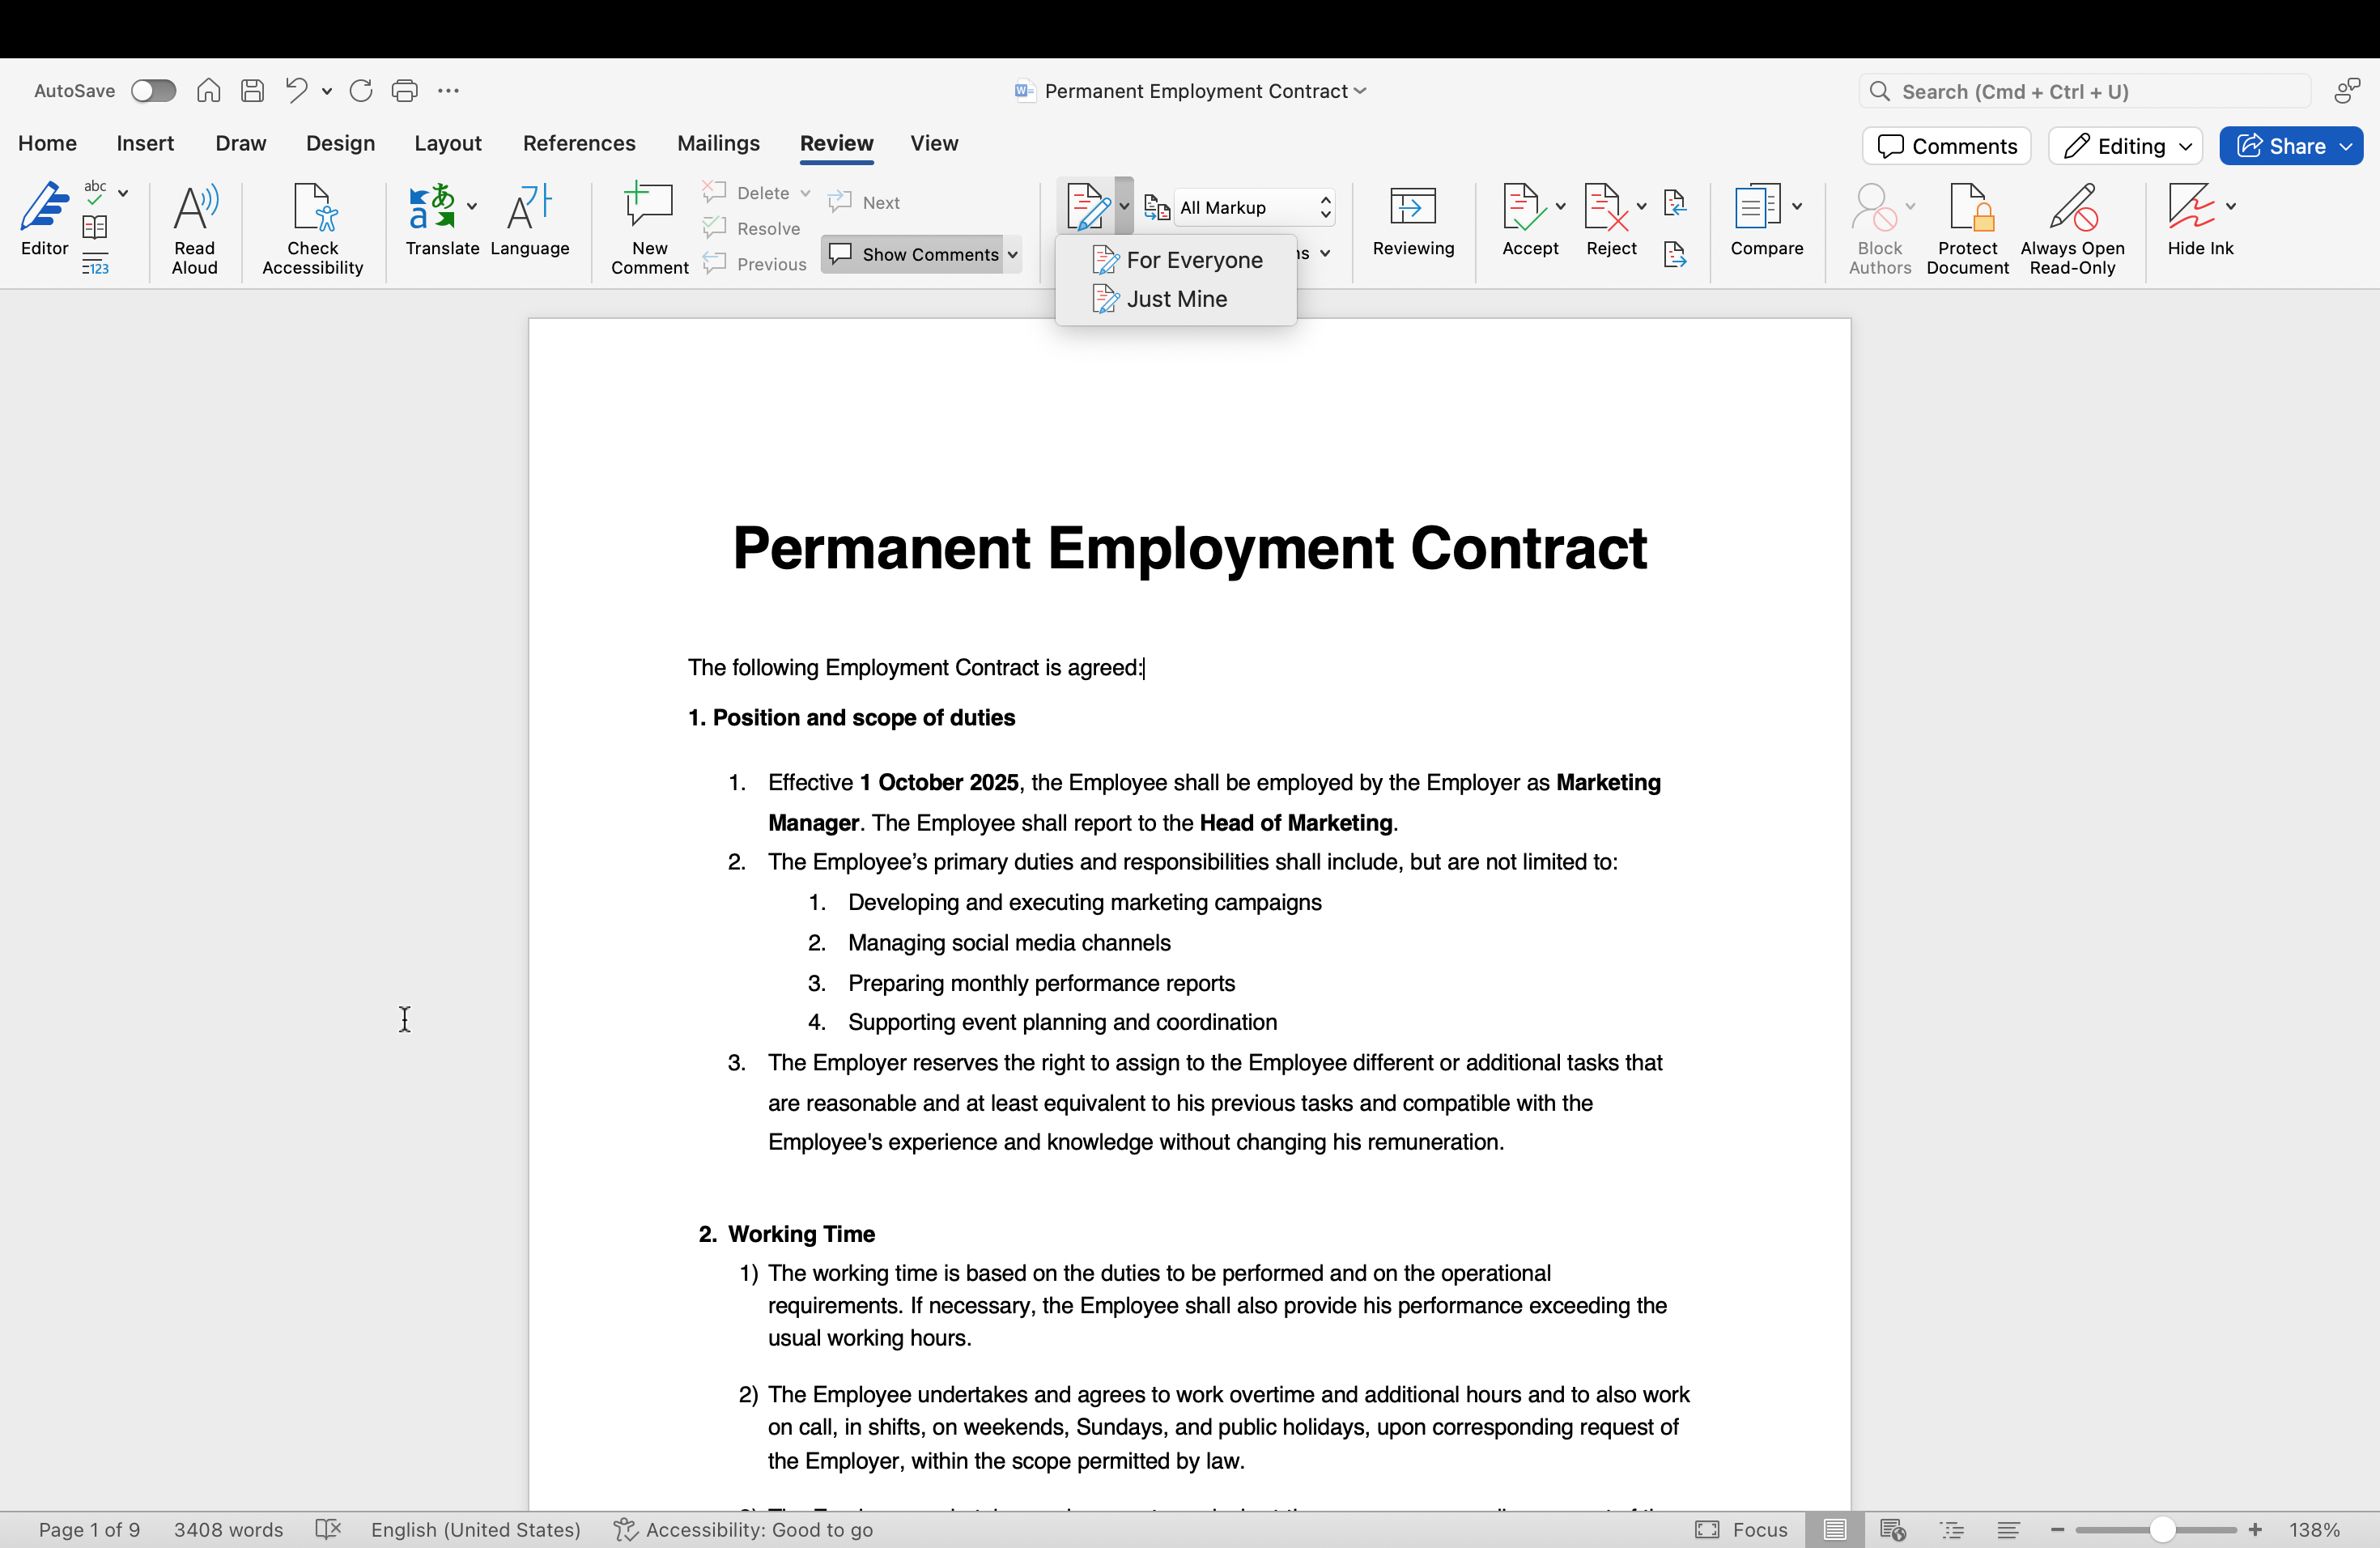
- If you click the small arrow next to it, you’ll see two choices:
- For Everyone → Word will track all edits from every contributor.
- Just Mine → only your edits will be tracked, even if other people are making changes.
- If you click the small arrow next to it, you’ll see two choices:
- Shortcut: press ^ Ctrl + ⇧ Shift + E to toggle Track Changes on or off.


Step 2: customize how changes appear
- Still under the Review tab, look for the drop-down that says Simple Markup (default).
- Switch between views depending on what you need:
- All Markup → shows every single change inline or in balloons.
- Simple Markup → keeps things clean, but a red line in the margin shows where edits are.
- No Markup → lets you preview the document as if all changes were accepted.
- Original → shows the text before edits.
- Under Show Markup, you can also choose to display or hide specific elements like Comments, Formatting changes, or edits from Specific People.
Step 3: Start editing
- Insert text: just type normally; Word highlights it as new.
- Delete text: press Delete or Backspace; Word marks it with a strikethrough or balloon.
- Format text: apply bold, italics, font changes — Word records these if formatting markup is enabled.
- Add comments: highlight a passage → click New Comment (or press ^ Ctrl + ⌥ Alt + M) → type your note.
💡 Good to Know: In Microsoft 360, you only have the All Markup and Simple Markup views.
How to redline a Word document with comments
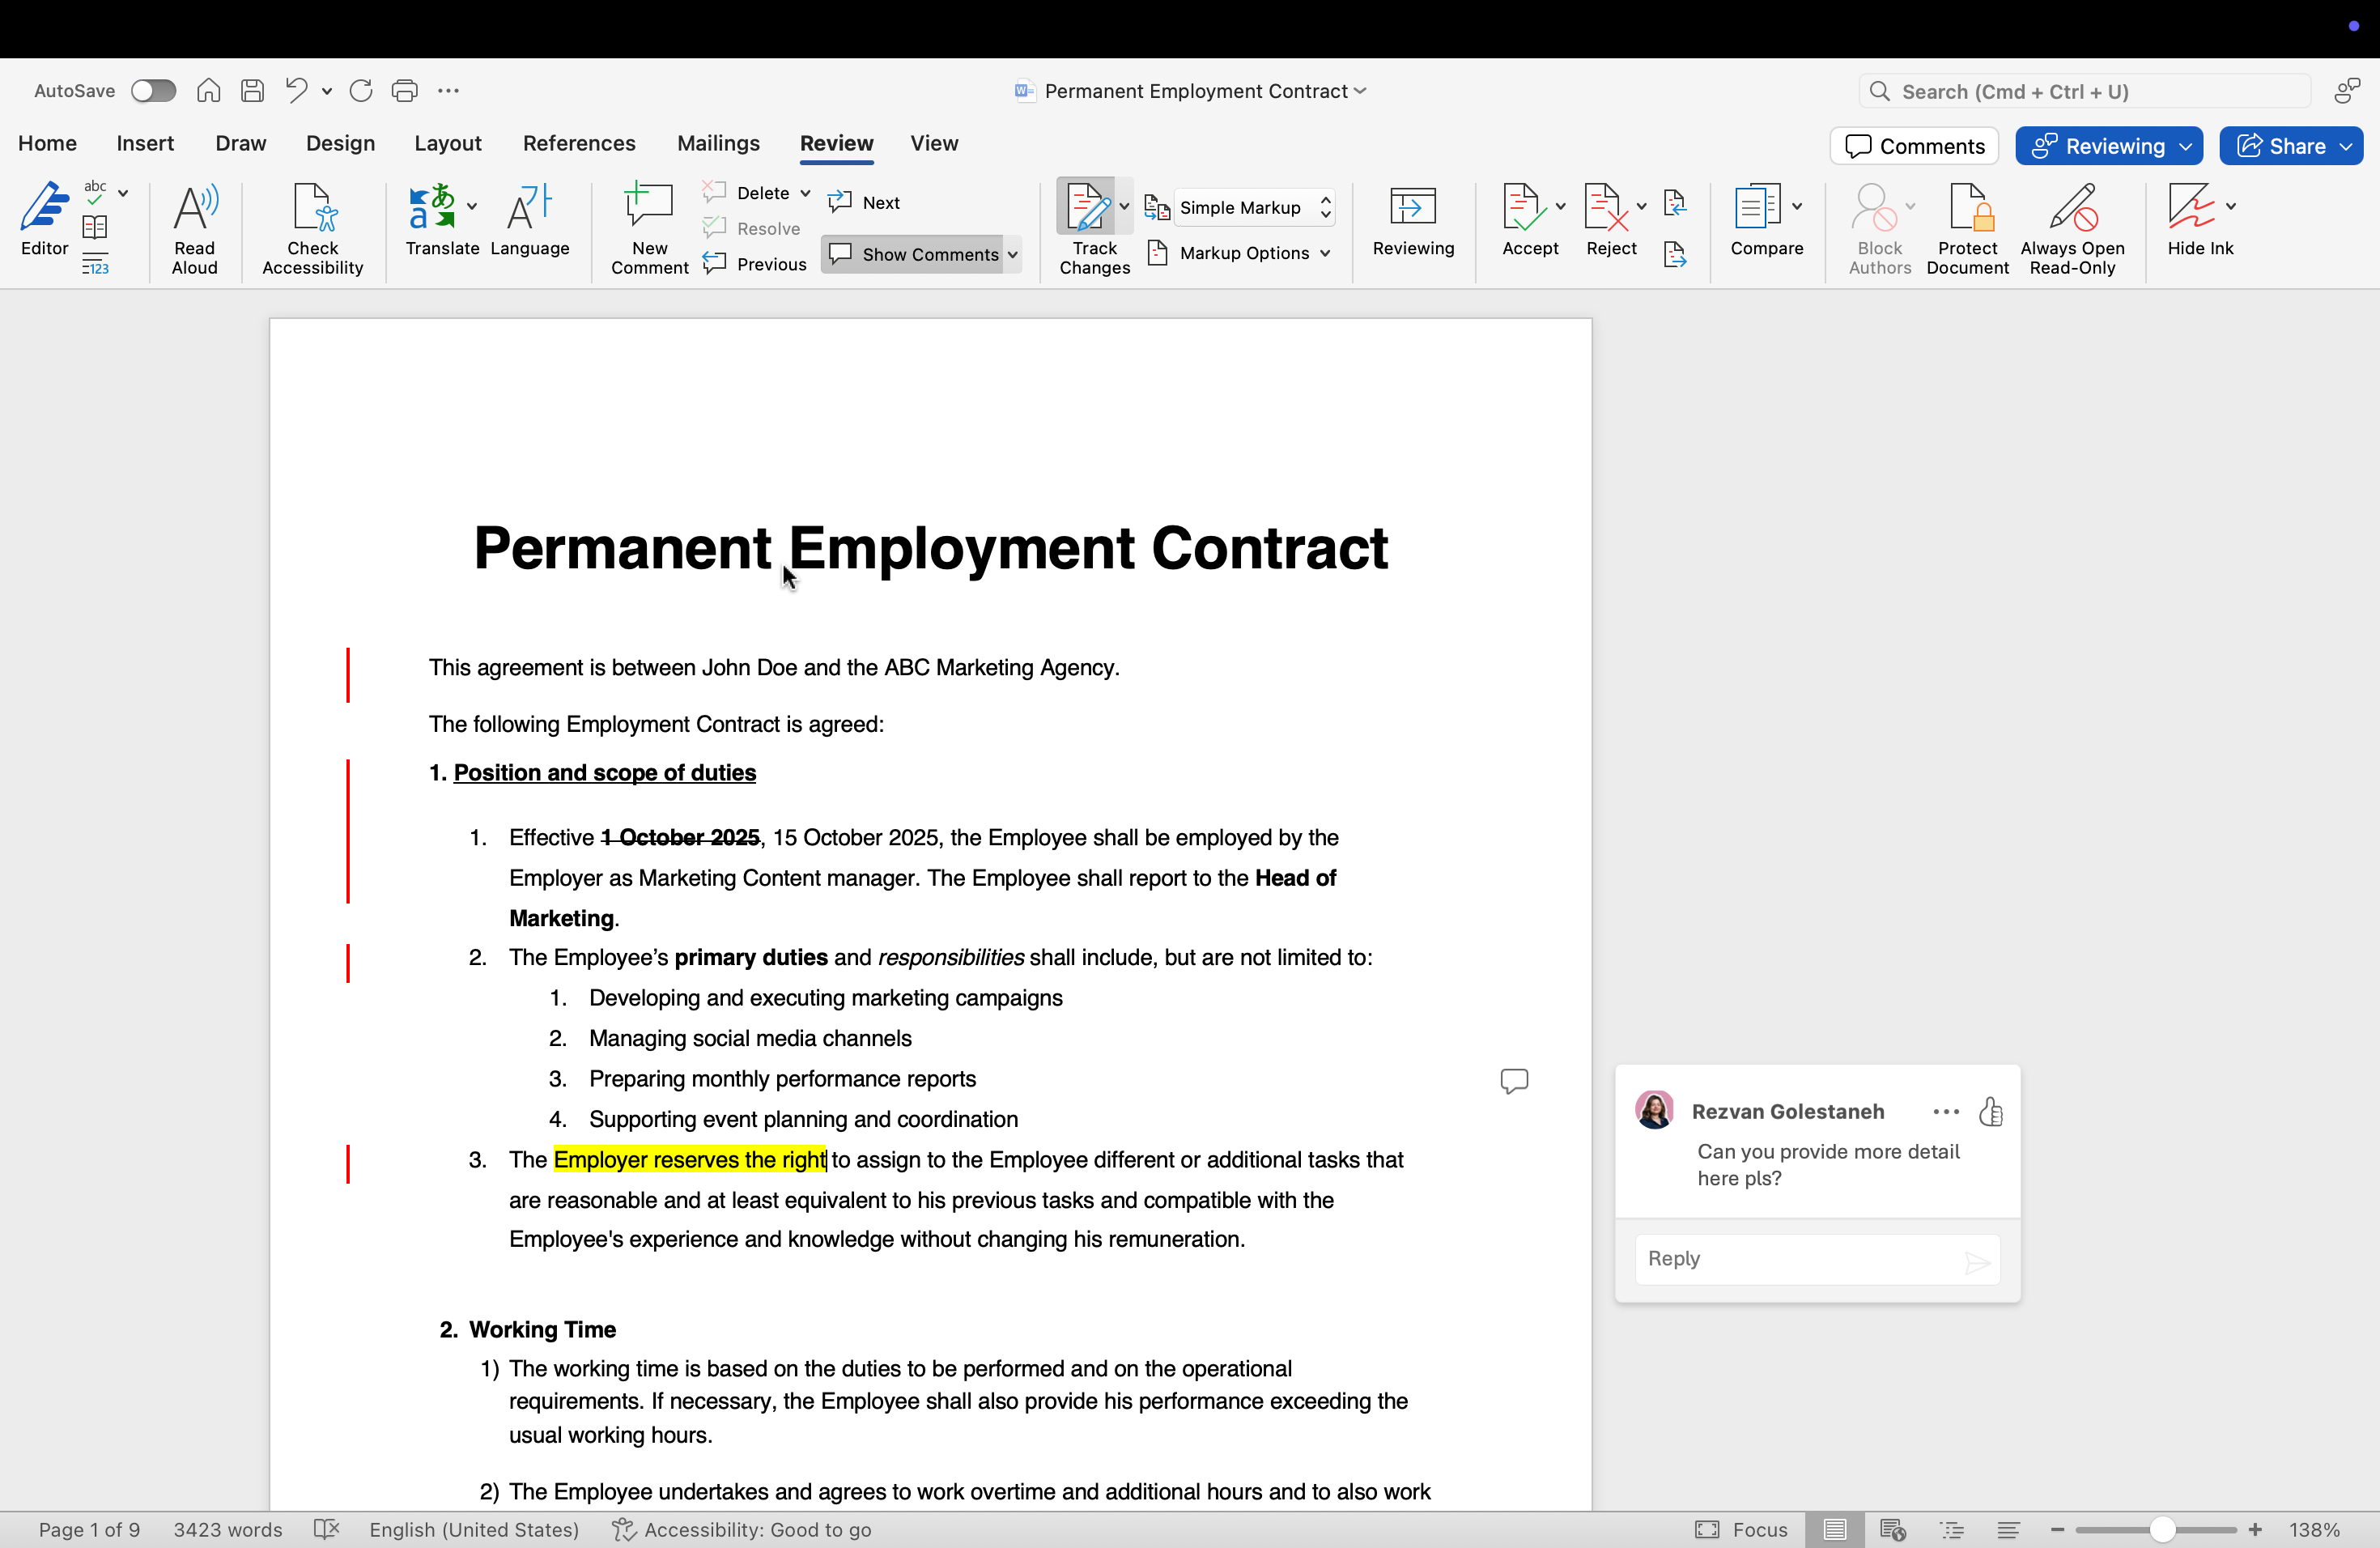
Comments are great when you want to leave feedback without editing the main text.
On Mac
Step 1: Add a comment
- Highlight the text you want to comment on.
- In the Review tab, click New Comment. Shortcut: ⌘ Command + ⌥ Option + A.
- Type your note in the margin.
Step 2: Edit or delete a comment
- Edit by clicking into the comment balloon.
- Delete by right-clicking and choosing Delete Comment, or from the Review tab.
💡 Good to Know: You can switch between Contextual or List display option for comments using the Show Comments option in the toolbar.


In Windows
Step 1: Add a comment
- Highlight the text or section you want to comment on.
- Go to the Review tab.
- Click New Comment. A balloon will appear in the margin where you can type your note.
- Shortcut: ^ Ctrl + ⌥ Alt + M.
Step 2: Edit or delete a comment
- To edit: click inside the balloon and change the text.
- To delete: right-click the balloon and select Delete Comment, or use the Delete option in the Review tab.
How to accept or reject redline changes in Word
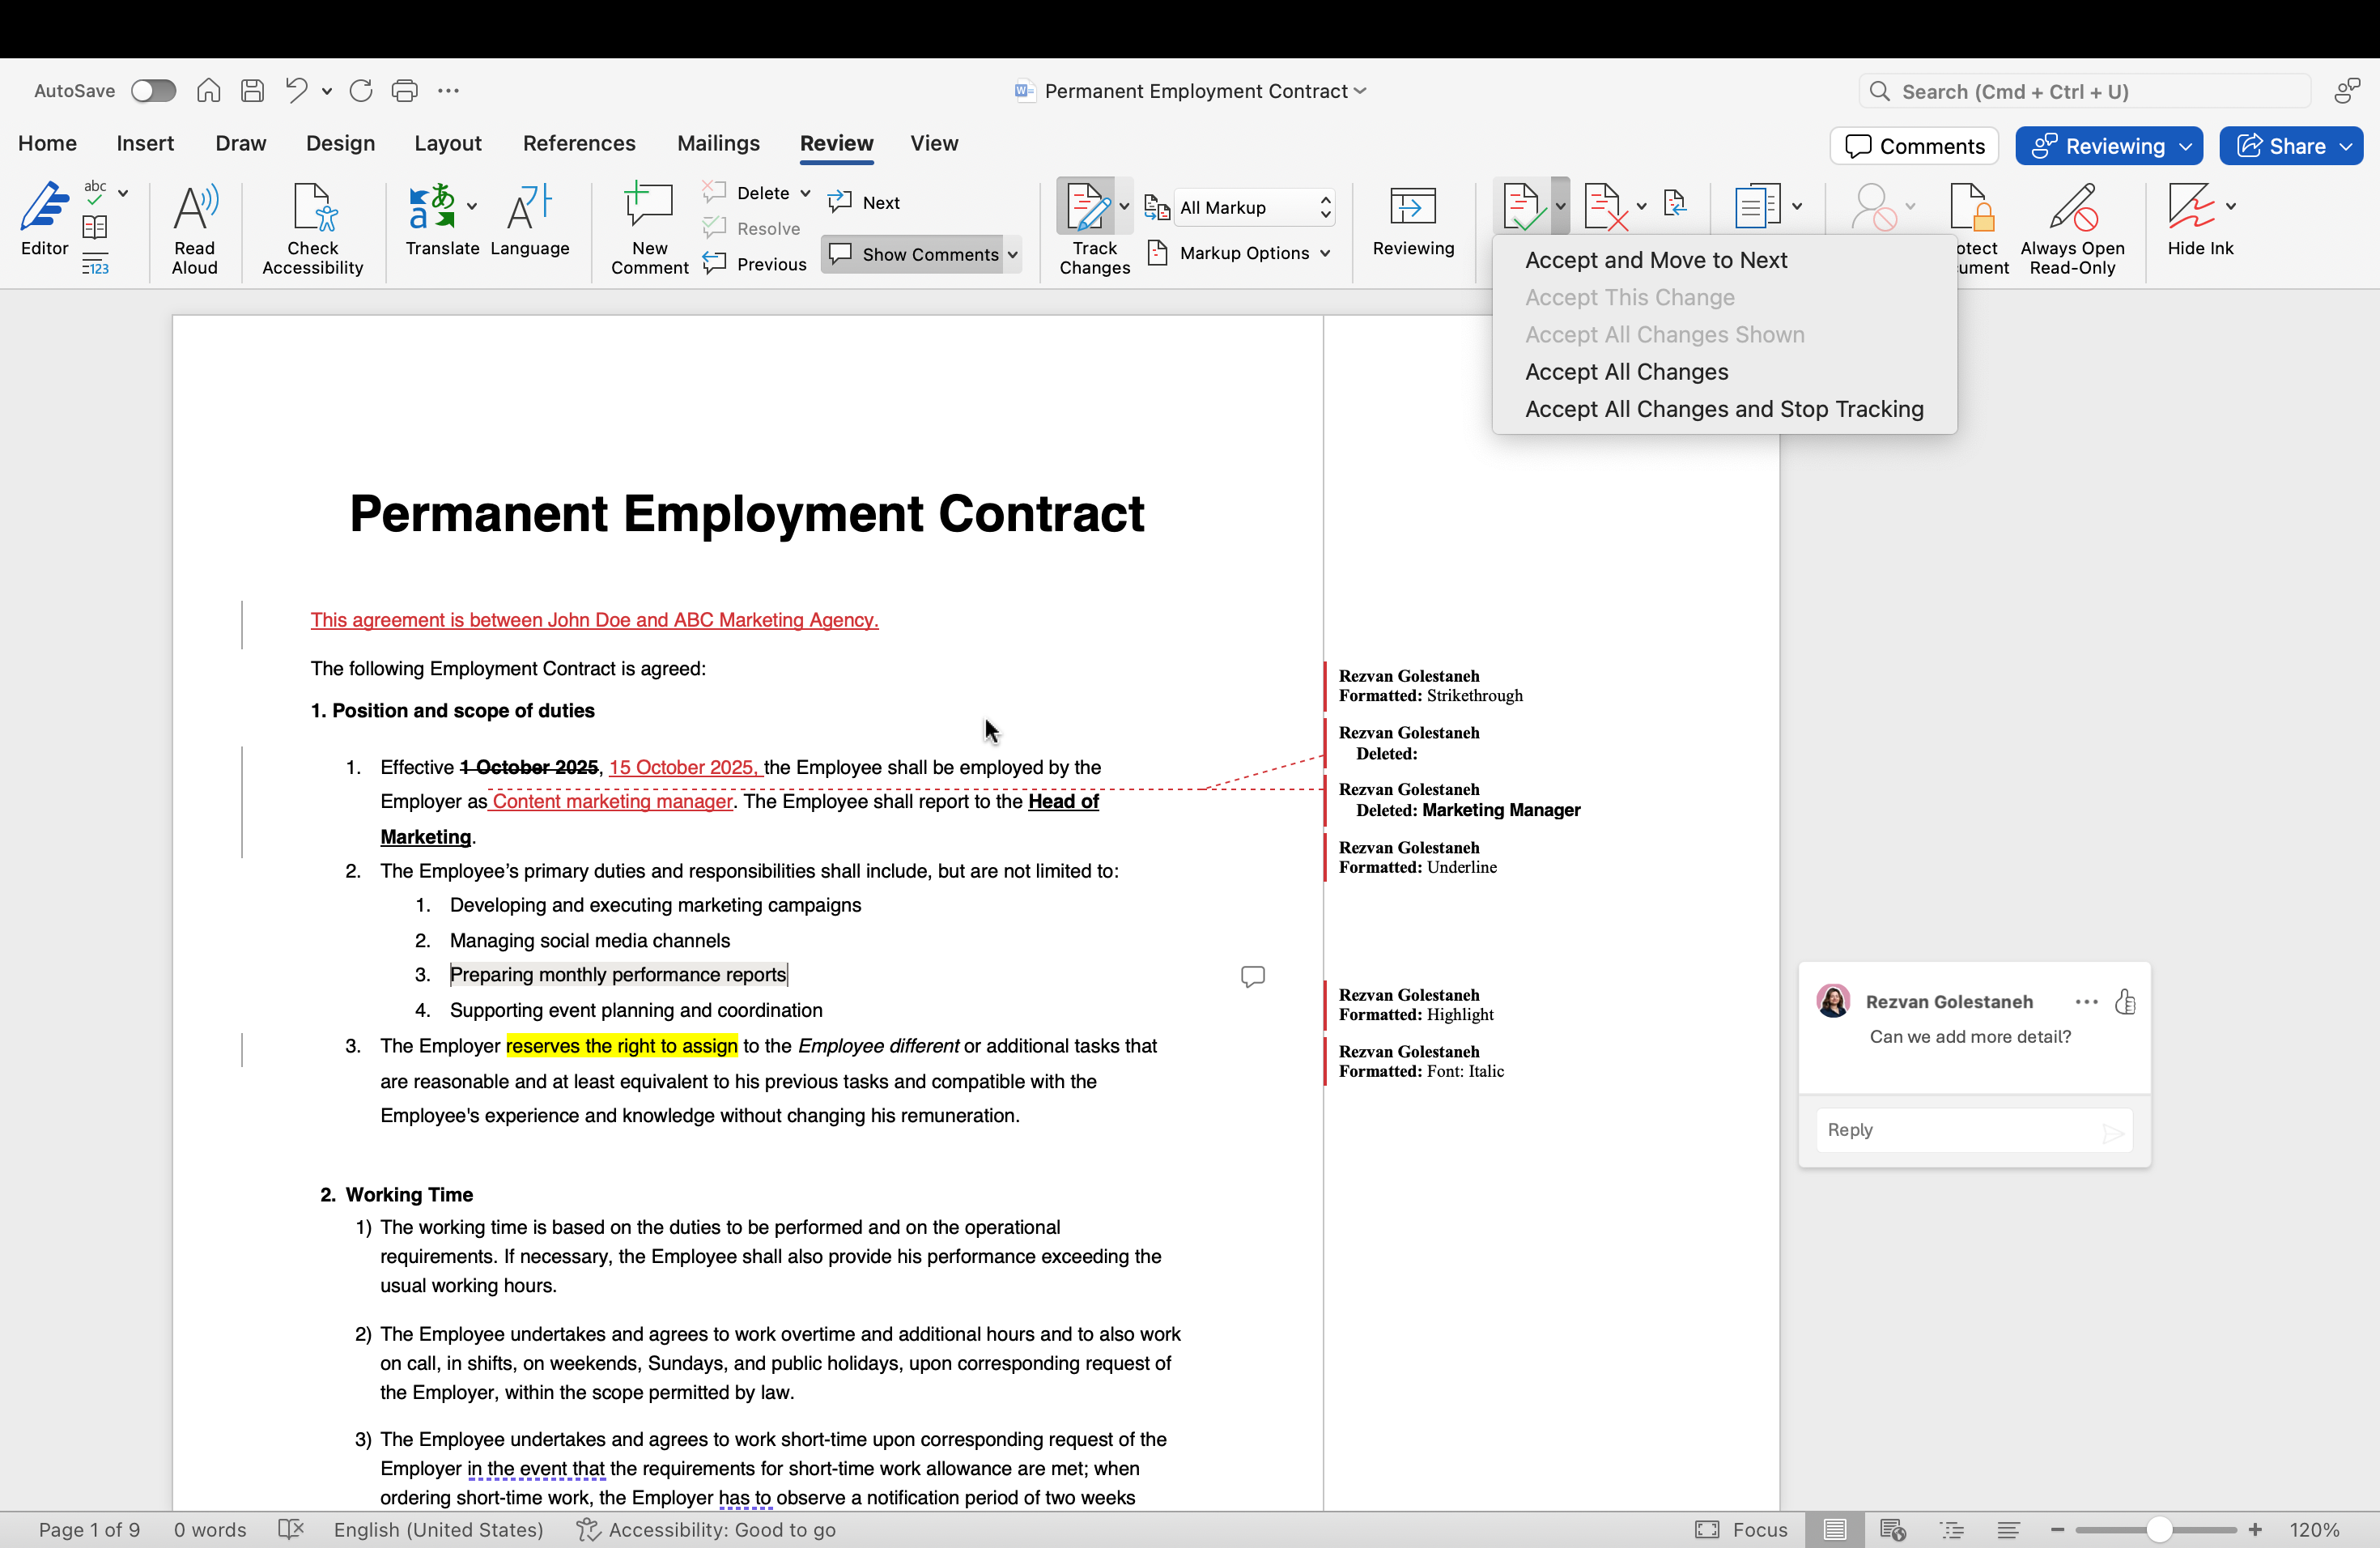
If you’ve just received a redlined document, your job is to review the edits and decide what stays and what goes. Here’s exactly how to do it:
Step 1: Open the Review tab
At the top of the Word window, click the Review tab. This is where all the tools for handling tracked changes live.
Step 2: Work through the changes one by one
In the Changes group, use the Next and Previous buttons to jump between edits. This lets you go through the document step by step without missing anything.
Step 3: Decide on each change
- If you agree with the edit, click Accept. Word will apply it to the text and move to the next change.
- If you don’t want it, click Reject. Word will discard it and restore the original text.
Step 4: Speed things up if you trust the edits
If you’ve already reviewed the document outside Word and just want to finalize it, click the small arrow under Accept or Reject and choose Accept All Changes or Reject All Changes. This applies your decision to the whole file at once.


In iPhone & Android
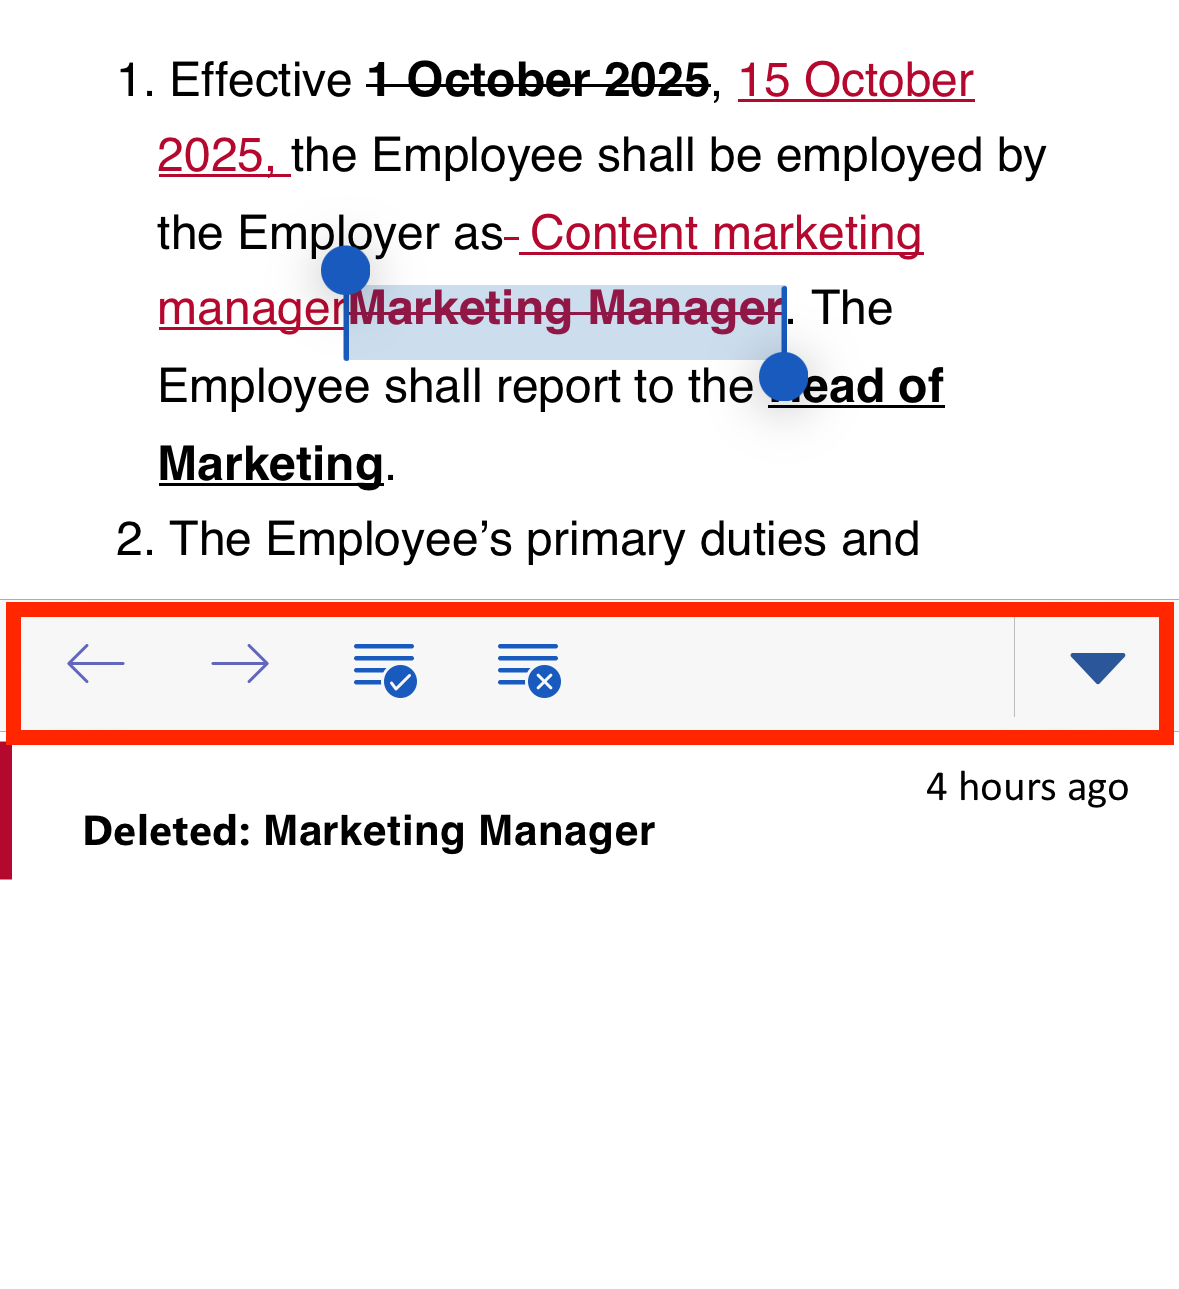
Although the redlining features of MS Word is very limited on mobile phones, you can still:
- Accept or reject the changes
- Reviewing the changes made to the document
- Reply or leave comments


Step 5: Save your final copy
When you’re done, save the document with a clear name like Contract_Final.docx. It’s also a good idea to keep a separate copy of the redlined version (e.g., Contract_Redline.docx) so you have a record of the edit history if needed later.
How to save changes on a redline Word document properly?
Saving a document with redlines requires paying attention to how changes are displayed and who’s edits are shown. Here’s how to do it right:
1. Keep the redlines visible for review
- Go to the Review tab.
- In the Tracking group, set the display to All Markup.
- Under Show Markup → Specific People, choose All Reviewers if you want every edit to appear in the saved file.
- If you select only one reviewer, only that person’s edits will show when you save. The other edits remain in the file but stay hidden until turned back on.
- Save the file as a .docx to keep it editable with tracked changes intact.
2. Save a clean version for final use
- Once all changes are reviewed, use Accept All Changes (Review tab > Accept dropdown) to finalize.
- Save again under a different name, for example:
Contract_Draft_Redline.docx(with changes visible)Contract_Final_Clean.docx(all changes accepted)
How to save a redlined Word document as a PDF
On Mac
On Mac, the process is nearly the same with a slightly different menu flow.
Step 1: Save as PDF
- Go to File > Save As.
- Pick PDF as the format.
- Confirm that markup is set to display before saving.
Step 2: Print to PDF
Go to File > Print.
In the bottom-left corner of the print dialog, click the PDF dropdown.
Select Save as PDF.
This creates a PDF version of the redline, including all visible comments and edits.
In Windows
Sometimes you’ll want to send a redline in a format that can’t be edited, usually PDF.
Step 1: Save as PDF directly
- Go to File > Save As.
- Choose where to save the file.
- From the dropdown menu, select PDF (*.pdf).
- Make sure the markup display is set to All Markup before saving, otherwise changes won’t show.
Step 2: Use Print to PDF
Go to File > Print.
Choose Microsoft Print to PDF as the printer.
Click Print and select where to save the file.
This method also preserves visible markup.
How to compare two Word documents and create a redline?
The Compare feature in Word lets you see what has changed between two versions of the same document without relying on someone to manually turn on Track Changes. Word does this by analyzing the text of both files and producing a new document that shows all differences as redlines.
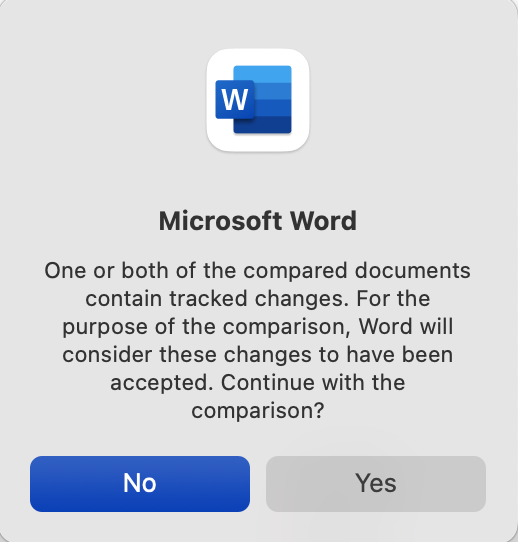
❗️Important: If the revised document already contains tracked changes, Word will ignore the markup itself and compare only the underlying text. The result is a fresh redline of the real differences between the two files.


On Mac & Windows
Step 1: Open the compare tool
- Open one of the two documents in Word for Mac.
- On the top ribbon, click the Review tab.
- In the Compare group, click Compare Documents (there is no dropdown like in Windows — it opens directly).
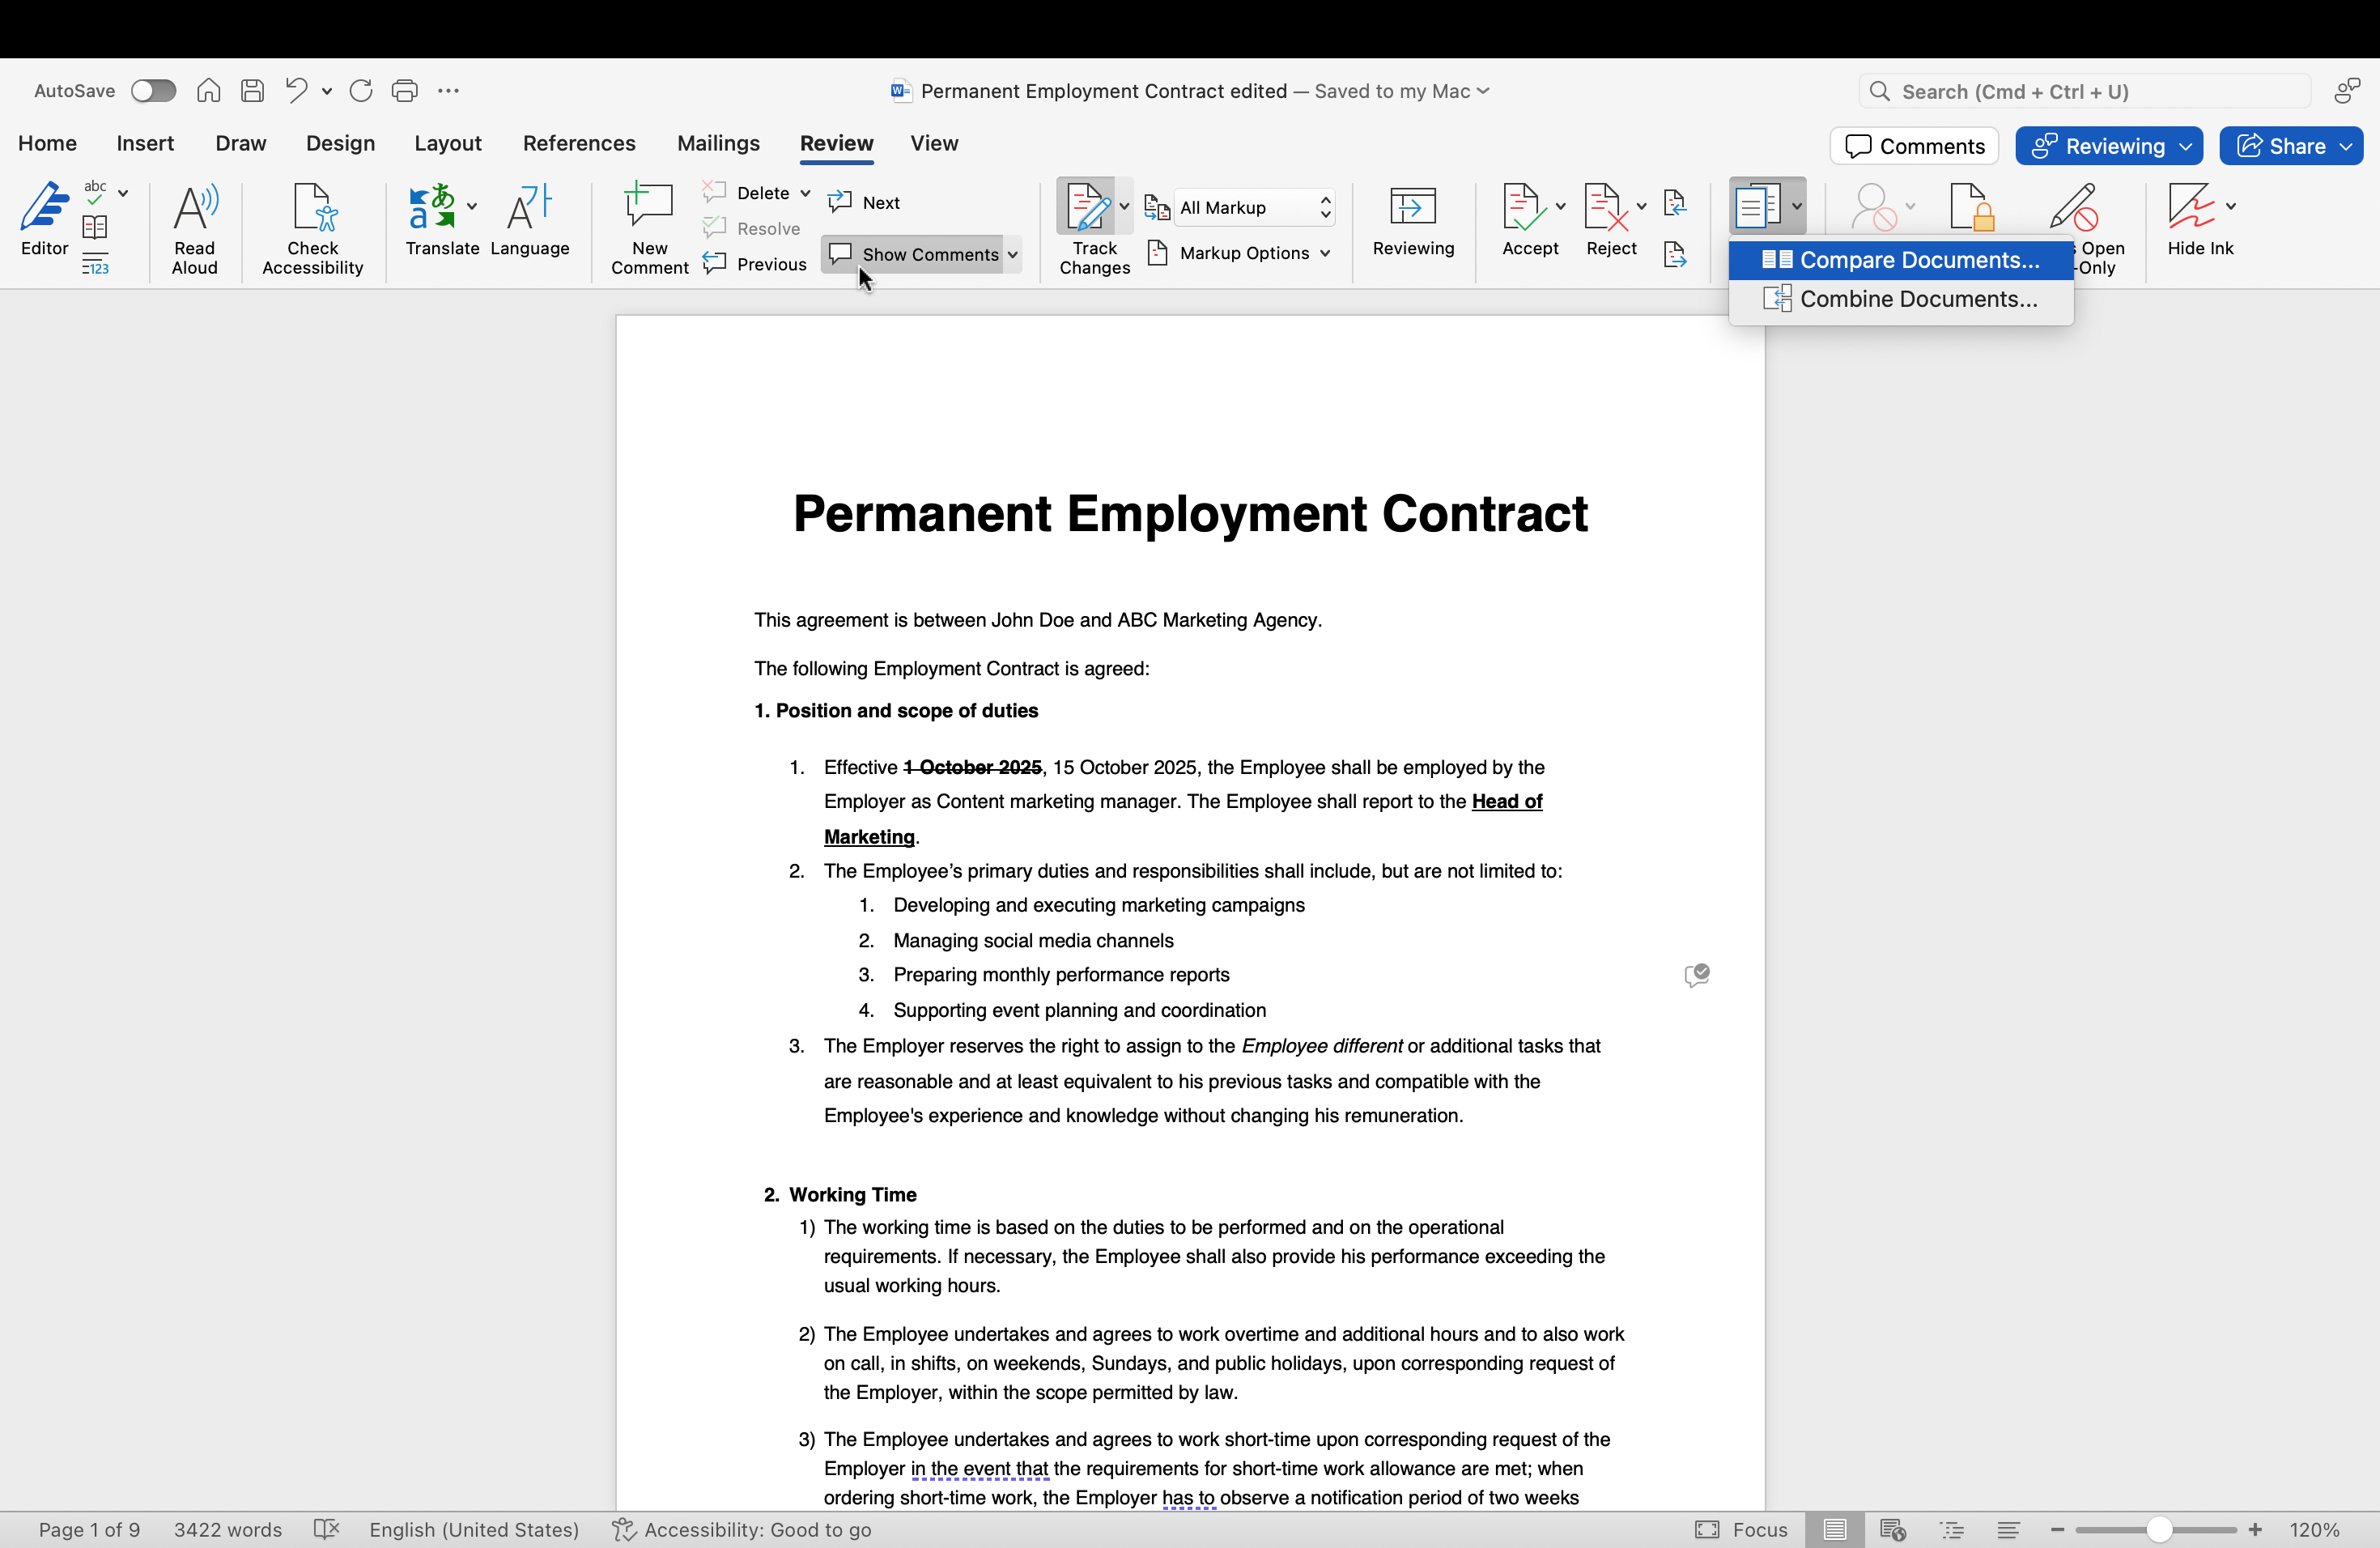


Step 2: Select your files
- A dialog box will appear.
- In the Original document field, browse for and select the earlier version.
- In the Revised document field, browse for and select the newer version.
- Click OK.
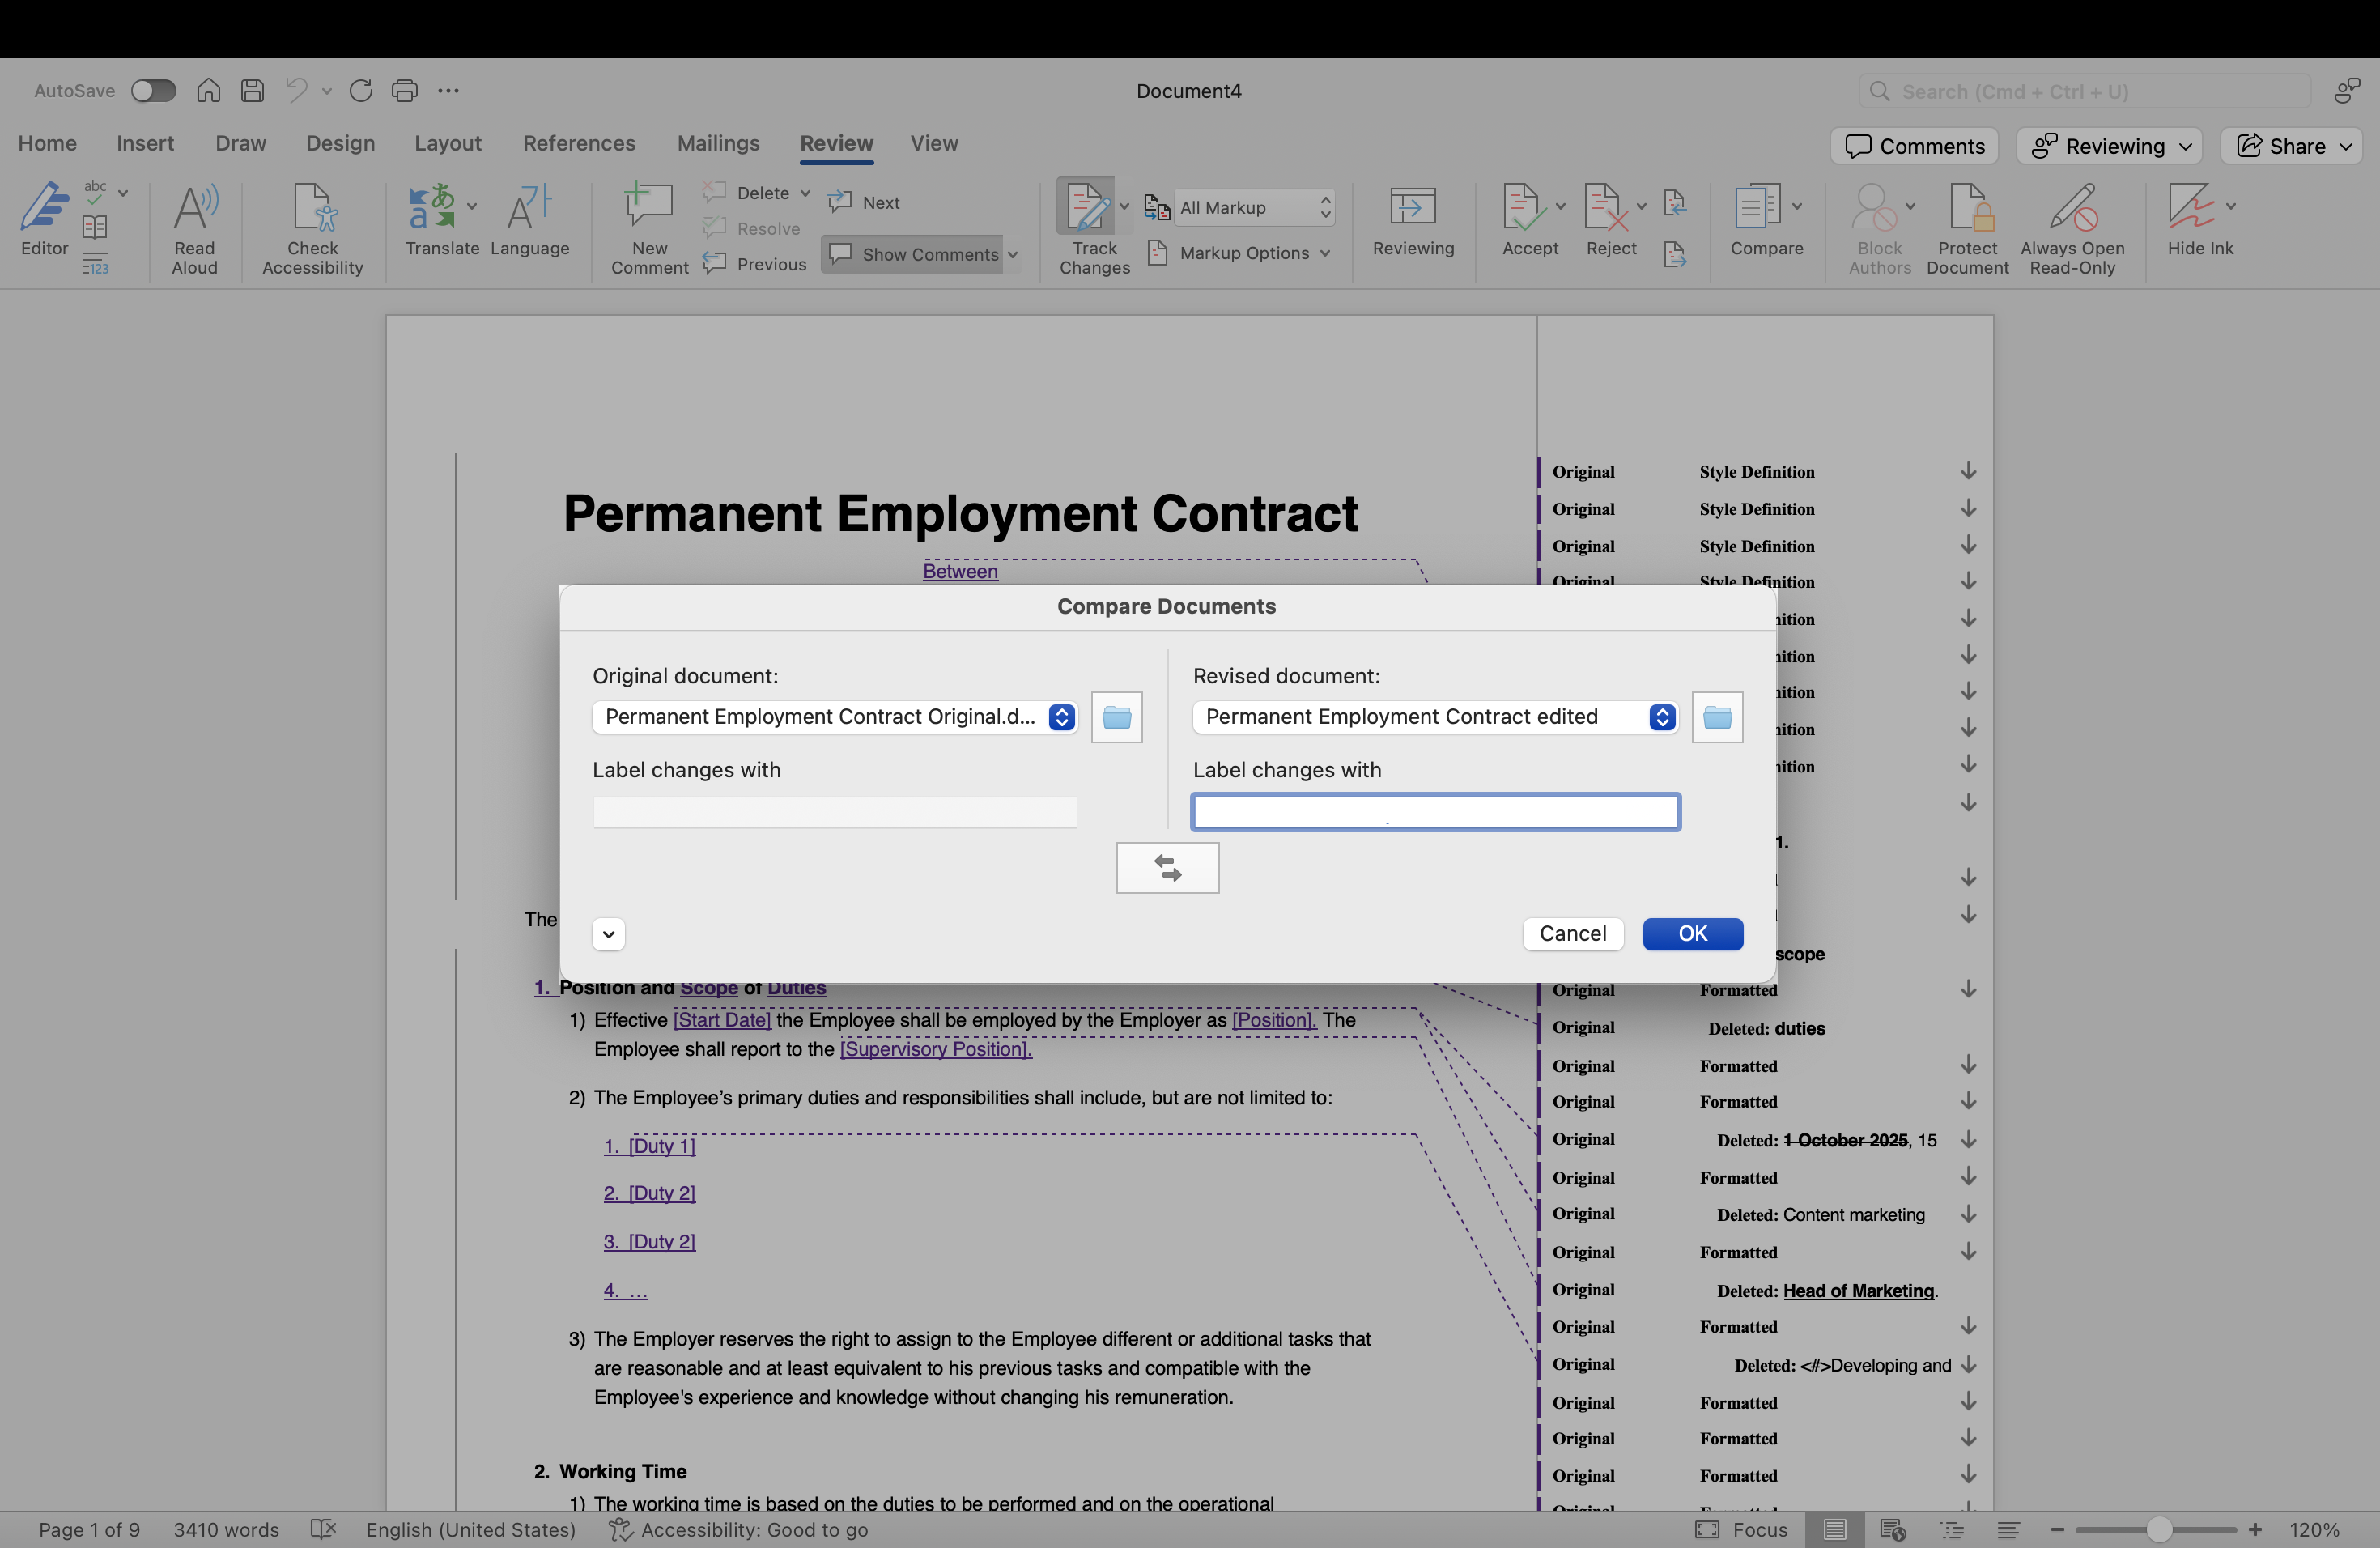


Step 3: Review the comparison
- Word creates a new comparison document showing tracked changes.
- Insertions, deletions, and formatting differences are highlighted just like they are when Track Changes is on.
- Use the Review tab to move through the edits, accept or reject changes, and leave comments as needed.
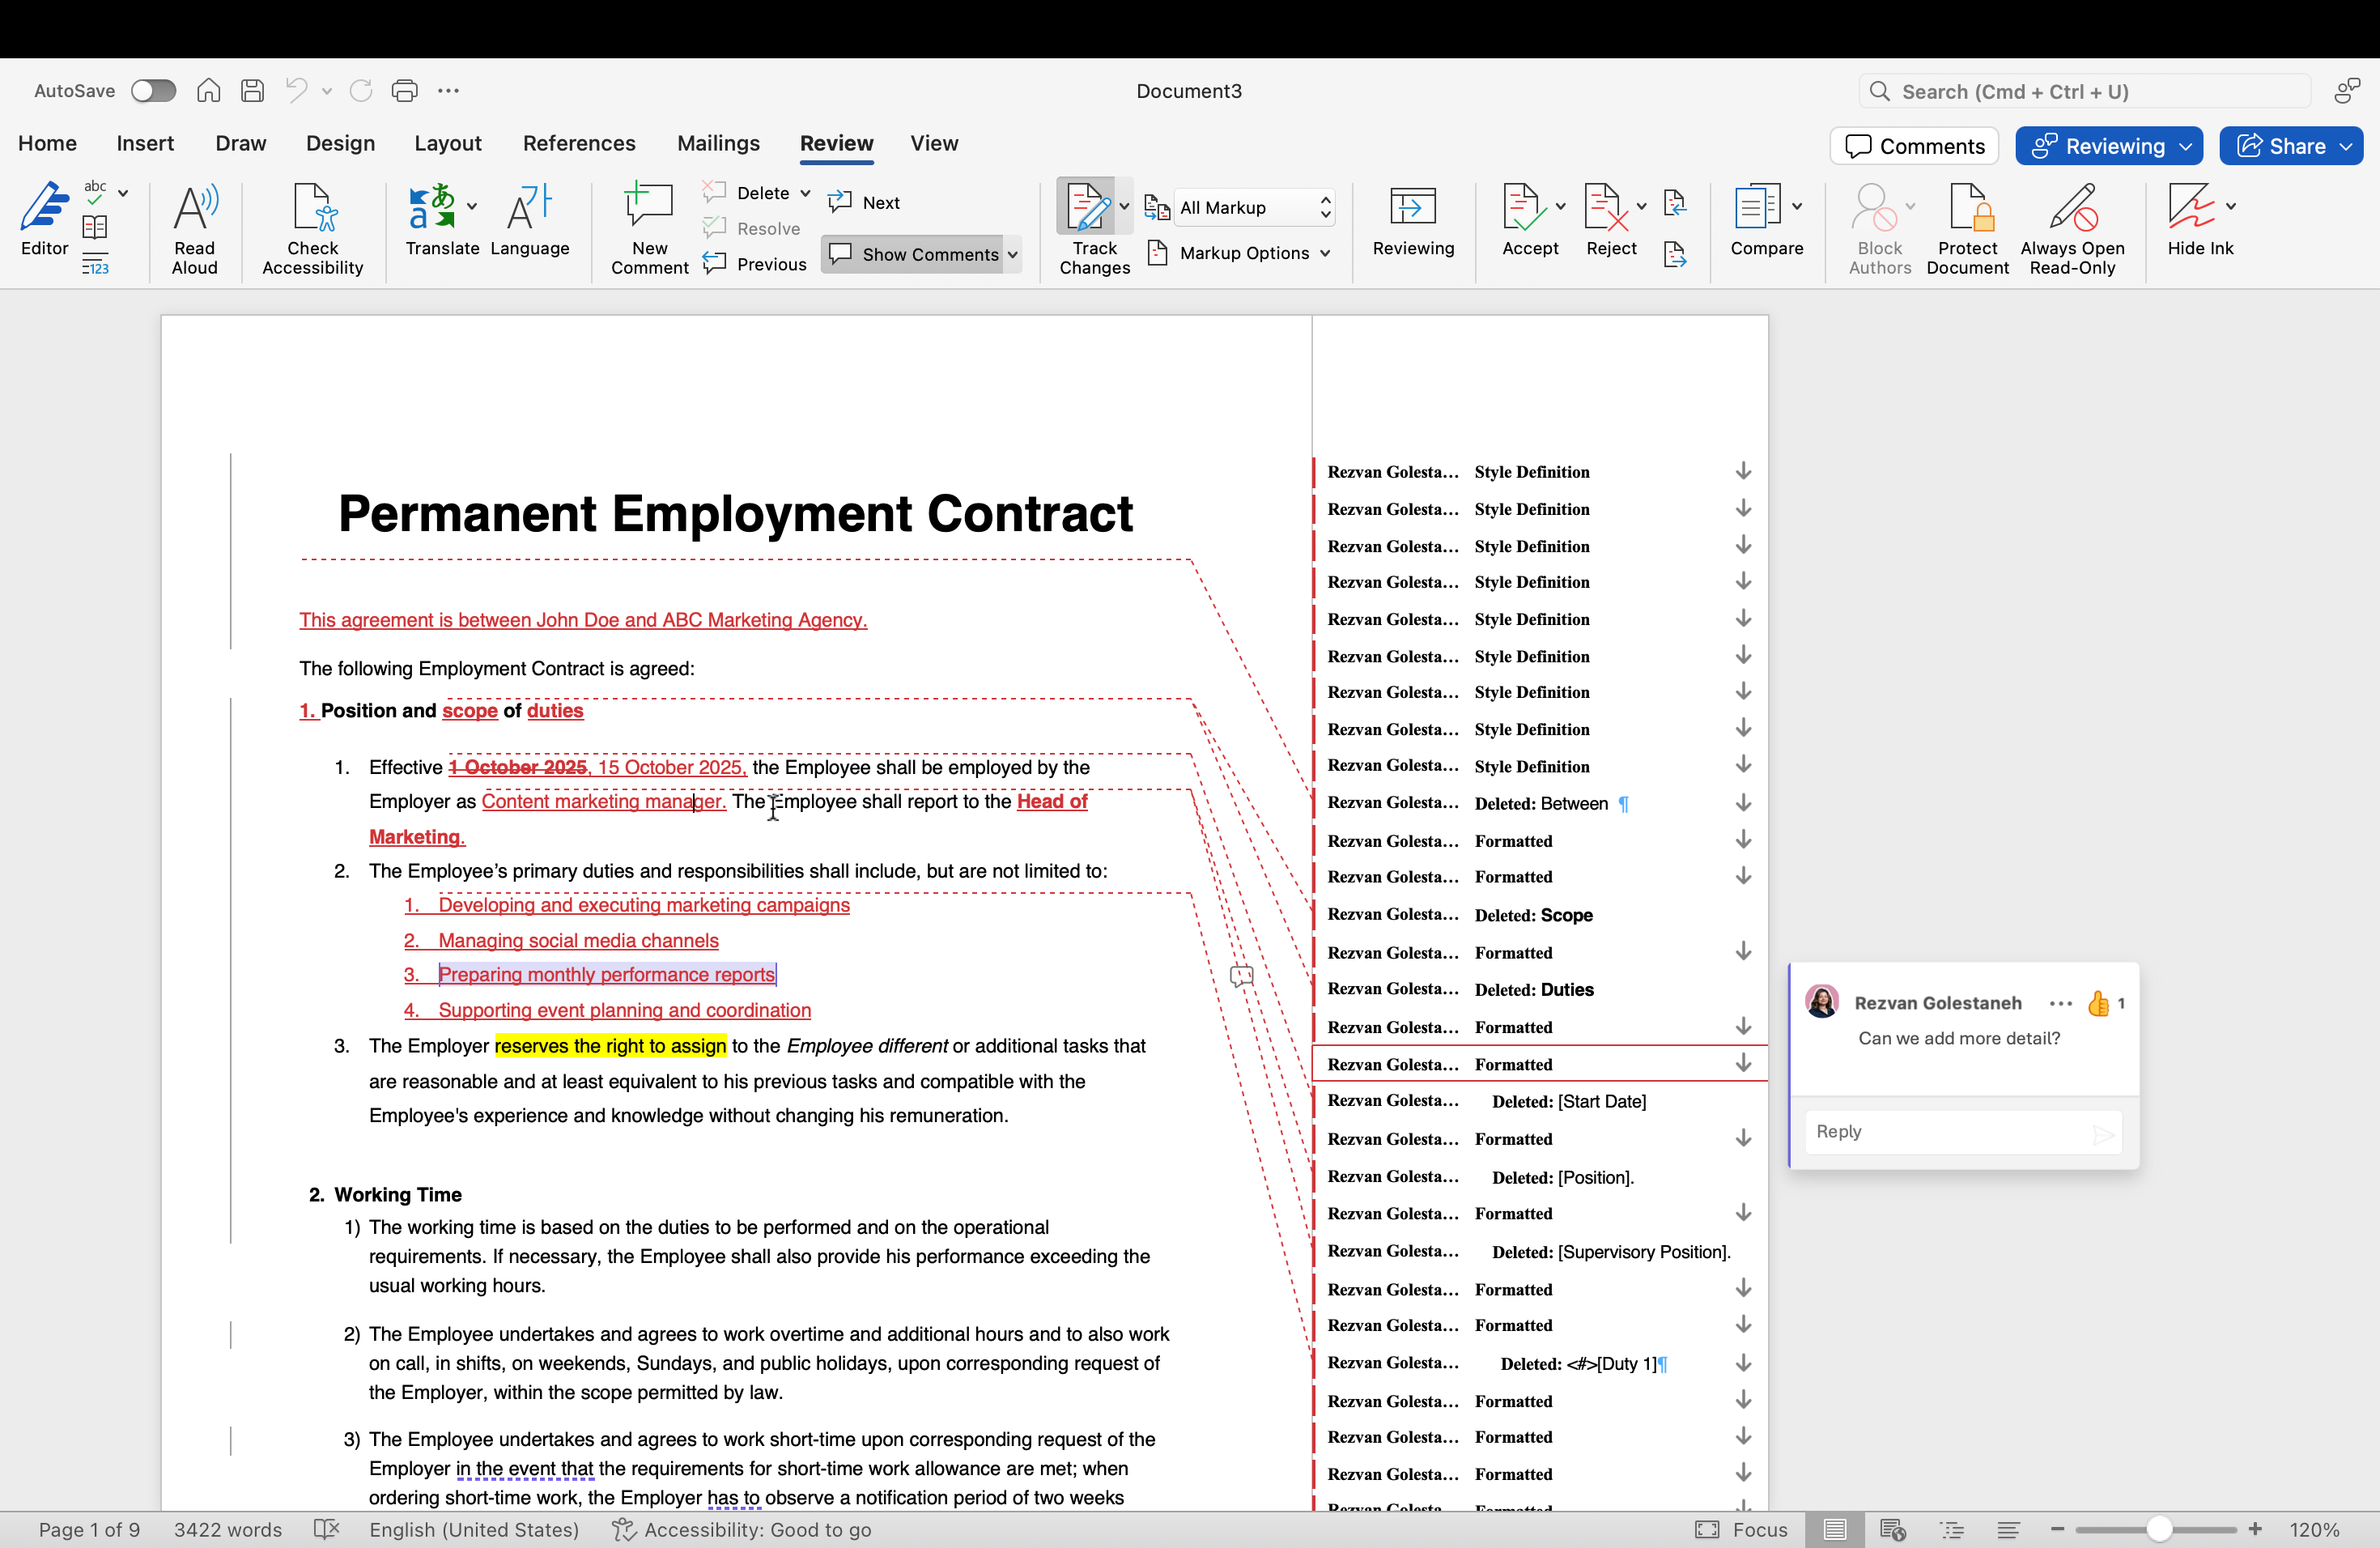


Word Online and mobile
The Compare feature is not available in Word Online or the mobile apps.
- To create a redline, you’ll need access to the desktop version of Word (Windows or Mac).
- Online and mobile users can only view or make tracked changes in existing documents.
How to share and send a redline Word document
On Mac & Windows
Step 1: Decide which versions to share
- Redlined version: Keep the tracked changes and comments visible so reviewers can see exactly what was modified.
- Clean version: Accept all changes and remove markup to provide a polished draft.
- Best practice: Send both versions together. The redlined copy gives transparency, while the clean copy gives clarity.
Step 2: Prepare the redlined document
- Make sure Track Changes is turned on.
- Confirm the view is set to All Markup so all edits are visible.
- Double-check the Show Markup menu to ensure comments, insertions, deletions, and formatting are included.


💡 Tip: If you only want certain edits visible, use Specific People under Show Markup to filter changes by author.
Step 3: Save in the right format
- To keep the document editable, save as a regular .docx file.
- To prevent editing but still show redlines, save as a PDF (File → Save As → PDF).
Step 4: Send or share the file
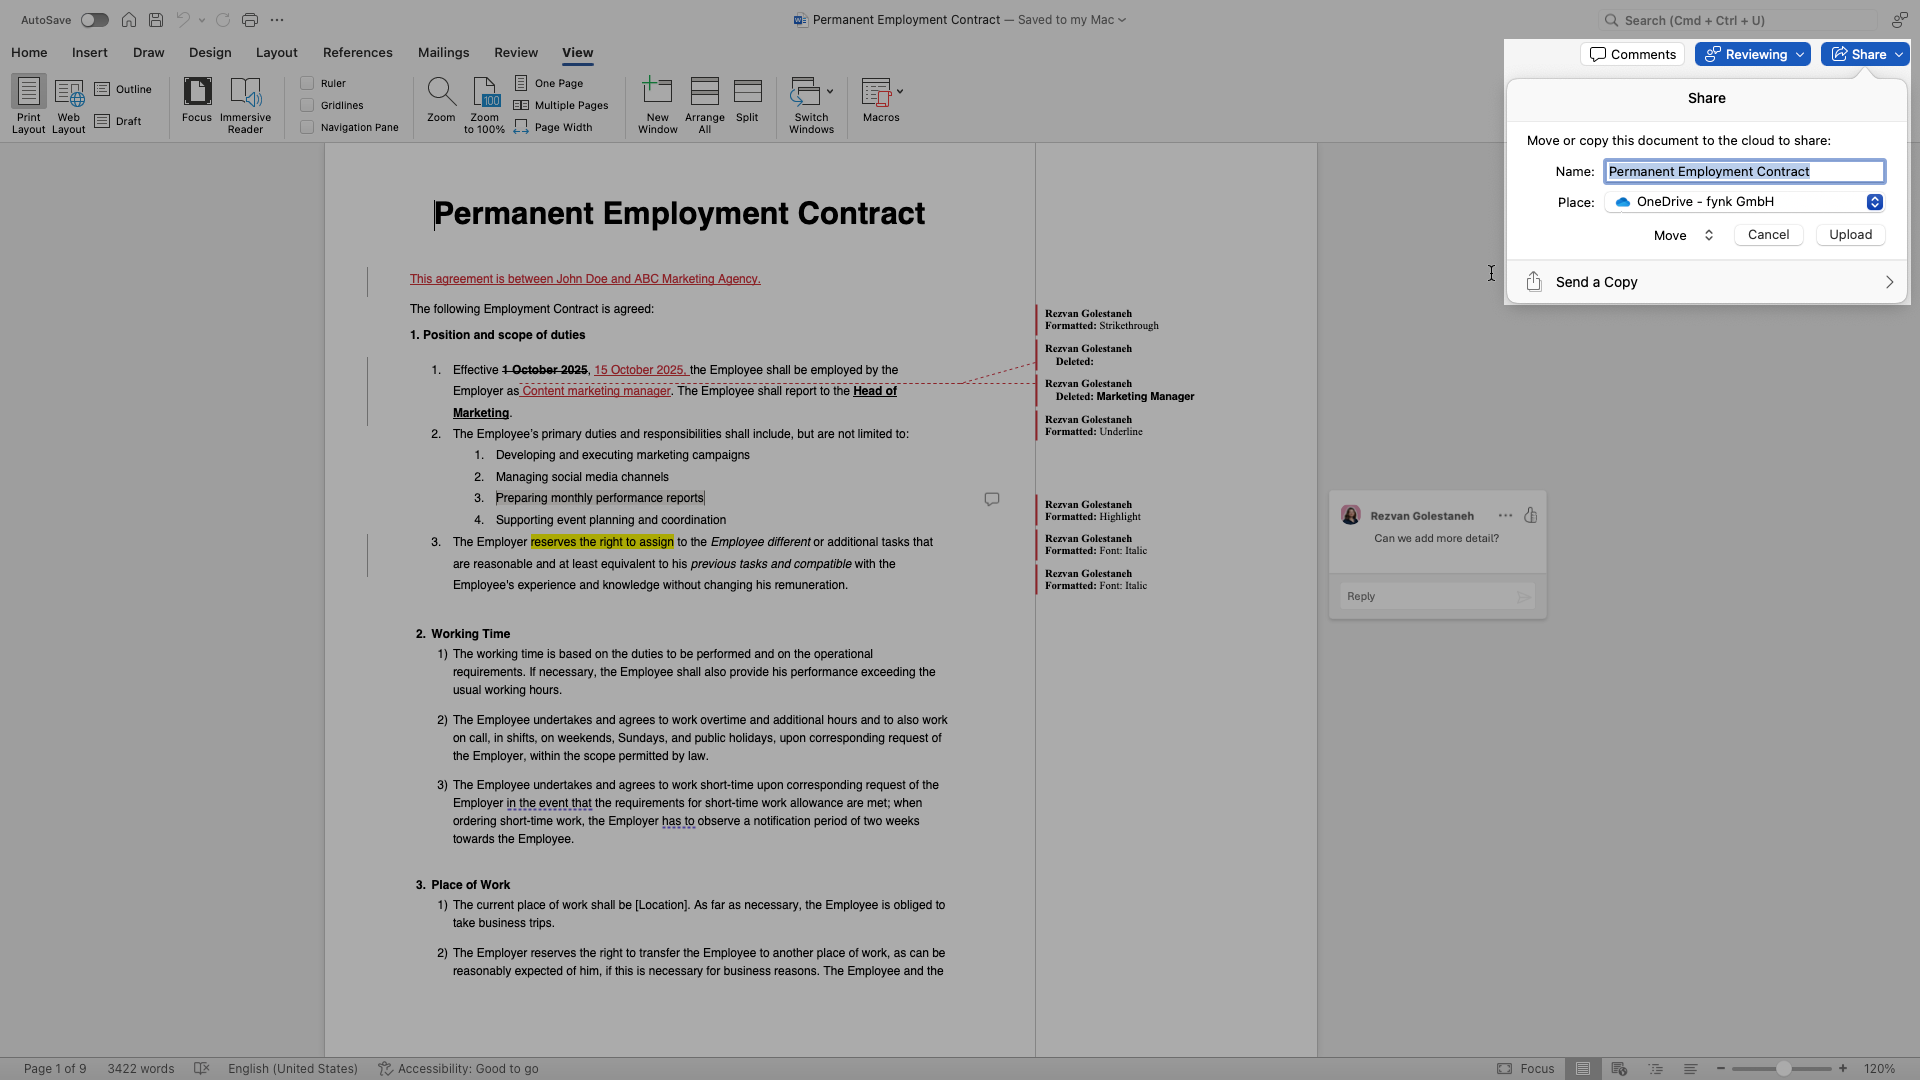
- Click the Share button in the top-right corner of the Word.
- Choose the name and place of the file.
- Decide whether you want to move or copy the file.
- Hit Upload.
You can also send the document as an email attachment, PDF, or HTML using the “Send a Copy” button in the share drop down.
Advanced redline setting in Microsoft Word
There are a few settings in the Review section that you can use to customize your redlining process:
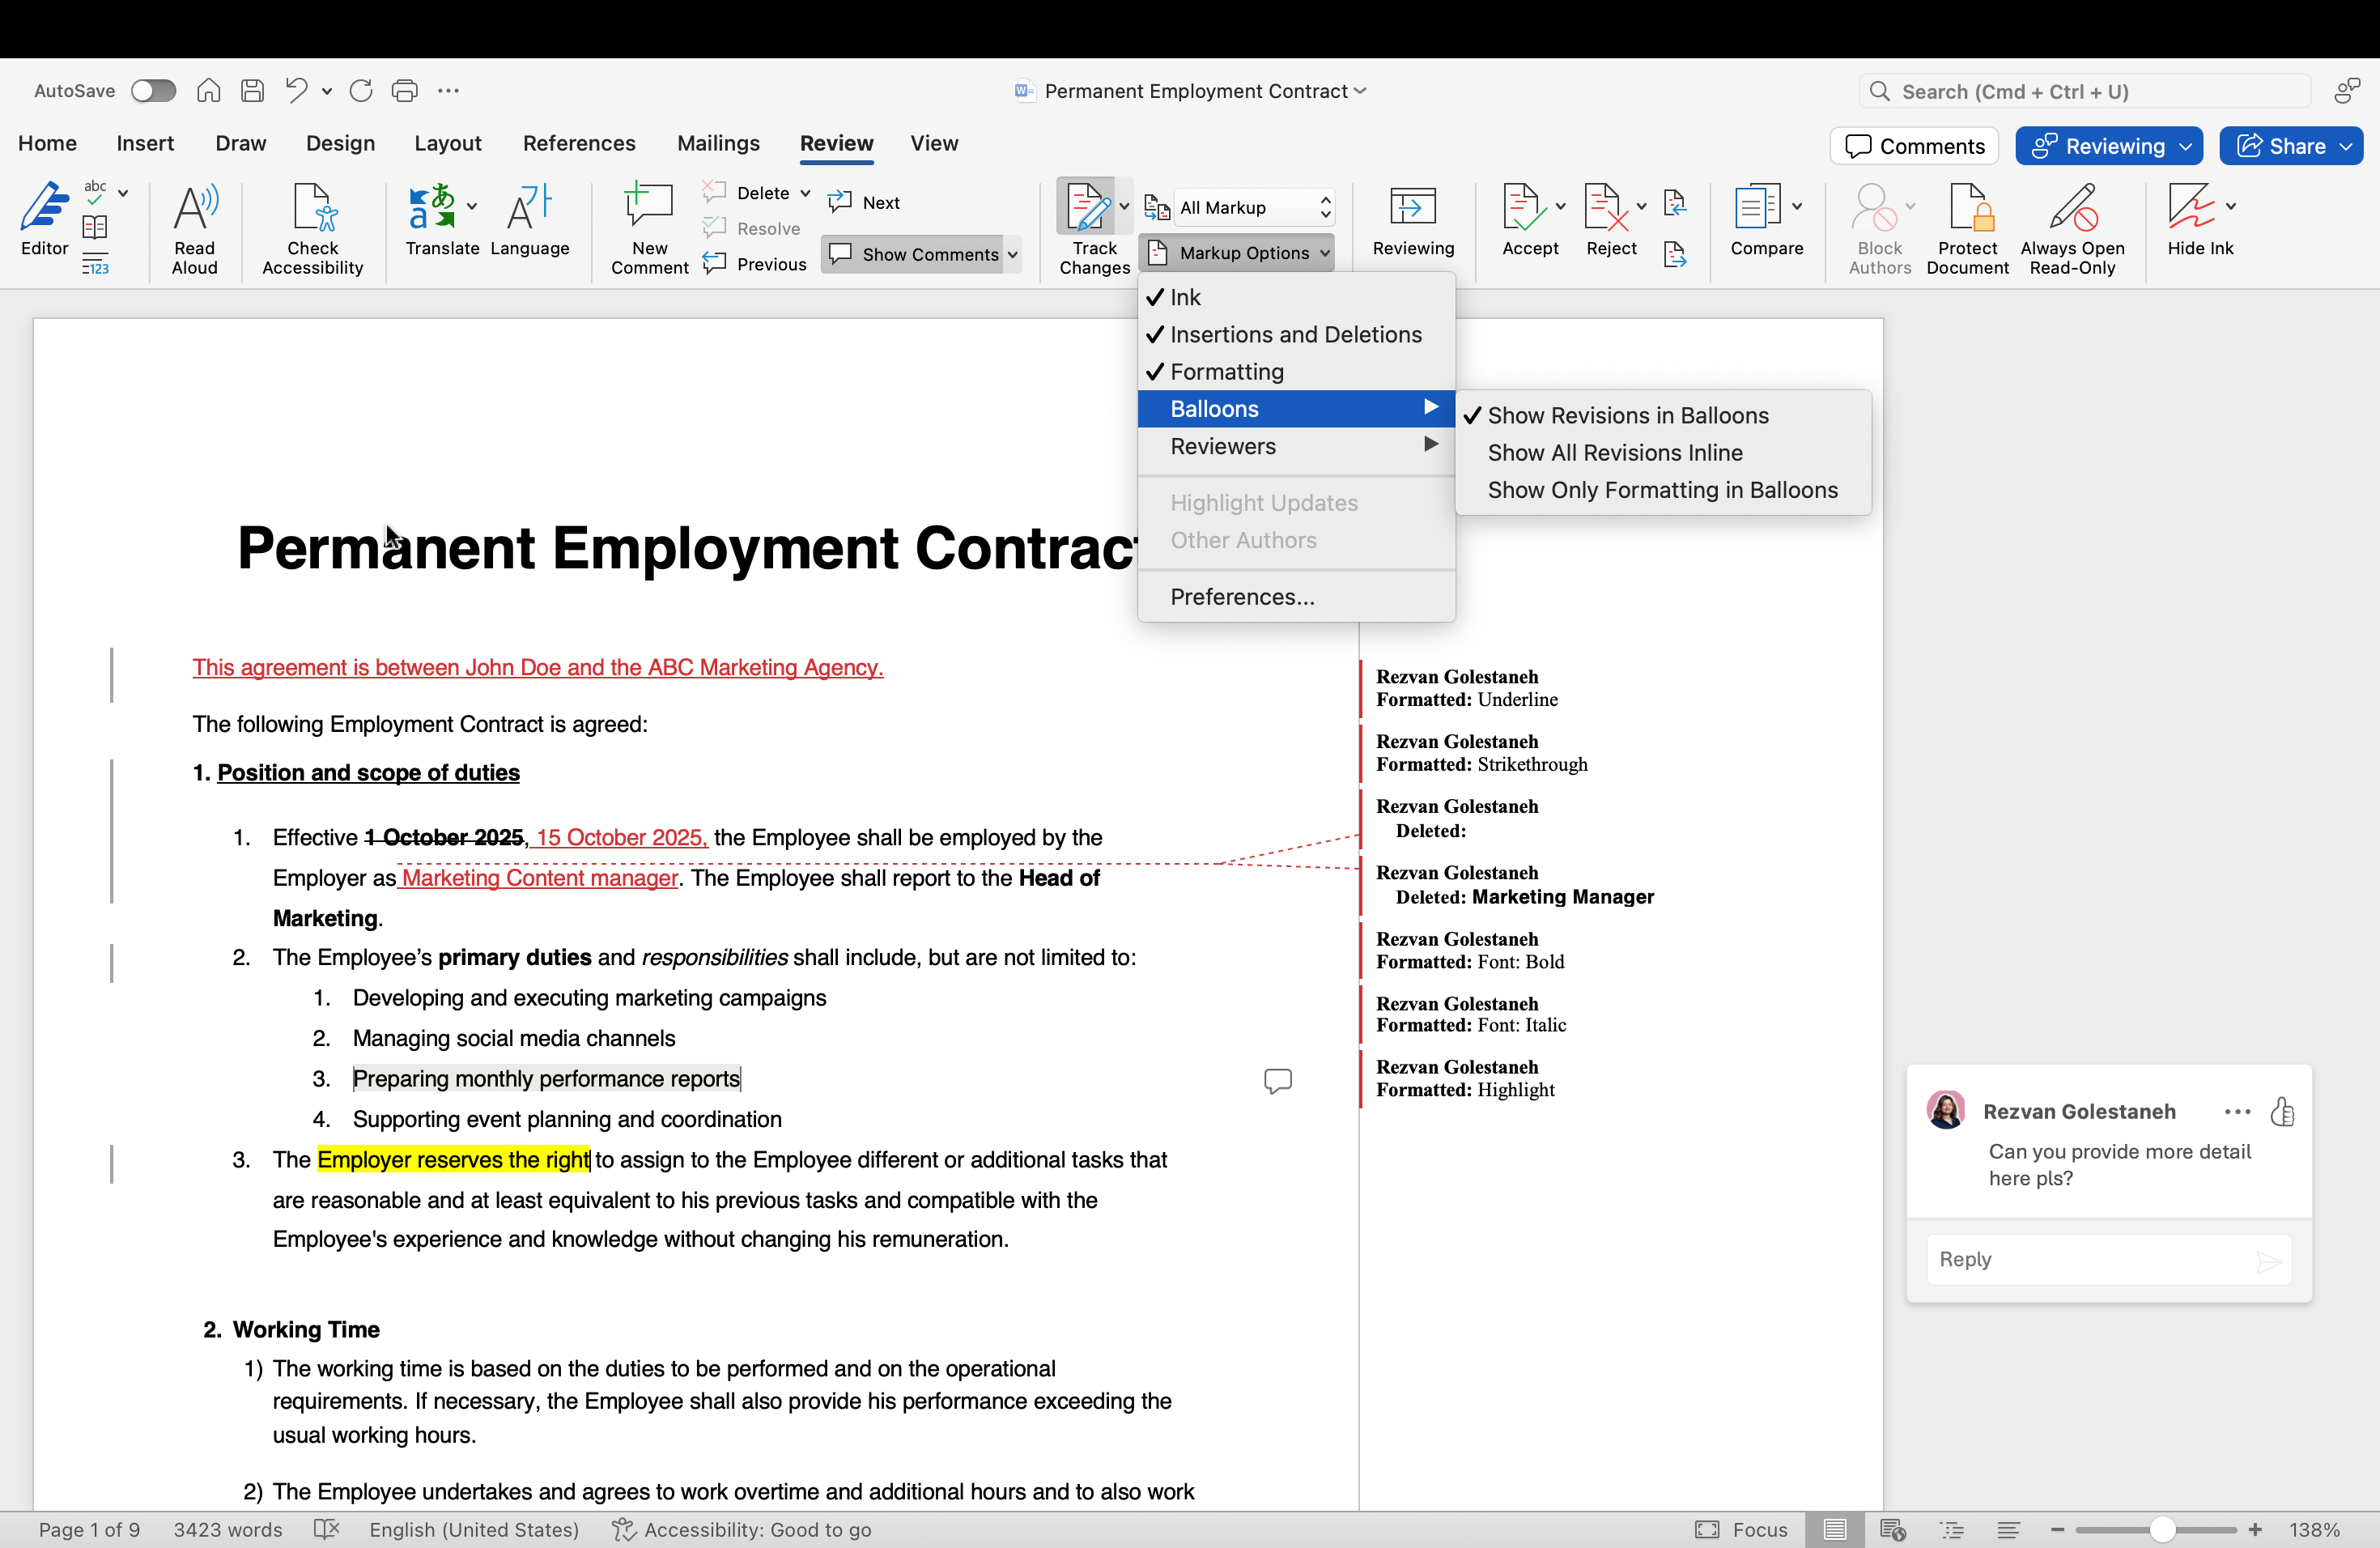


Markup options
Ink
- Shows or hides hand-drawn annotations (like signatures, circles, or notes made with a stylus/touchscreen).
- If you uncheck it, those pen strokes are hidden but not deleted.
Insertions and Deletions
- Displays added text (insertions, usually underlined or in color) and removed text (deletions, usually struck through or in balloons).
- If unchecked, the document looks “cleaner,” but the tracked changes are still there in the file.
Formatting
- Tracks changes to styles (bold, italics, font changes, spacing, colors, etc.).
- If you turn this off, formatting changes won’t be shown in the markup, but they are still saved as edits.
Balloons
- Controls whether comments and some tracked changes appear in balloons in the right margin or inline in the text.
- Sub-options typically include: Show All Revisions Inline, Show Revisions in Balloons, or Show Only Comments and Formatting in Balloons.
Reviewers
- Lets you filter tracked changes by person.
- You can show edits from All Reviewers or only a specific author.
Preferences settings in Markup
When you use Track Changes in Word, the markup preferences control how edits and comments look on the page. These settings don’t change the edits themselves, They only affect how they’re displayed to you and other reviewers. Here’s what each option does:
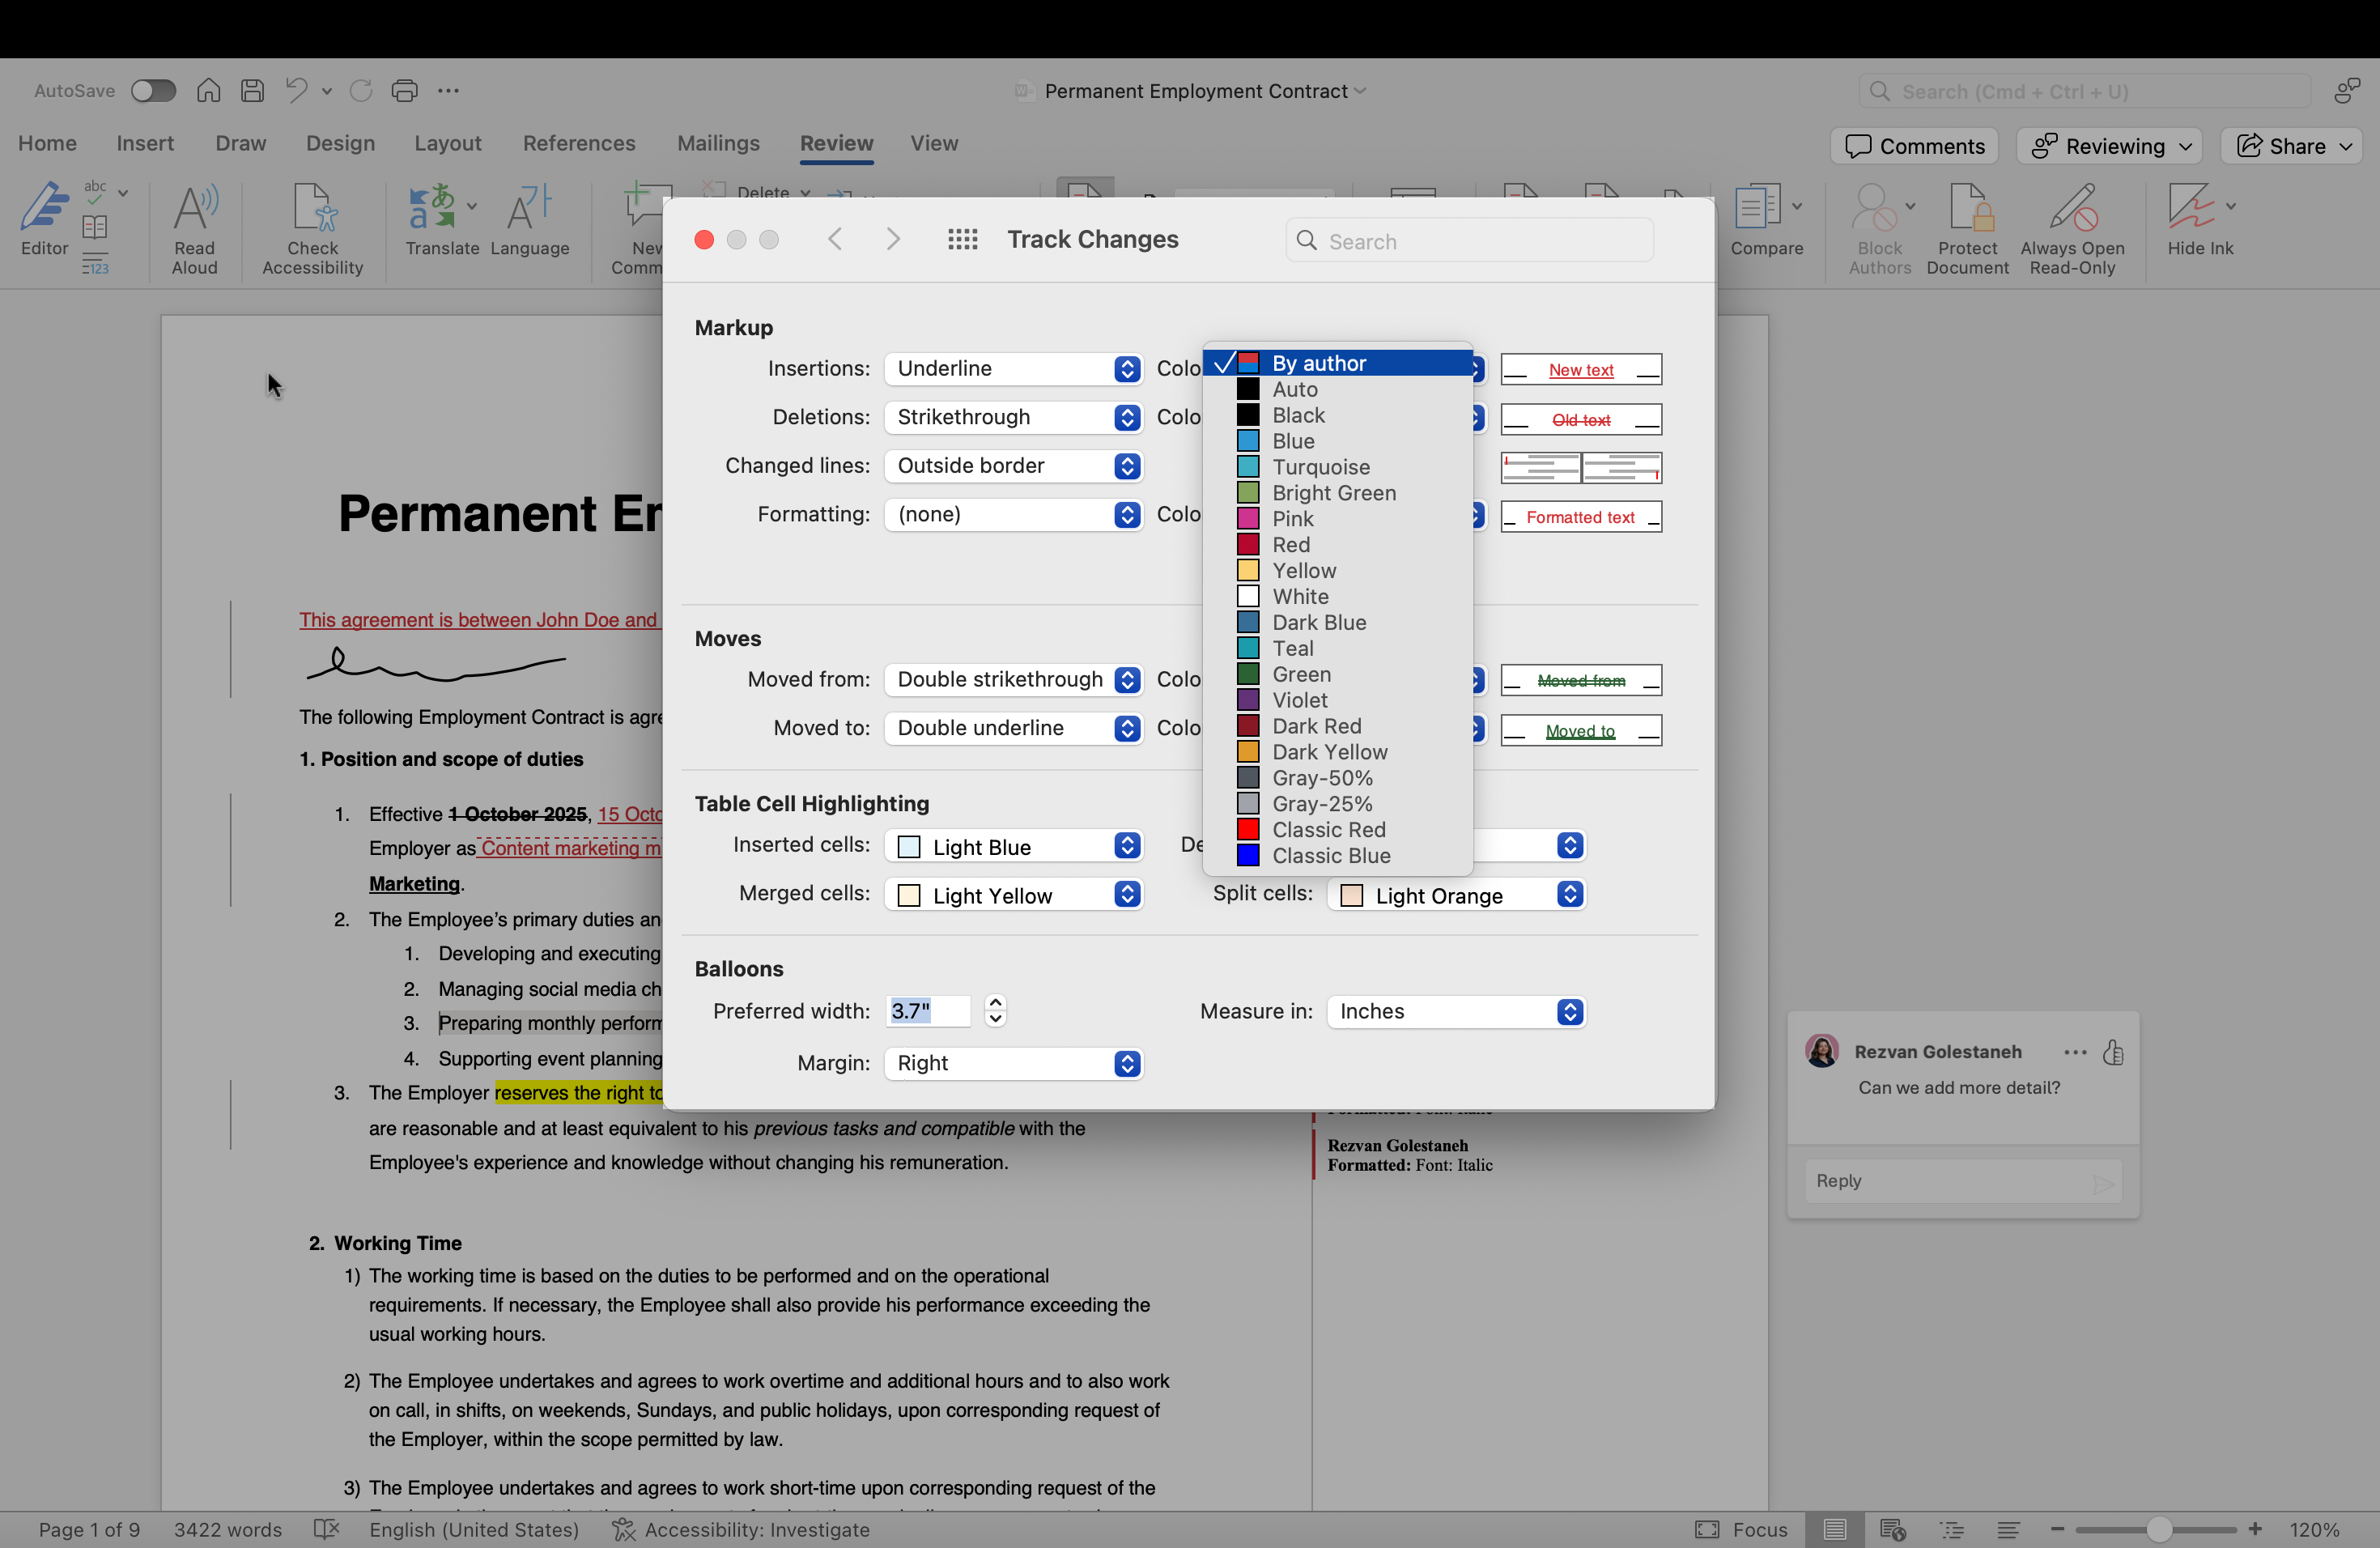


Markup
This section controls the appearance of text changes.
Insertions
- Defines how added text looks.
- Commonly set to Underline or Bold.
- You can assign colors to each reviewer (e.g., Editor A = red, Editor B = blue) or keep it “By Author” so Word auto-assigns.
- Use case: Underlines in different colors make new content stand out while keeping the flow readable.
Deletions
- Controls how removed text is displayed.
- Default is Strikethrough, but you can also set it to hidden or shown in balloons.
Changed lines
- Adds a vertical bar in the left or right margin wherever edits are made.
- Helpful when working in Simple Markup mode — even if changes are collapsed, the line shows “something changed here.”
Formatting
- Tracks non-content edits such as bold, italic, font, size, color, and spacing.
- You can give formatting changes a unique color so they don’t blend with insertions/deletions.
Moves
This option makes it clear when text is relocated.
- Moved from: Marks the original spot of moved text (often shown with double strikethrough).
- Moved to: Marks the new spot (often shown with double underline).
Table cell highlighting
Edits in tables are easy to miss, so Word highlights them with background colors.
- Inserted cells – Highlighted with a color (default: light blue).
- Deleted cells – Marked in another color (default: pink).
- Merged cells – Highlighted (default: light yellow).
- Split cells – Highlighted (default: light orange).
Balloons
Balloons are the boxes in the margin that hold comments and sometimes changes.
- Preferred width – Sets how wide each balloon should be (in inches or centimeters). Narrower balloons save space, but wider ones are easier to read.
- Measure in – Choose the unit (inches, centimeters, characters).
- Margin – Decide whether balloons sit on the left or right side of the page.
Redlining a sensitive or legal document?
For years, Microsoft Word has been the go-to for redlining. But let’s be honest: it’s clunky, especially when it comes to redlining contracts and other legal documents.
- You’re stuck emailing endless versions back and forth, never quite sure which one is the “final” draft.
- Tracked changes pile up into a chaotic mess of strike-throughs, balloons, and formatting clutter.
- You can see what changed, but there’s no reliable way to know who made the change, when they did it, or why.
- And every time you hit “send,” you’re exposing sensitive agreements to unnecessary risks outside your secure workspace.
This isn’t just inconvenient for legal teams, it’s a liability.
How fynk makes redlining seamless
fynk rethinks redlining from the ground up. Instead of patching workflows onto a word processor, it gives you a contract-first environment built for collaboration and control:
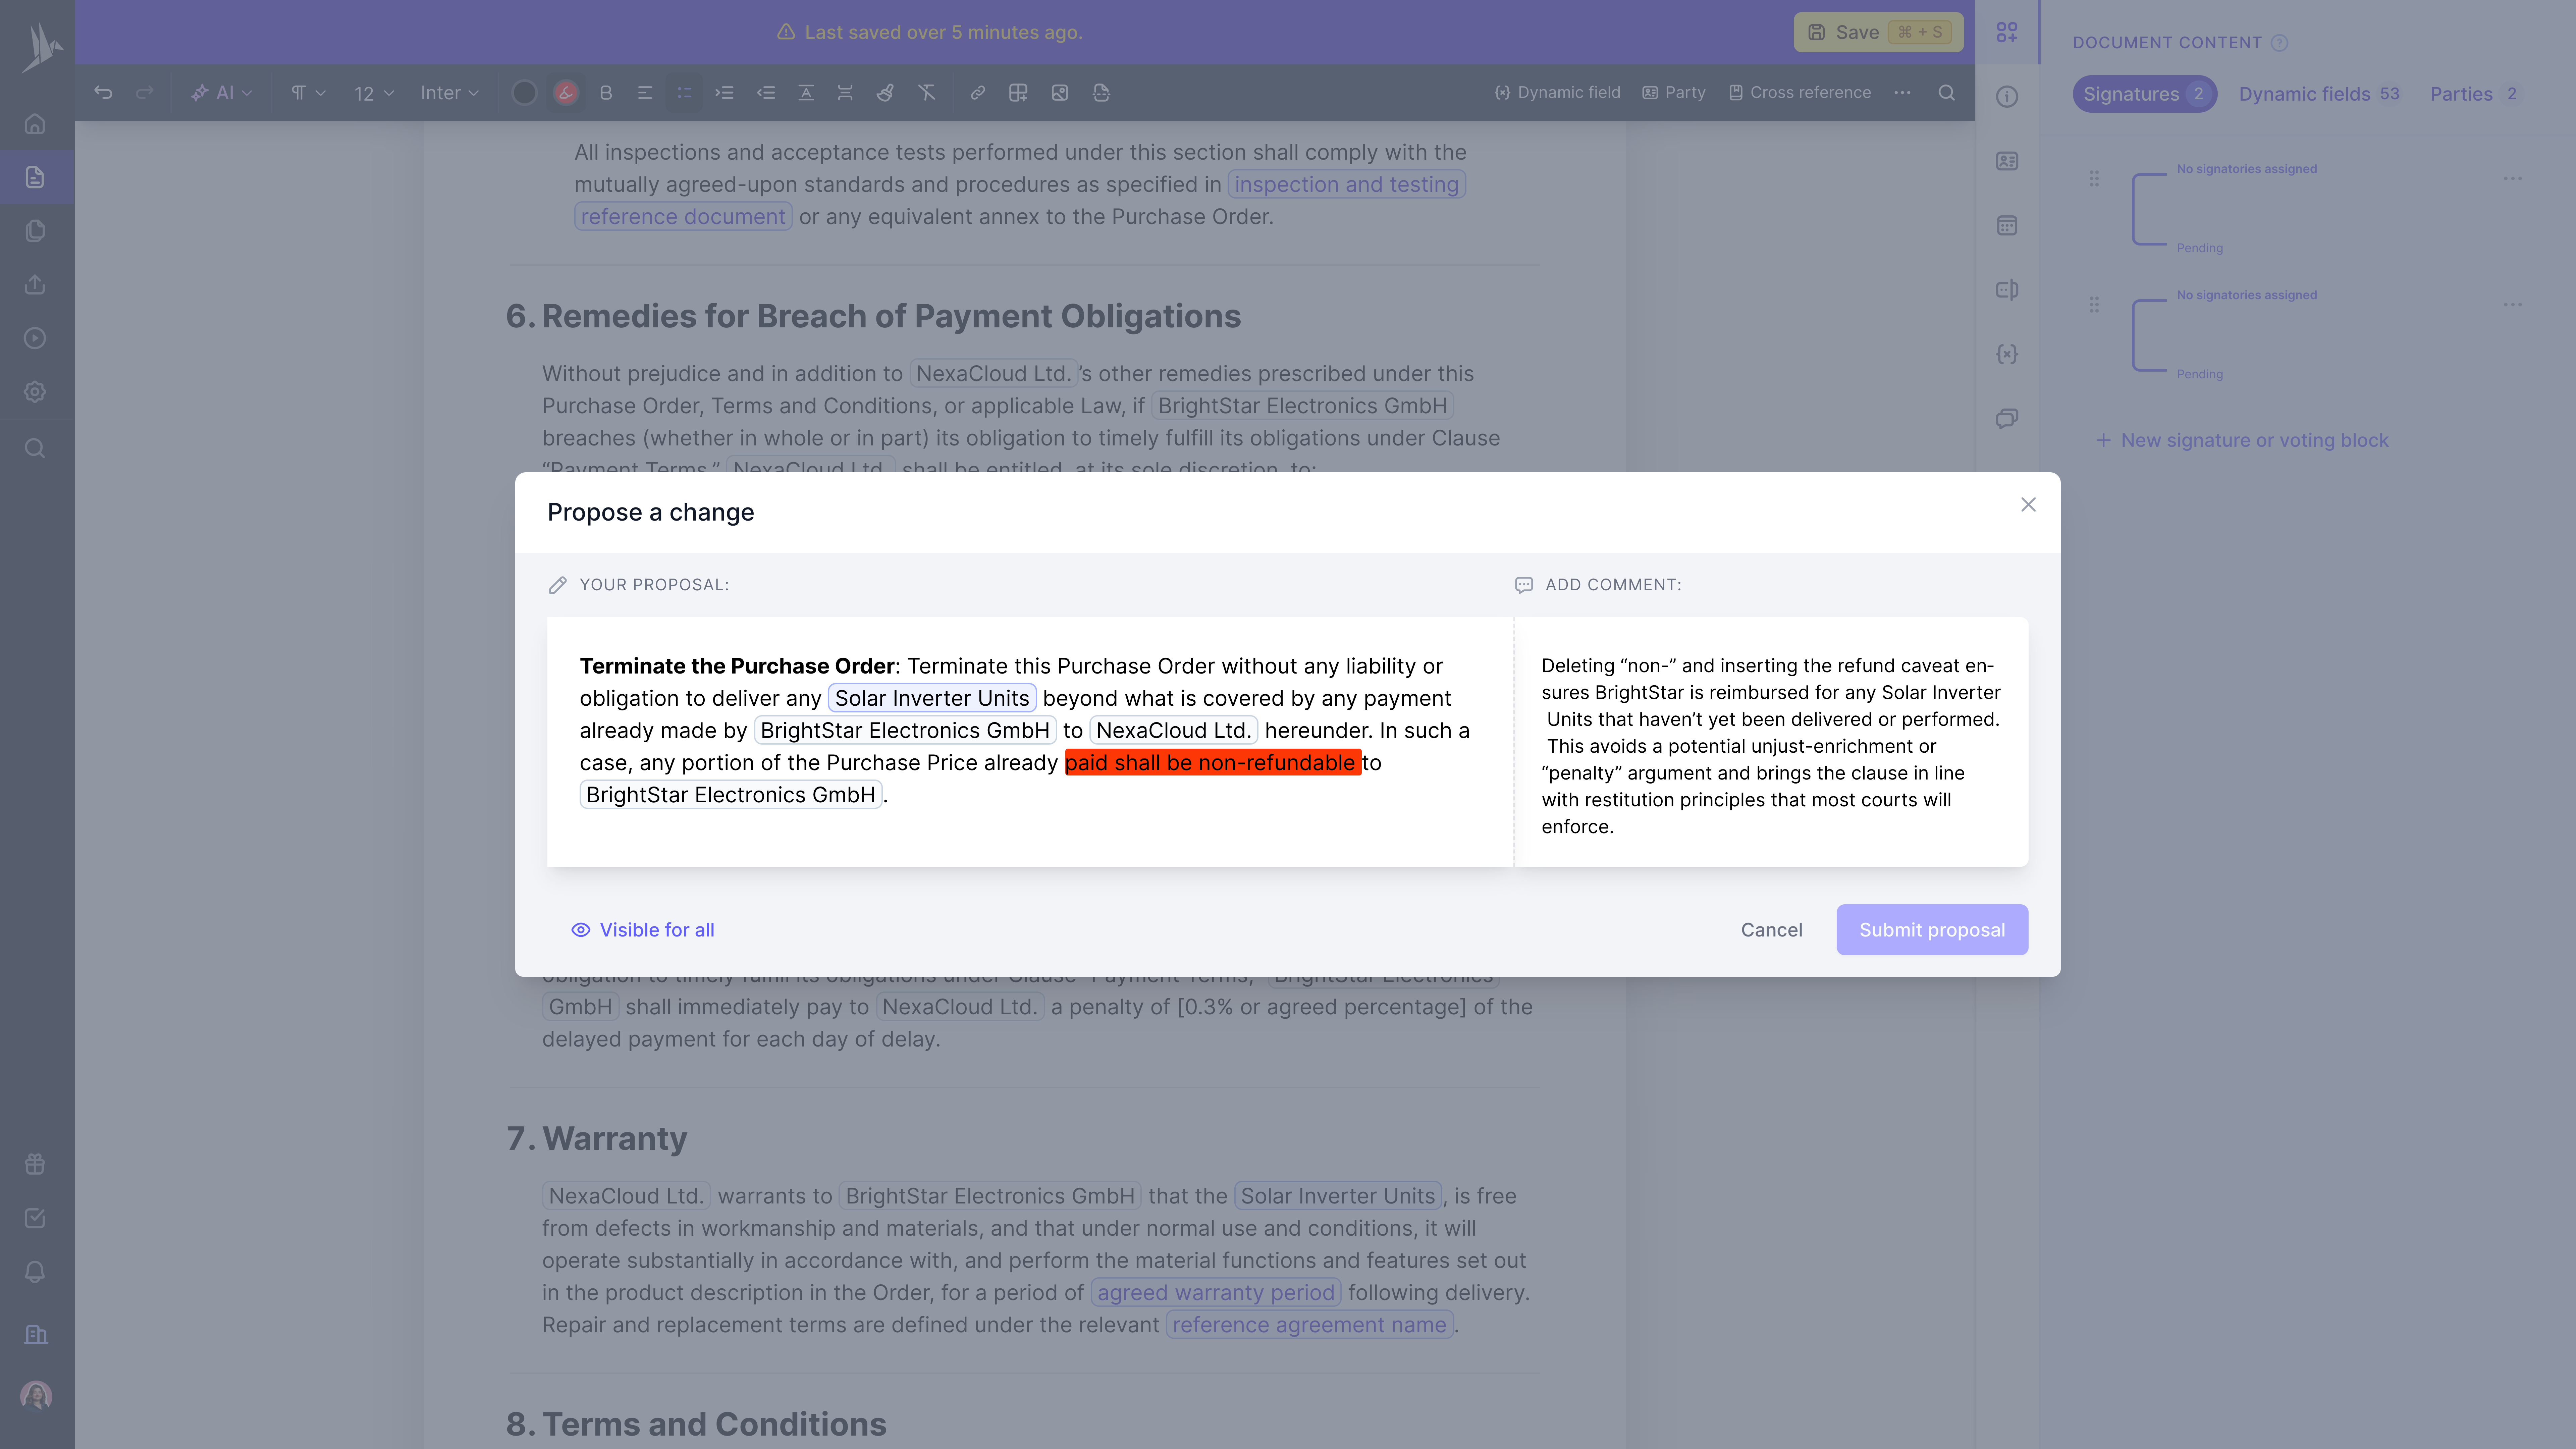


- Simple, clear suggestions – Highlight text and propose a change. No messy balloons, no confusion, just clear context everyone can follow.
- Internal vs. external comments – Keep strategy discussions private inside your team, while sharing only the polished negotiation points with the counterparty.
- Built-in tasks – Turn edits into actionable items with deadlines, assignees, and reminders so nothing slips through the cracks.
- Automatic audit trail – Every edit, comment, and approval is logged with who, when, and why, creating a defensible, tamper-proof history of the contract.
- Role-based permissions – Control exactly who can view, edit, or approve. Sensitive clauses stay secure and visible only to the right people.
- One living version – Everyone works on the same contract in real time, with every change captured.
Searching for a contract management solution?
Find out how fynk can help you close deals faster and simplify your eSigning process – request a demo to see it in action.
Please keep in mind that none of the content on our blog should be considered legal advice. We understand the complexities and nuances of legal matters, and as much as we strive to ensure our information is accurate and useful, it cannot replace the personalized advice of a qualified legal professional.

Table of contents
- TL;DR – Redlining in Word Made Simple
- How to redline a Microsoft Word document
- How to redline a Word document with comments
- How to accept or reject redline changes in Word
- How to save changes on a redline Word document properly?
- How to save a redlined Word document as a PDF
- How to compare two Word documents and create a redline?
- How to share and send a redline Word document
- Advanced redline setting in Microsoft Word
- Redlining a sensitive or legal document?
Want product news and updates? Sign up for our newsletter.
Other posts in Guides

What is a document audit trail and how it work
When you’re dealing with regulated processes, contracts, or any kind of business documentation, having a clear …

How to extract and manage contract metadata with AI
Contracts contain critical information, but finding it shouldn’t take hours. Instead of manually searching …

SaaS contract management explained for buyers and vendors
If you work in SaaS, you know how quickly contracts can pile up. Each one comes with its own terms, renewals, …
Contracts can be enjoyable. Get started with fynk today.
Companies using fynk's contract management software get work done faster than ever before. Ready to give valuable time back to your team?
Schedule demo

